Our group was tasked to design and build a gross and fine motor playset for a family that would be outdoors and could grow with the child.
The goal of the project was to build an outdoor playset for a young girl. The playset needed to allow her to develop her gross motor skills and needed to include options for fine motor play. The family noted that the young girl likes to play on swings and slides when they go to the local park, but their concern is that the parks do not have any opportunities for her to have sensory play. The playset needs to be able to grow up with this young girl so that she can continue to use it as she gets older.
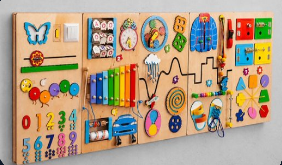
After our conversation with the family, we were given some inspiration photos of what type of playset they were looking for. The family also sent us an idea of a busy board that we used to inspire our sensory play area within the structure. We did additional research on playset structures and what it would take to design and build a from scratch playset. We found a couple of different playset options that we could purchase from a couple of websites. Each playset contained different features such as a different number of slides, swings, different play areas like a sandbox, table, or boards for drawing. All of these different features inspired our decision to build off an existing playset and add on the features that the family is looking for.
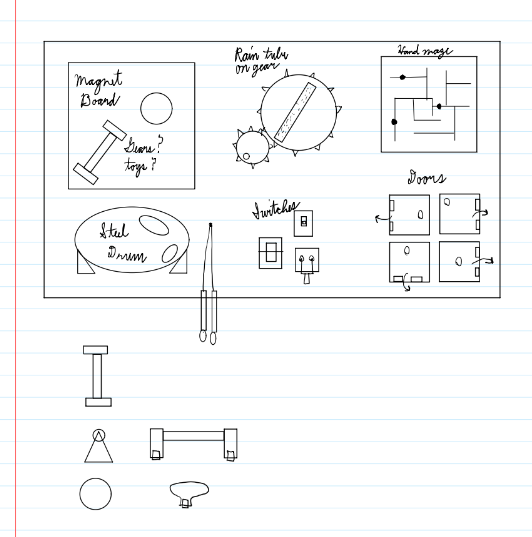
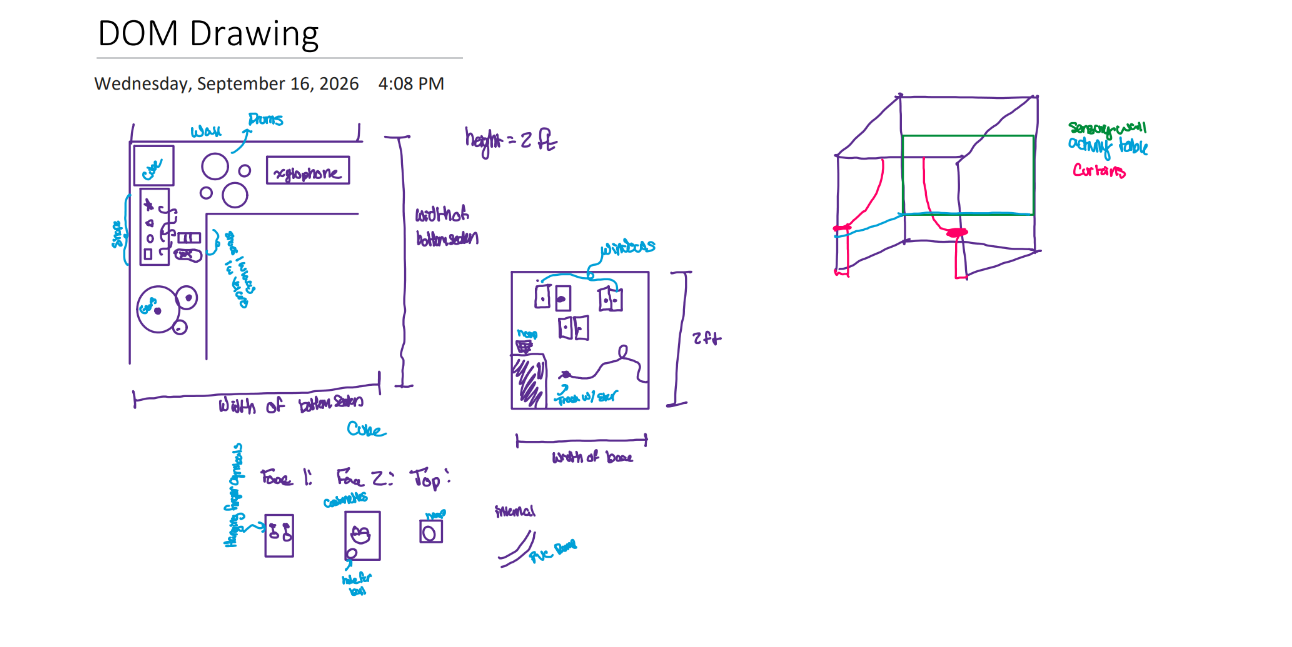
Design 1 is made to be added to the structure of a playset. It is a vertically mounted busy board that has a total of 6 different “stations” for play. The first is a flat, steel section that is used to hold a handful of magnetic toys that can be removed. The next is two gears that have a large gear reduction between them, with the larger gear having a rain tube affixed to it. After that is a small hand maze, followed by a wall mounted steel drum. The remaining two stations consist of miscellaneous switches and tactile doors that open to cubbies that can be used as fidget toys or storage.
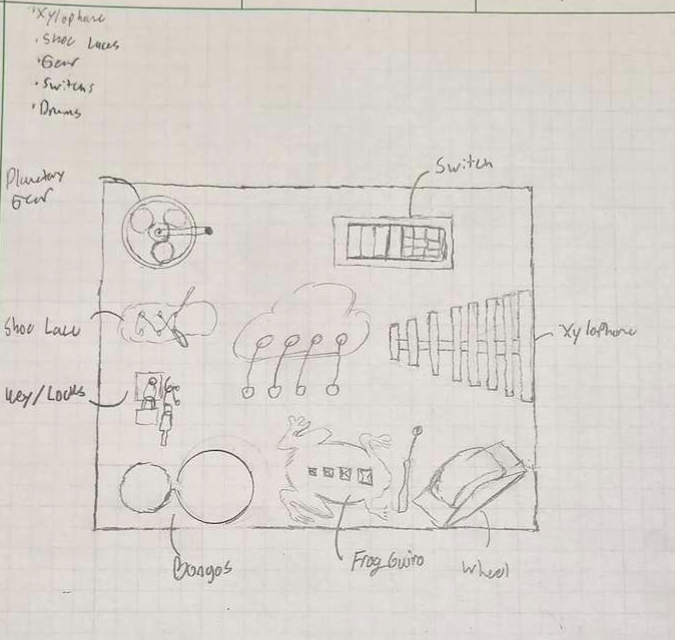
Design 2’s foundation was a love for noise, which stemmed from the child’s love for music. We received some inspiration, like a sensory board and playground. Hence, we brainstormed interactive toys that are stimulating. Some toys like the lock and key took space to encourage problem solving skills, while others like the xylophone allow her to be more creative. We added some strings like with the cloud bead toy and shoe tying to focus on developing additional skills.
Design 3 is intended to be added to an existing playset design. The design features an L-shaped table that would function as a busy board. There are spinning gears, instruments such as a xylophone, and drums, a place for the child to practice tying and velcroing their shoes, and a station focused on matching shapes. Off of the table there is a box that would allow the child to be able to throw a ball into a hole and for it to come back to them. This box would also contain storage for different instruments such as finger cymbals or castanets. In addition to the table, this drawing also uses the vertical space to add a wall with windows that can be opened and closed and a hand maze like option.

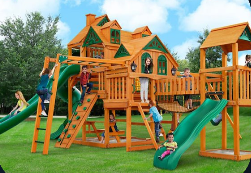
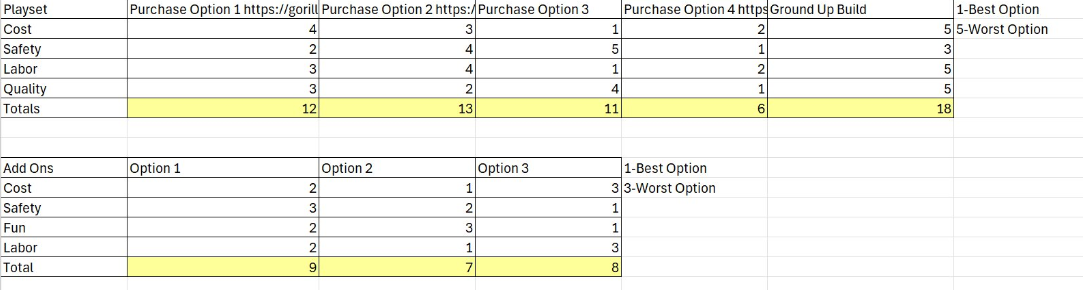
We eventually decided to build off of the playset shown in the image. Our goal is to design a sensory table and wall with elements from each of the designs to add onto an existing playset. This decision was based on the matrix shown below, we decided option 4 was the best playset and the individual designs were close enough in all of the factors to combine elements. After analyzing the budget constraints as well as communicating with the family, we eventually changed this opinion to place option 1 as the best choice. The family noted that they wanted us to add on a slide and give the young girl more of her own space. This playset allows us to meet all of those needs as well as the budget constraint so it is therefor the best option.
The design that we chose allows us to build a sensory board, table and slide off of the playset. The sensory board will be a combination of 3D printed material for the gears, wood cutouts for the blocks and hand maze and then painted details for the shoes. We are choosing to go ahead with these components for the board after discussing the family’s wants and needs for this playset. The second thing that we will be adding is a table to house the musical instruments that the family wanted. The instruments will be set into the table so that they will cannot be removed easily, but also attached in a way that the instruments are still able to make the sounds that they should be. The third item that we will be adding is a slide. This slide will be attached to the platform of the playset with a step to correct the angle. This will allow for the playset to meet more of the gross motor and play skills that the family has asked for.


The first type of analysis we chose to do was loading analysis on the table. This was done to show how much weight the table needed to support at either end if there was a 100 lbf point load on the center of the table. The analysis was done for a fixed-fixed beam and the reaction forces and bending moments were calculated at both ends. There were no applied forces in the x direction so the x components of the reaction forces at both ends were 0 lbf. Due to the weight of the elements that are placed on the table, there are applied loads and forces in the y-direction. This drove the calculations of the reaction forces at both ends relative to the weights.
The results of the calculations were:
Reaction at End A = 54.67 lbf (Upwards)
Moment at End A = 640.27 lbf-in (Clockwise)
Reaction at End F = 52.028 lbf (Upwards)
Moment at End F = 530.73 lbf-in (Counter-Clockwise)
For the next type of analysis, we chose to look into a couple different kinds of fasteners. Since we are making an addition to and most likely reinforcing the playset during assembly, we will need to use our own fasteners for multiple different applications. The two kinds of fasteners that were researched were a common d16 nail and #10 wood screw. After both of were put through the same shear and withdrawal analyses, we found that the screw experiences over 50% higher shear stress than the nail but is over 3 times more resistant to withdrawal forces. For this reason, we will be using screws in our additions and reinforcements.
On our sensory board, we chose to use wooden blocks with magnets attached to train fine motor skills. However, these shapes can be easily lost if not attached to the board. We came up with a solution: drill a hole through the blocks, push through a string, and anchor it.
To evaluate this against a 5-year-old child’s peak pulling force of 50N, a tension analysis was performed using Maximum Tension Load, Angle of Force, and Factor of Safety. The main problem is friction between the string and the hole edges in the board. If jerked at certain angles, it causes severe string wear. However, the Factor of Safety revealed that the solution is to smooth out the hole edges.