college of engineering white

Project 5: Sensory/Smart Bed

Abstract

For this project, we are creating a bed for a child who has been diagnosed with autism. The bed needs to have sensory aspects that will help him as he does not sleep well without sound and mild lighting. The lighting and sound both help him calm down so that he is able to sleep soundly. We also have to add aspects to the bed that account for the safety of the child.

Left to Right: Richmond Boone, Micah Willoughby, Alan Mullican, Tucker Masters, and Colin Wall

Problem Statement

This project was created due to a child needing a sensory bed to help him sleep better. This child has autism, and he has a difficult time sleeping without the assistance of sound, lights, vibrations, etc. The main concerns on this project are to create a bed that is safe and has sensory aspects.

Design Specifications

There were a couple of needs that we have to fulfill such as the size of the bed, the electronics that we use, the types of sheets, the safety of the bed, and the choice of sensory objects that we make. The size of the bed needs to match the twin bed that they have, so that is what our bed is designed after. The family is already using a particular brand of camera, so that is the one that they are wanting us to design our bed after. The types of sheets are safety sheets, and the bed has to keep the child contained so they don’t roll out, hit their head, etc. The bed also has to be designed it will not flip on its side, so the base is lower to the ground to keep a lower center of gravity. The family was saying that the child likes sensory objects that are related to space. This works out well with our thoughts on design due to us wanting to put a starlight headliner on the bed we are designing.

Background Research

There are several companies that make safe/sensory beds such as Cubby and zPod.  These beds include features such as safety sheets, speakers, lights, and a camera.  However, these models are very expensive and unaffordable for parents.


Shop Cubby - Sensory + Safety Bed For Special Needs | Cubby Beds

Cubby Smart Bed

zPod Special Needs Bed for Autism and Other Sensory/Sleep Disorders | Gen 2

Zpod Bed


Concept Design 1

For our first design of the safety bed we choose a steel rectangular frame and an arched semi circle aluminum top frame that will slide onto the bottom frame.  We chose the semi circle frame to allow for more headspace.  Inside the arched frame will be a star light headliner to provide some light and to cut the mustard toward his love for space.  There will also be speakers and a camera inside the frame to satisfy his needs for sound and so the parents will be able to monitor him while sleeping.  The supports on the inside will be wrapped with foam and then covered with a breathable fabric mesh.  The front side of the bed will be similar to a tent opening with a see through screen so the parents will be able to see in.

Concept Design 2

The second design is very similar to the first with a steel rectangular base, but the bed has a flat wooden top instead of an arched top similar to the Zpod bed.  The bed walls will also be made of wood.  The bed will still include speakers, camera, and star light headliner.  In addition the bed will include a small tv that will display images.

Concept Design 3

For this concept we chose a round bed instead of a rectangular. This gives the bed more of a spaceship appearance which would go along with the child’s love of space. This design has a plastic window, a zipper opening, speakers, a projector, an aluminum top frame, a steel base, and a rounded mattress.

Selected Concept Design

We decided to go with the Arc Top design (Design 1). The Rounded design was very unique, but very impractical and would be very difficult to manufacture. The Flat Top design was okay, but not as safe or financially feasible as the Arc Top. The Arc Top matched all of our specifications and was the overall best choice.

Decision Matrix

Overview of Selected Design

We chose to build our own frame rather than ordering one online to limit the cost.  We will use a wooden frame, and then add metal poles and arches to the bed frame to provide the canopy look.  The bed will include a starlight headliner attached to the arch of the bed, as well as speakers, moonlight, and a camera in the footboard to meet all of the child’s needs to sleep better.  The front of the bed will use a metal bed rail overlaid with foam to keep the child in the bed and prevent him from getting out.

Describe Design Details

Wooden Frame:

The frame will be made out of untreated Red Oak wood donated from Tucker Masters, one of our team members.  The bed frame design is that of a typical bed with 4×4 post in each corner.  The wood will be sanded down to avoid any sharp edges.  The 4×4 post will have holes in the top to allow the metal poles to slide down into them.  To finish the frame, it will be stained to provide the look the family wanted.  

Metal Poles/Arch:

The metal poles will be made out of 1-inch steel DOM tubing with 0.065inch wall thickness from Bennet Industries in Cookeville.  The frame will consist of four 35.5inch metal tubes in each post and two 64-inch metal arches attached to the tubes in the post using a slug connection and bolt.  

Starlight Headliner:

The star light headliner will resemble a car headliner with multiple layers.  The headliner will be made of wooden ¼ inch underlayment and have holes drilled in the top for the lights to go through.  We will have two wood pieces wrapping around the top arch.  Once the lights are in place there will be a layer of batting and fabric to cover the wooden underlayment.  Lastly, a top cover will go over the arched bars to cover the wiring.  

Headboard/Footboard:

The headboard will consist of ½ inch sanded plywood overlaid with 1-inch-thick foam, batting, and a royal blue fabric.  The footboard will be similar, except there will be a spot cut out for the speaker bar, moon lamp, and camera.

Fabric Wall:

The back wall will consist of a polyester/cotton blend that will snap onto the back using heavy duty metal snaps.  This material is flame retardant and breathable. 

Engineering Analysis 1

For our first engineering analysis, we chose to use SolidWorks to calculate the von Mises stresses. The stresses are in the blue and lower end of the green, so the bed theoretically will not be overstressed for the assumed static load applied. The load that we applied was 150 lbf.

Engineering Analysis 2

For our second analysis, we calculated the strain throughout the wooden part of the bed frame from the first analysis. Once again, the frame does not seem to be overloaded.

Engineering Analysis 3

For our third analysis, we did a displacement analysis with the same static load that we used for our von Mises stress analysis. As expected, most of the deflection will be in the middle of the base; however, this will only bed at max around 4 mm and thus will be suitable.

CAD Drawings

Document Fabrication Process

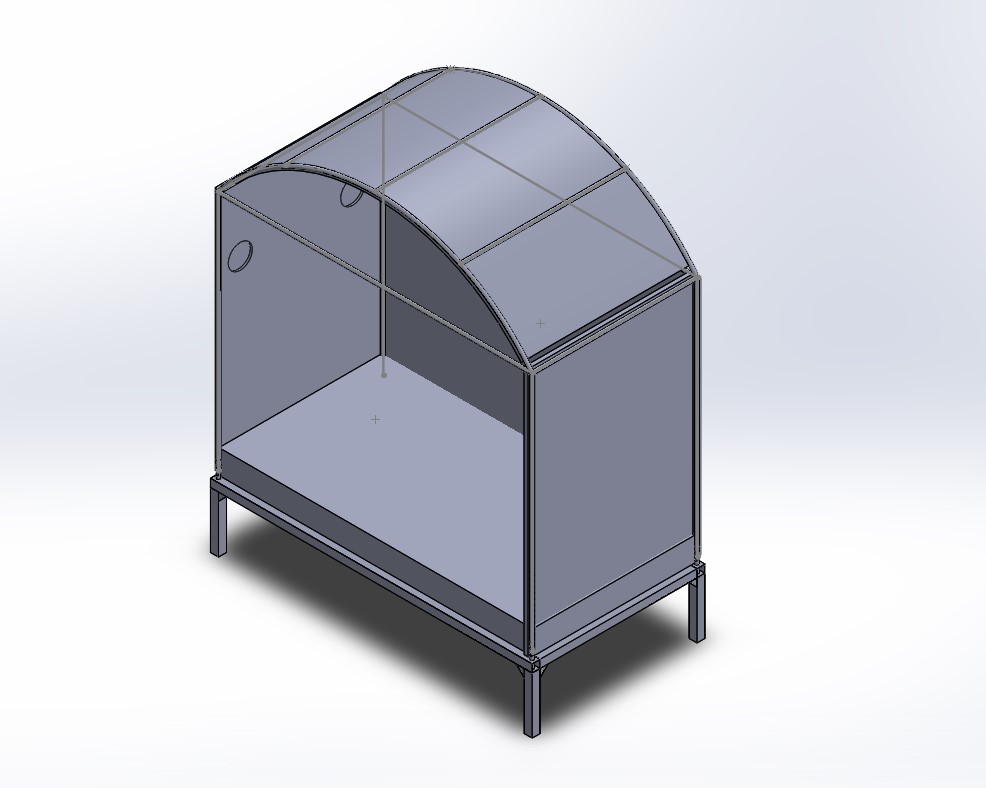
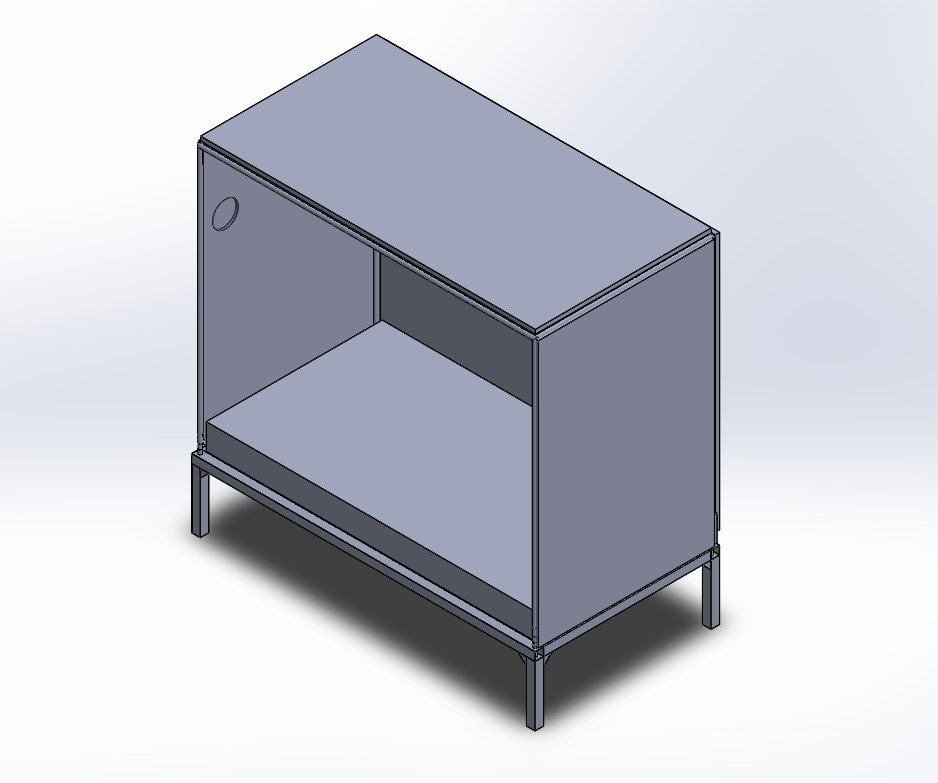
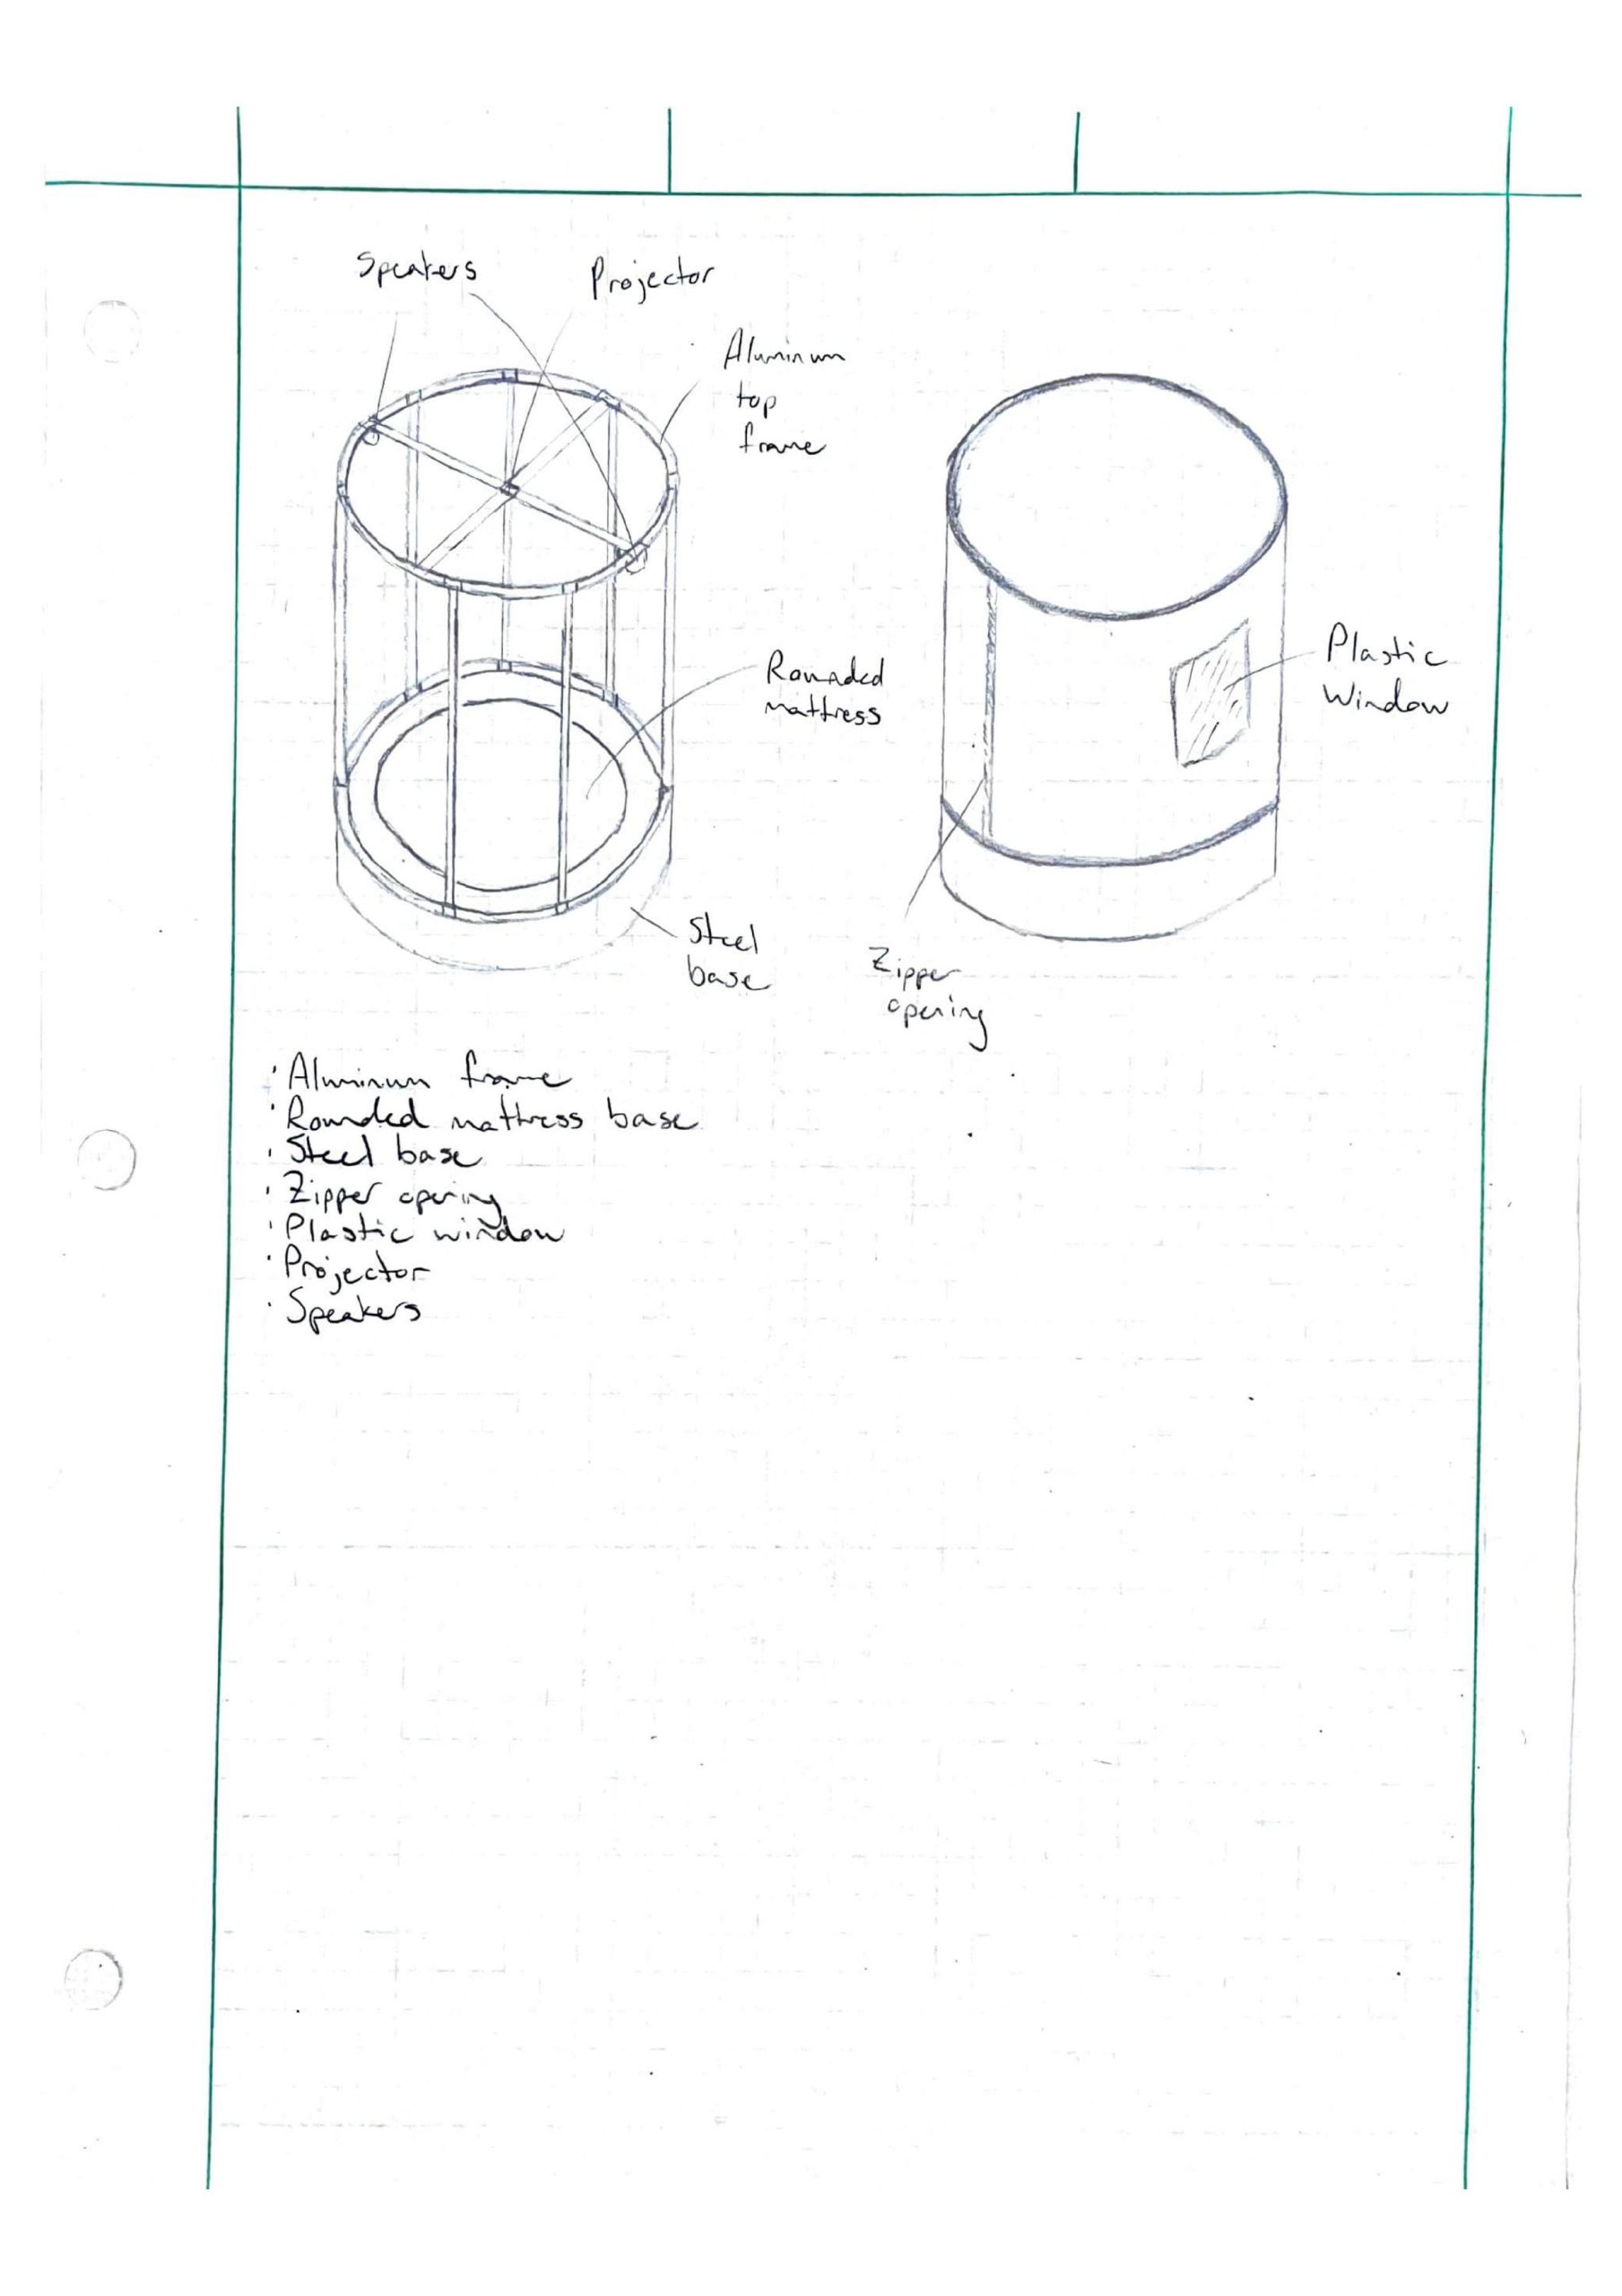
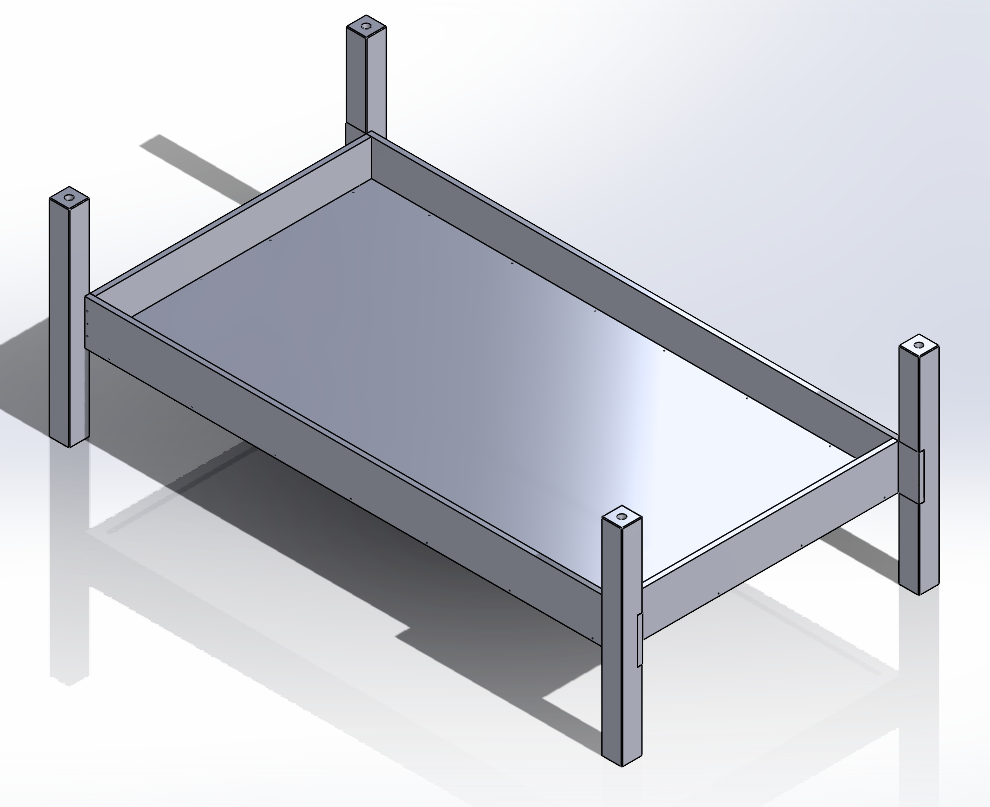
We began by preparing the wooden frame. This involved milling all of the pieces and drilling them together. We started with the oak pieces, fitting them all together, before adding the plywood base. We then sanded and stained the wood before later adding the clear coat.

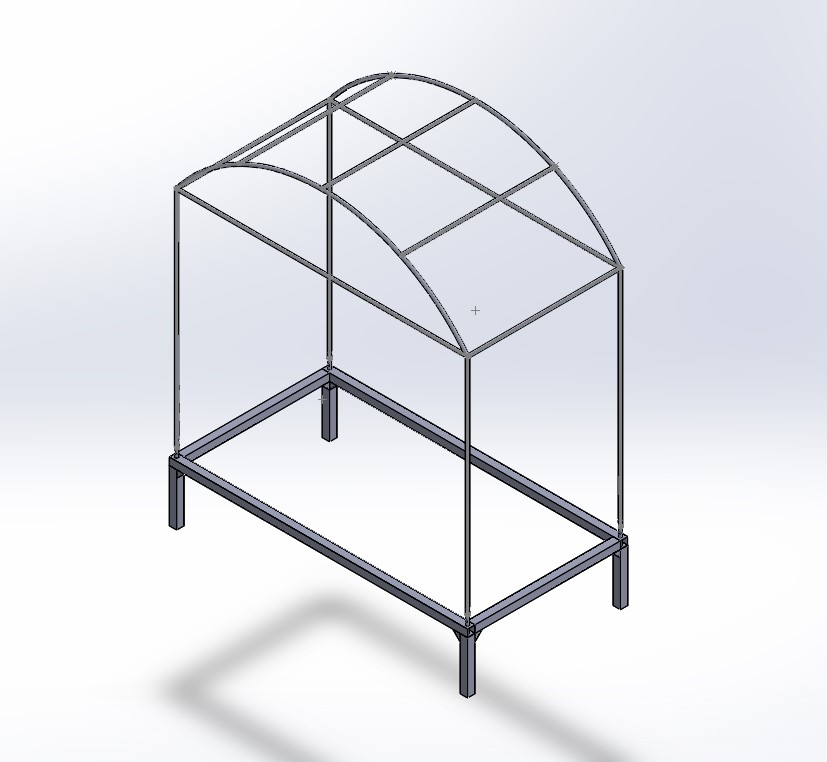
After the wooden base was complete, we began fabricating the metal frame surrounding the bed. We bent two metal rods into the quarter circles we would need and painted them. We learned, however, that we had accidentally ordered the poles for the railing a little short. We accounted for this by adding extensions and welding the whole thing together. We then sanded the welds and powder-coated the railing.

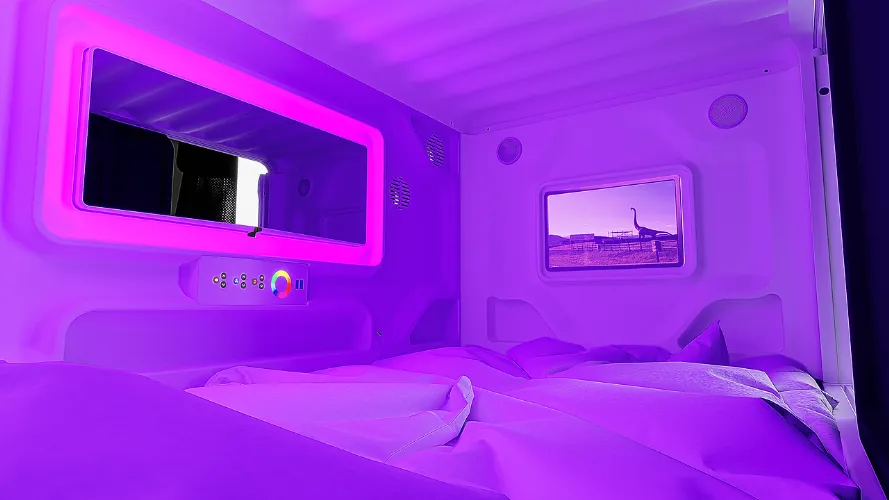
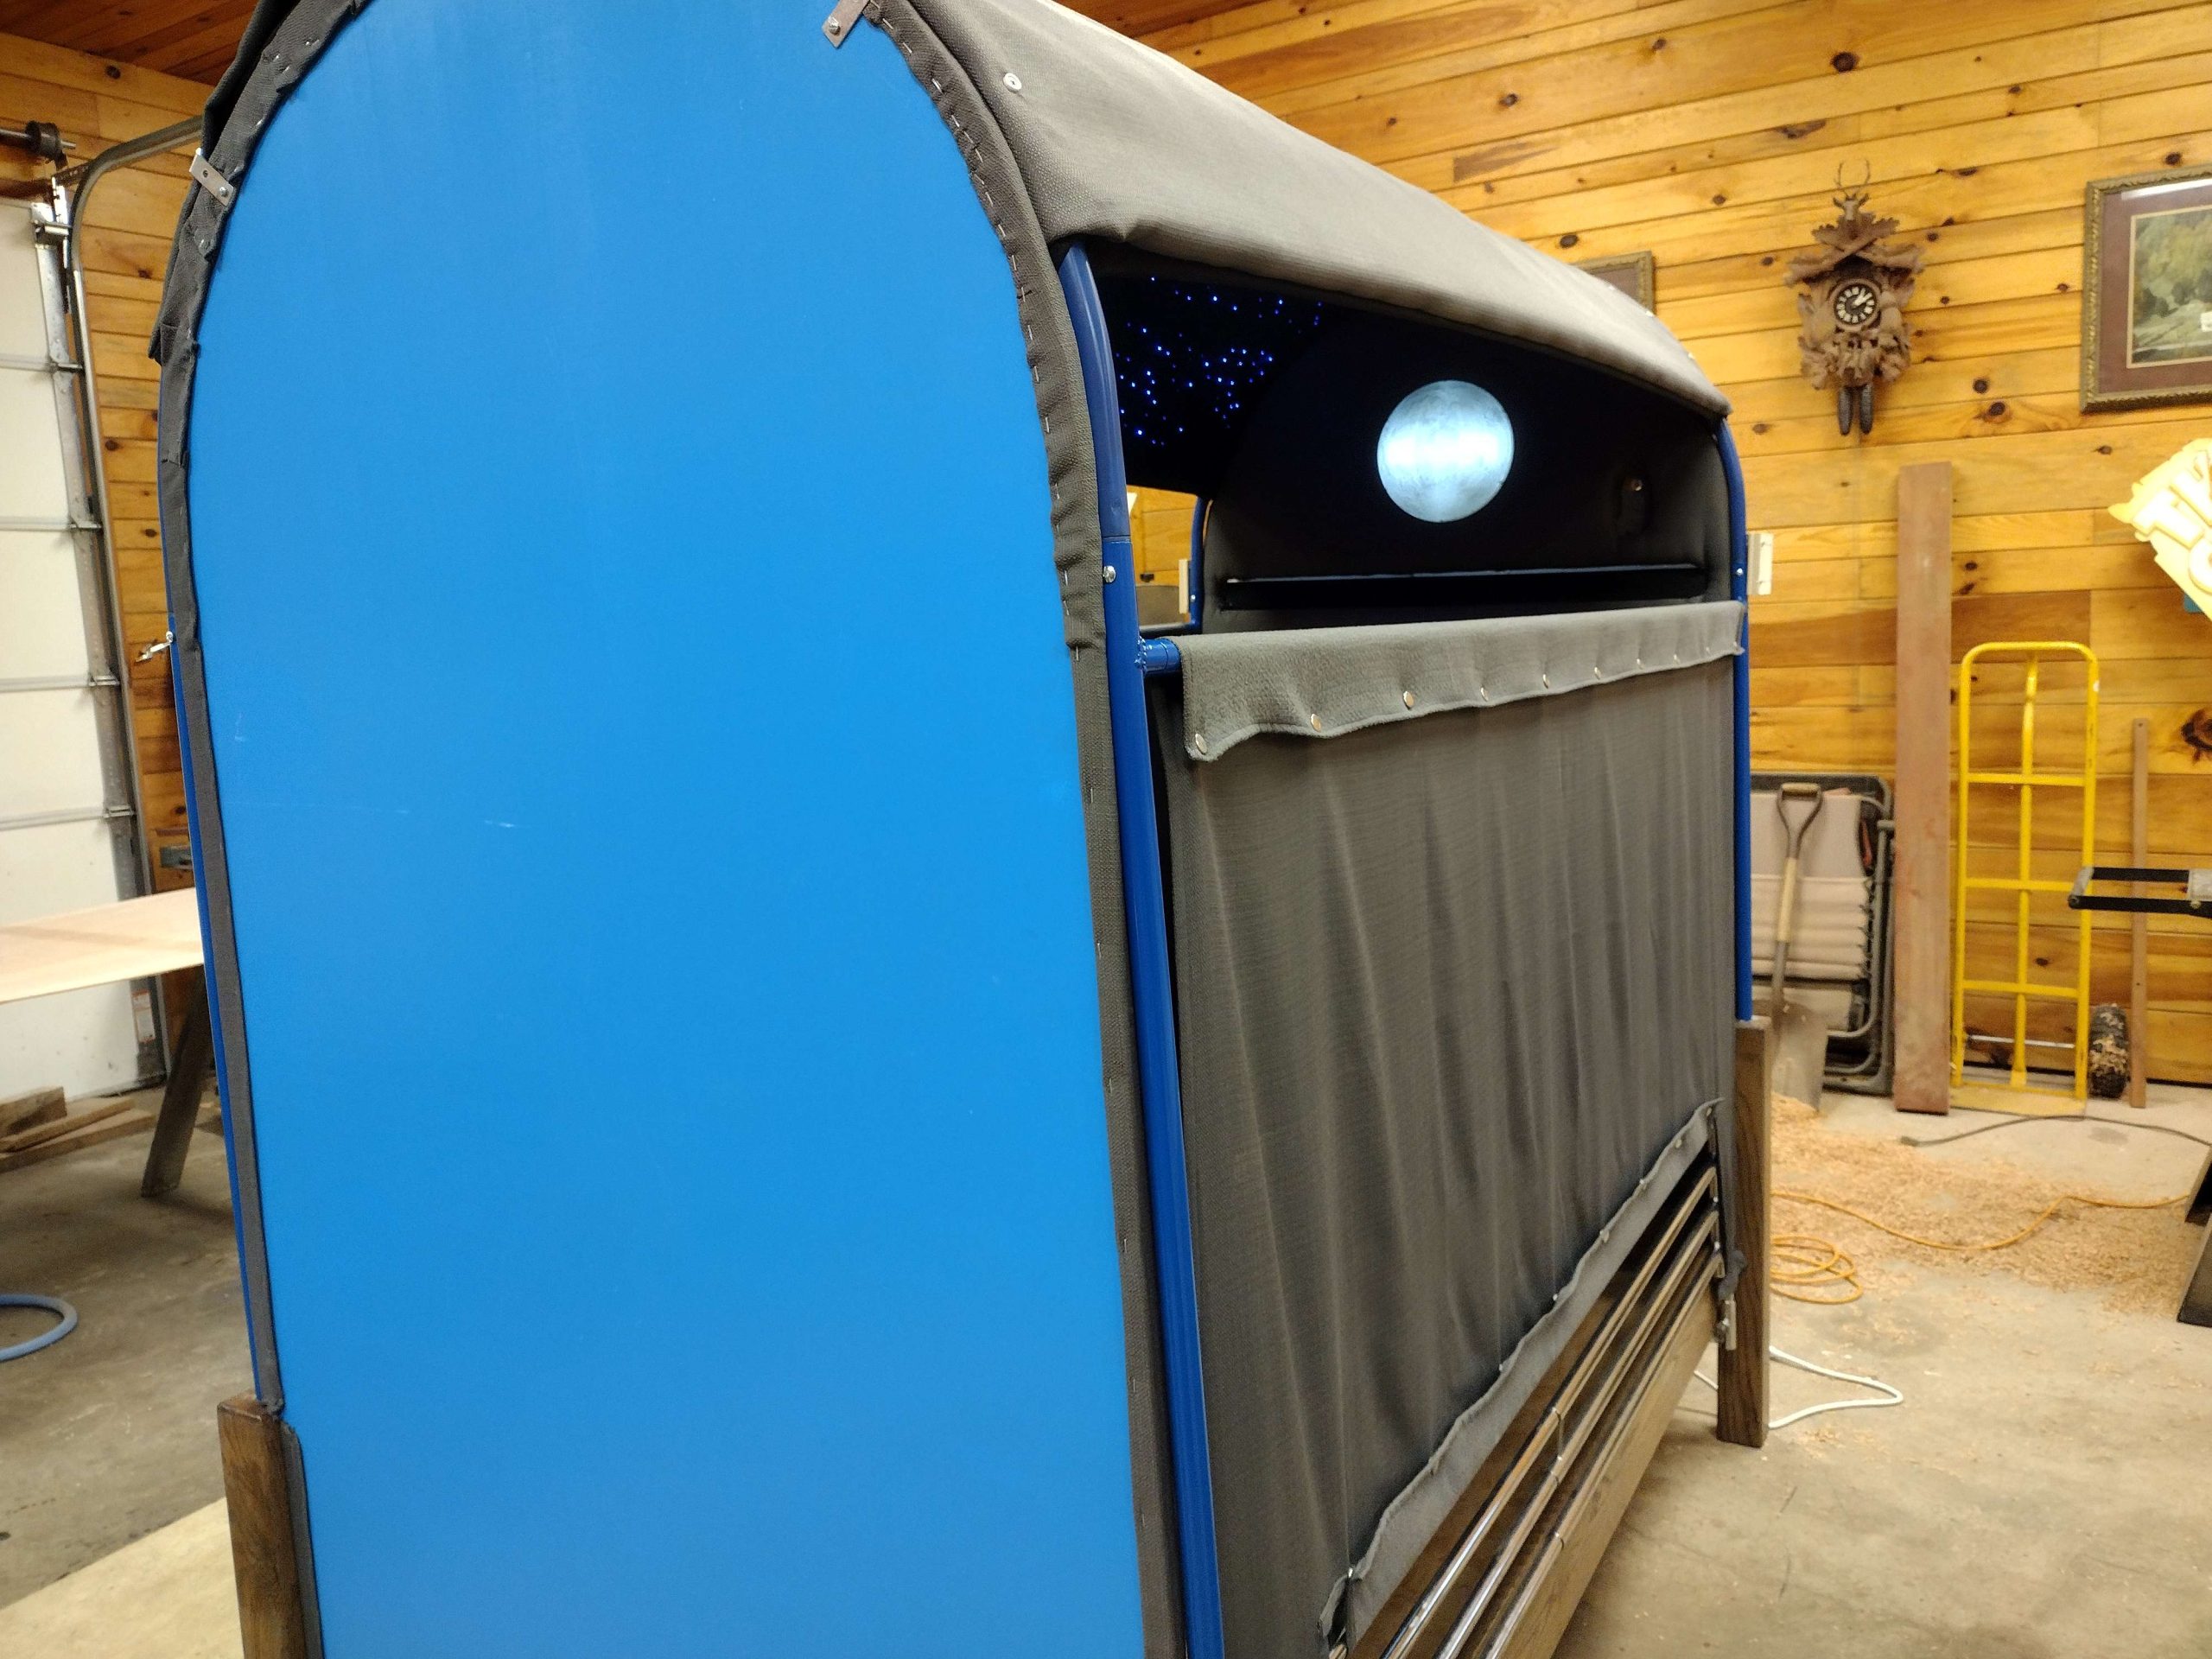
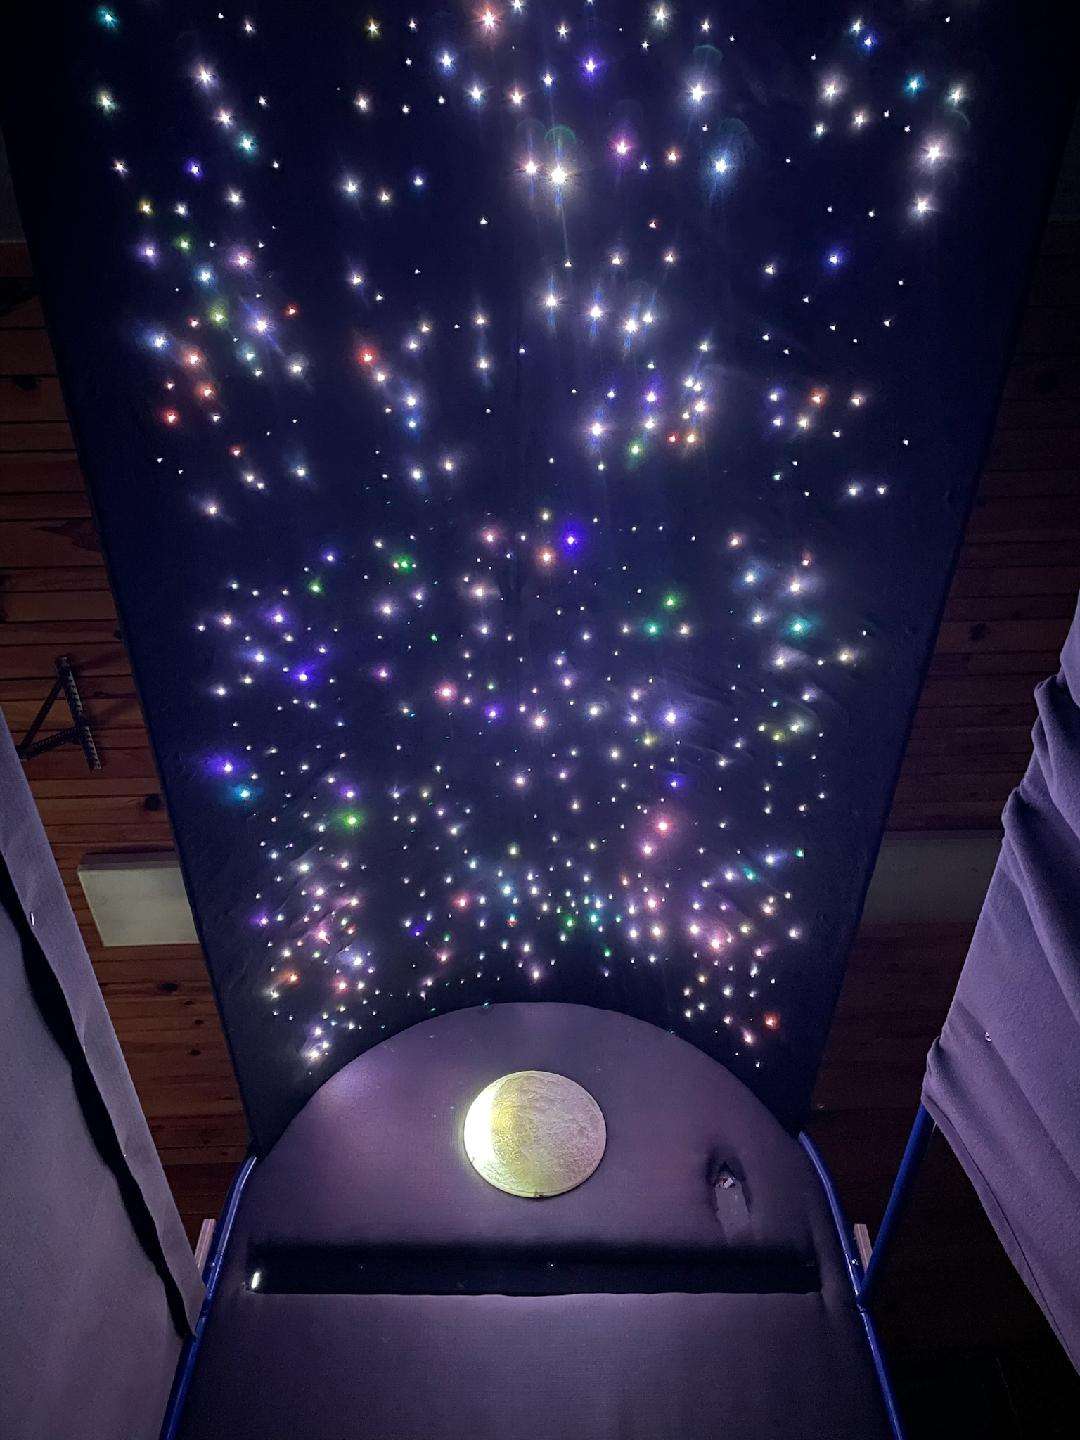
We were ready to begin the tedious task of the starlight headliner itself. We steamed and bent plywood and fit it along the bottom of the arched rails. We fit a piece of black fabric across the bottom of this plywood, and after drilling a large number of holes we began feeding through the cables. There were a total of 600 cables that would be fed through the plywood, piece through the fabric, be glued to the wood, and finally snipped short. This process took a large amount of time, especially due to the difficulty of fitting the cables through the fabric and the time taken for the glue to dry; however, the final product was amazing and the prized feature of our project.

While this was being done, the sideboards were being prepared. These boards would go the full length of the bed and have a protective layer of foam along the inside with certain spots prepared for different features. An unintended side effect was the sound quality inside of the bed itself, acting as a special chamber that would be perfect for the soundbar we had prepared. The back sideboard would have a shelf prepared for the surge protector that would power the soundbar, the headliner, and the camera. These sideboards would be sanded, painted, and have a layer of fabric along the inside where the foam was.

The last major task that needed to be prepared was the fabric that would go along the outsides and act as both a curtain and a doorway. The fabric needed to be specially made and cut to fit along the metal side rails on both sides. We decided to use button snaps to connect everything as they were both strong and easy to open/close.

With everything ready, the last thing that needed to be done was to put everything together. We ran into some difficulties fitting certain parts together; however, we were able to find different options or engineer certain ways to make them work while still being safe and structurally sound.

Completed Design Photos

Project Summary/Reflection

Overall, we are very satisfied with our final product. We ran into multiple issues along the way, but we were able to adequately address those issues and find solutions to produce a bed that was safe, sound, and in line with what the family had asked of us. This project has allowed all of us to experience working on an actual project and has taught us valuable lessons about working as a team, how to develop special skills, and what it takes to be a real-world engineer. A video demonstrating the entire project and its features is linked below:


Semester

2022 Fall