This sensory design is a project designed for a little boy diagnosed with cerebral palsy. He loves music and flashing lights, but he has minimal ability to use his limbs. His eyesight is also limited, and the idea is to have bigger buttons for him to be able to press to activate a song or light. His adoptive family’s desire is to have buttons that play music, light up, and say yes and no to help him learn how to communicate.
Mason Heathcott, Jennifer Lowe, Landon Howell, Abigail Buettner, and Devin Gifford
Problem Statement
The sensory box will involve Noah’s strength and muscle coordination as well as work to develop the prefrontal cortex through physical interaction. Through the function of intractable buttons and switches Noah can connect physical movements with neural connections to help develop problem-solving, planning, and regulate emotions.
Design Specifications
Design Specifications: After talking with the family and getting some suggestions of features they would find useful we have concluded that we will need these features to accommodate the family.
• Yes/No button to help communication
• Locking mechanism to highchair and/or wheelchair
• Can be used laying in the floor
• Sound/song buttons for entertainment
Background Research
On the market, there are products that provide sensory adaptive toys for kids. Most of the products are single function toys that are repetitive and only play the same couple seconds of a song. There are some button/switches that are easily activated and safe.
We are trying to provide a product that allows ours to be personalized and provide lots of different uses.
Concept Design 1
Our first design incorporates the use of 3 foam sensor to provide padding for his hand when activating the sensor. It is also at an angle to provide room for wiring as well as creating an angle so it is easier to activate. This design would also be modified to fit into Noah’s high chair and be able to be stationary on the ground.
Pros
Softer buttons
Simple
Less wiring
Easy to produce
Cons
More expensive
Concept Design 2
For our second design concept, our group decided that it would be a good idea to possibly collaborate with the group that was in charge of building the supportive chair for our child. Therefore, this design was sort of based upon the idea of building a collaborative table that could be locked into the supportive chair while having the ability to be removed and placed wherever is easily accessible. This design would include a variety of sensory driven button and switches specific to what he liked.
Pros
Mobile
Easily accessed
Designed to fit into supportive chair
Cons
Time consuming mechanical design
Mobility could lead to damage
Potentially hard to build depending on material
Concept Design 3
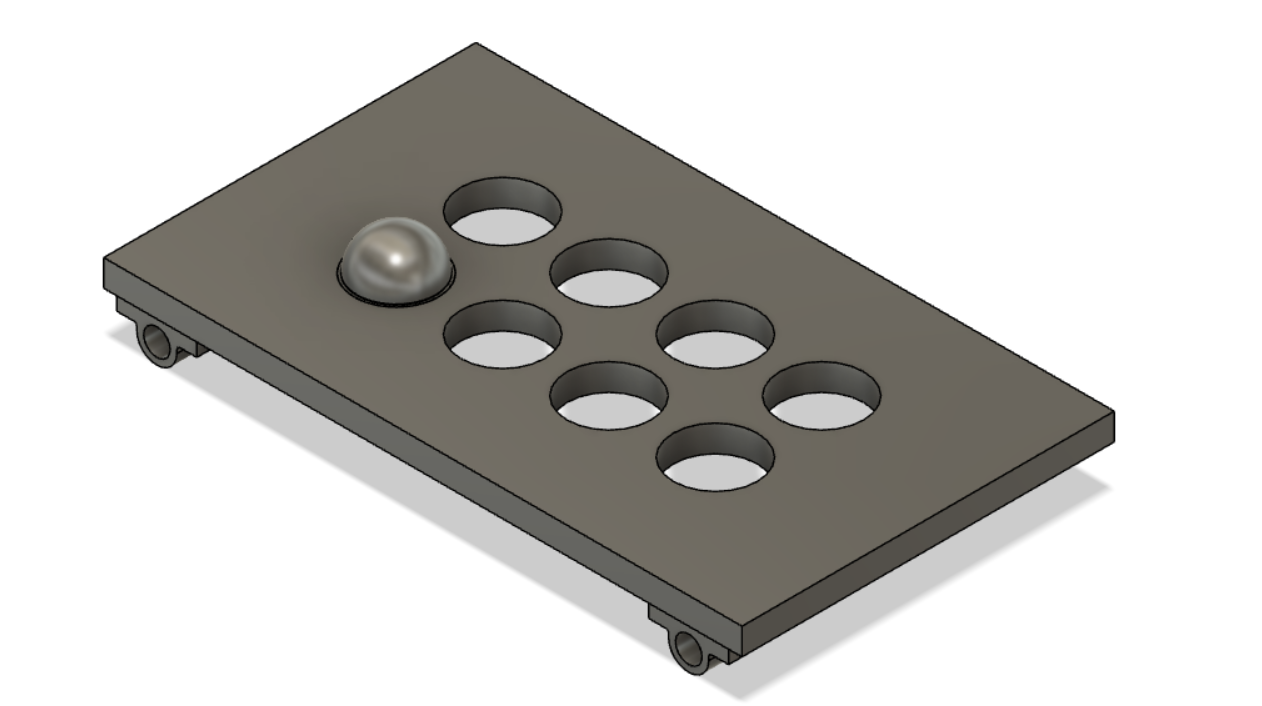
For our third design concept, we designed a rectangular box that would be made of plastic with a rubber lining. This box would have distinct functions based on which side was front facing at the time with some features including but not limited to, buttons to indicate yes and no responses, reprogrammable buttons to play music, sensory switches that light up and make noise, and manual cutoff controls to regulate accidental activation.
Pros:
Easy shape to manufacture
Resistant frame for drops or impacts
Cons:
Potentially cumbersome
Complex Design
Semi-hollow center could lead to electronics damaged on drops
Selected Concept Design
After conducting our decision matrix, it led us to selecting Concept Design 1. Although this is the selected design, it is likely that our final design will include aspects from each concept design.
Decision Matrix
Overview of Selected Design
Our selected design incorporates pieces of each of our concept designs 1, 2, and 3.
Describe Design Details
In the first phases of our design process, we wanted to consider several things: price, size, rigidity, and, of course, the recommendations from the family. One of the things the family recommended was that they preferred the toy to be mobile and of a size that could be used on the floor and also in a tray on the child’s seat where he spends his time doing daily activities. After receiving the dimensions of the tray, we were able to come up with a size that we believe will best fit the tray and also transition to the floor easily. Once we developed some overall dimensions, we were ready to choose the material. Although there are numerous materials that could fit this project well, we decided to choose 3 different ones (aluminum, MDF particle board, or acrylic) and allow our shop manager to give us his opinion on which one he thought was best. After getting his opinion, we decided that the best option was aluminum because it is cheaper, more convenient, and more rigid. Although this material will have its downfalls, we believe we can overcome most of these downfalls by adding features to make it safer and more accessible for our child to play with. For example, we plan to add a padded material to the outer surface of the toy to eliminate any dangerous hazards this material could possibly cause. We also plan to add a rubberized material to the base of the toy to help keep the toy stationary as much as possible.
After completing our mechanical design process, we moved into the electrical side of things. We plan to use an Arduino Micro without headers and connect a 9V battery source from a 6 AA container. This will give us a consistent power source to run the buttons soldered to the Arduino as well as the 3 Watt 8 Ohm speakers and Micro SD card reader. All of these components will be soldered directly to the board and then housed inside the box to prevent any damage while still providing accessibility to change or recharge batteries.
Engineering Analysis 1
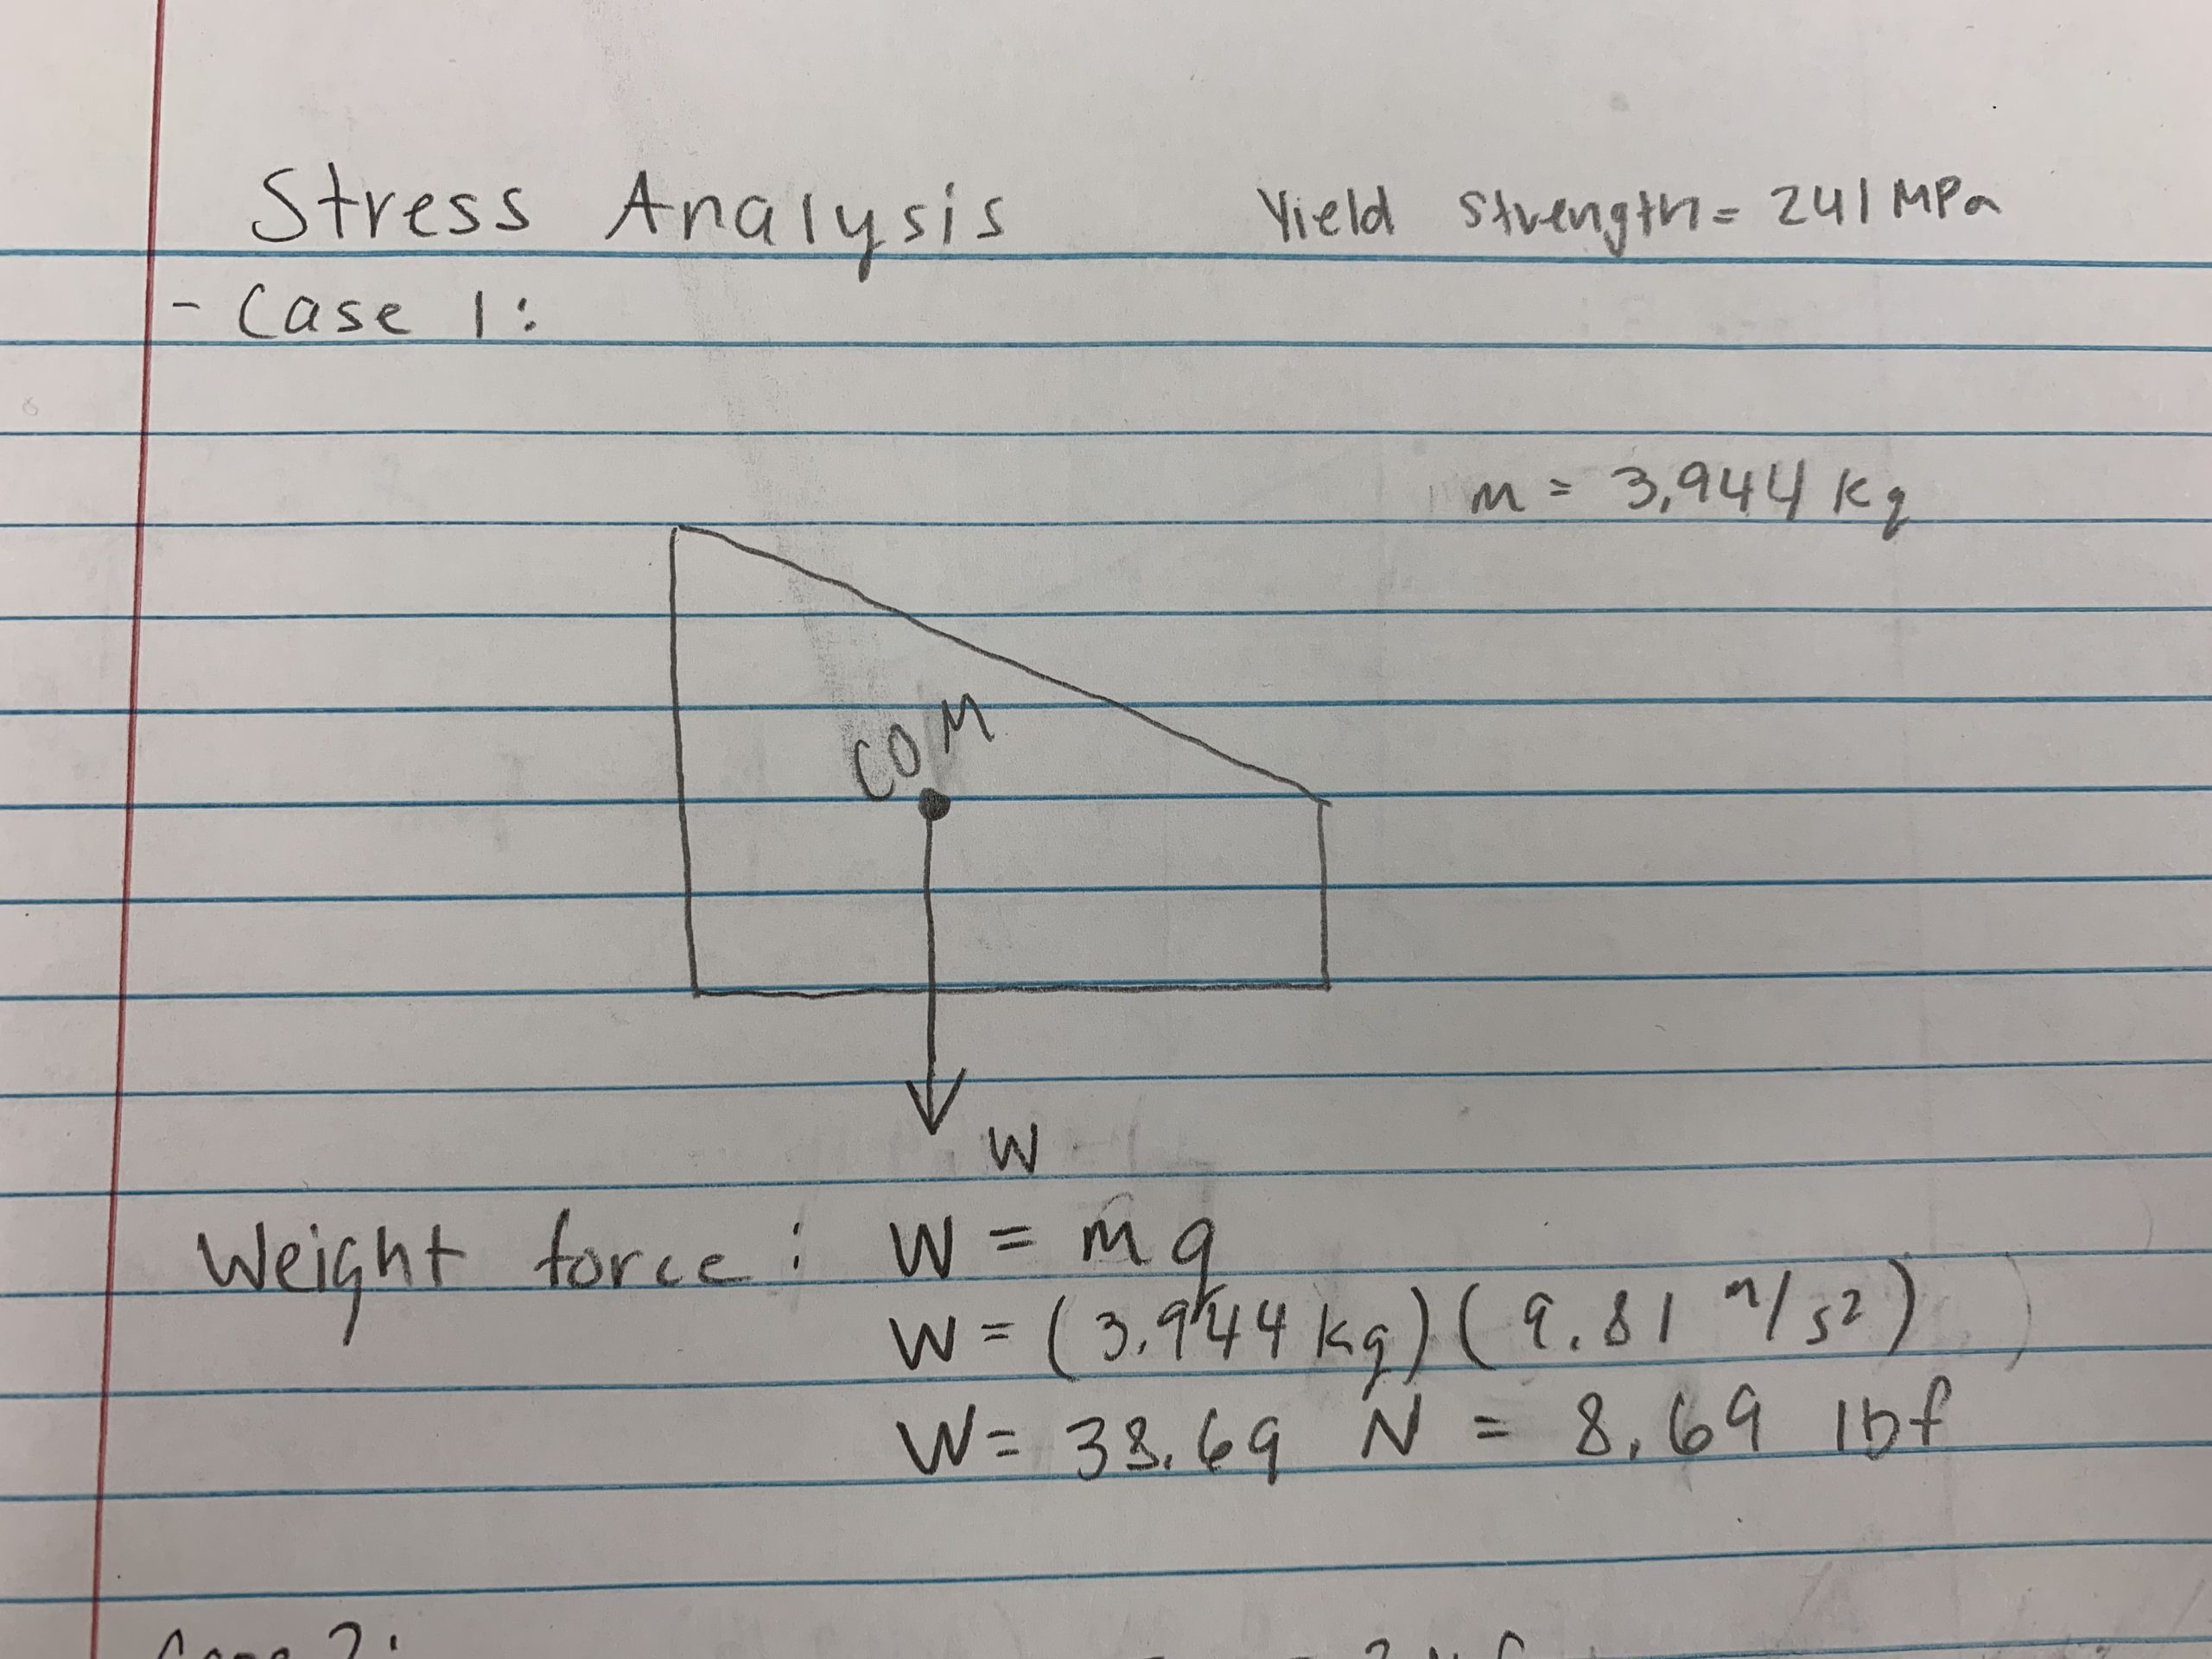
Considering our project at hand, one of our main goals was to consider the weight of our toy. We wanted to make sure our design wasn’t too heavy for our child’s family to move around when needed, but to also make sure it wasn’t too light that it could be easily manipulated while he was playing with it. Using our 3D modeling software, we were able to find our weight force which is also calculated in the image of the free body diagram provided.
Engineering Analysis 2
For our second analysis, we did some research on the typical force required to push a simple mechanical button. We found this to be approximately 2-3 pounds of force. Although this force may or may not be true to our application, this generalized analysis gave us a total resultant force of 10.44 lbf that pushes at an angle of 19 degrees into the ground.
Engineering Analysis 3
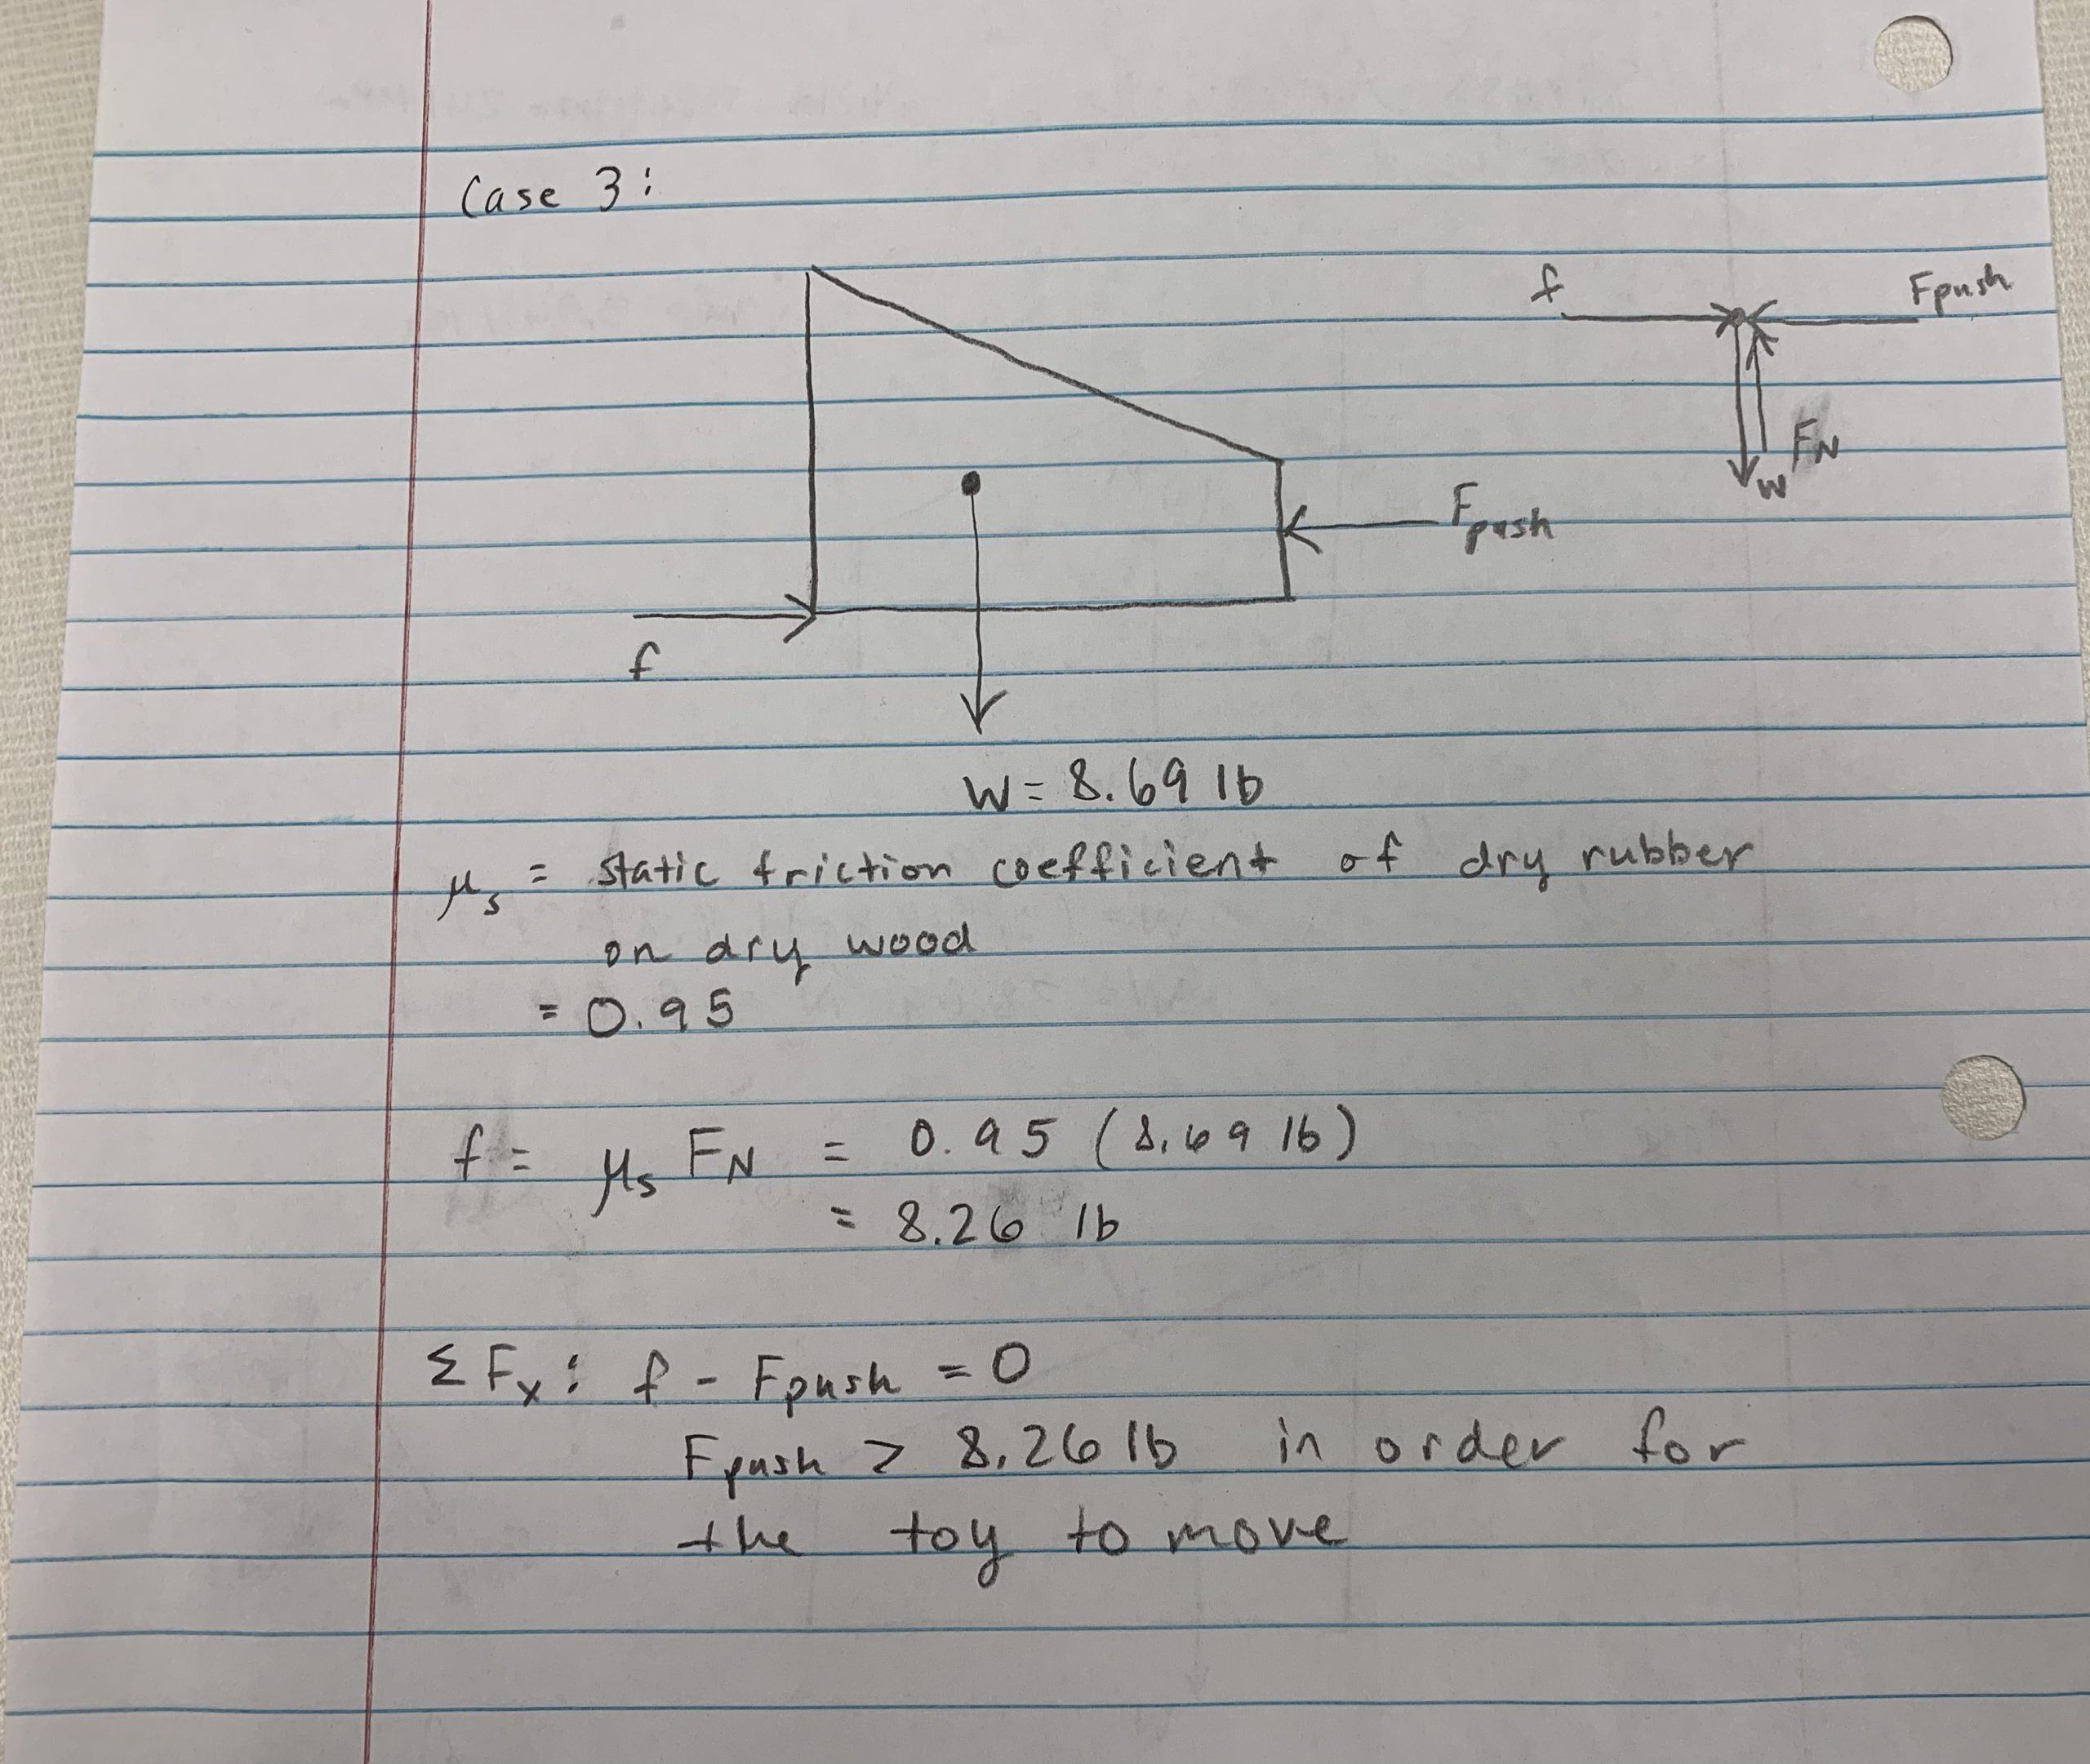
Our last analysis shows us exactly how much force would be required to move the toy on typical dry wood surface (i.e. wood floor). We calculated this force by using our knowledge of dynamics along with some research to find the appropriate friction coefficient for this case. Accounting for the weight force of the toy and the friction force acting against the pushing force, we found that the pushing force would have to be larger than 8.26 lbf in order to set the object in motion. As a team, we believe this achieves our goal of allowing the child play with the toy in any position without easily manipulating it.
Then we turned our 3D model into print files to cut out our pieces for our box
Next, we cut out our pieces using our Aluminum, but it didn’t connect as wanted even after attempting to connect it with pieces of 2020 rail
We then cut the pieces out using wood
Once it was cut out, we put the sponge foam rubber on the pieces and put the box together
Then we worked on the ardunio and setting up the circuit to allow for a power source and speaker
Next, we continued to try writing and tweaking different codes to fit our project
Once we got it working correctly, we sodered the circuit together and to the buttons used
Then we 3D designed and printed a speaker mount and cut a hole to amplify the sound of the speaker from the inside
Next, we screwed the buttons into the correct spaces
Then we mounted the on/ off switch to the box
Finally, we secured the Arduino to the inside of the box so nothing would move when our child played with the music box
Previous
Next
Completed Design Photos
Previous
Next
Instructions for Safe Use
To use the music box, an adult needs to turn on the on/ off switch on the back. Then the child may press any button. The green and red buttons say yes and no respectively and the two white to cycle through playing children’s songs.
The music box does not exhibit many safety factors. The box is sturdy and able to handle any banging. The family should be careful to not allow the box to be dropped or thrown on the ground from a far distance so as to not disturb the wiring and electronics inside of the box.
To change the batteries or to access the Arduino to change the song programming, the back of the box should be unscrewed by an adult to accomplish this. No children should be around in case of tiny pieces falling out. Once done, the back should be screwed back in place before being handled by the child again.
Should the box fall/ break open or the back not be screwed on correctly, children should be kept out of reach of electronics and wiring as some of the pieces are small enough to swallow.
Project Summary/Reflection
This project required our group to go beyond the comfort zone. After talking with the family, we knew we were trying to accomplish building a toy that was easy to use with low motor functions that would play music and help with communicating yes and no. It brought us out of our comfort zone mostly because this required a lot of Electrical Engineering knowledge that our predominately Mechanical Engineering group did not have. With a lot of research and trial and error with coding, we were able to figure it out. Luckily the construction and ideas behind the creation of this music box were more up our alley and easier for us to produce through this project. In the end, it came out as well as we had planned.
Our group is very grateful and humbled to be able to participate and help create a project that will help bring joy and means of learning how to communicate to a family fighting odd that we’ve never experienced. We are happy with how our music box turned out and how easy it is for the user to function with. As a group, we would like to send a huge thank you to Dr. Stephen Canfield, Ms. Stacey Trent, and Noah’s Family for allowing us the opportunity to help.


