The goal of this project is to design and build an affordable “Safe Sleep” style bed to help a child diagnosed with autism to have a bed that they cannot leave during the middle of the night. The guardians expressed an interest in designing the bed to have the appearance of a train to cater to the child’s interests as well. The bed must be able to be locked and unlocked by the parent or guardian, but not the child. This bed must be able to accommodate the child through the majority of their pre-adolescent years (up to 10-12 years old). This bed must be built to withstand many years of use as well as being affordable, as beds of these nature are often expensive.
Spencer Chandler, Tyler Williams, Charles “Alex” Savage
Problem Statement
A Sleep Safe Bed designed for children with autism is designed in such a way that prevents the child from leaving the bed when they are supposed to be sleeping. This is done so that the child is not able to wander around during the night while they are unsupervised, as this proves a great risk of injury to the child. A safe bed should be designed in such a way that the child will not be injured while inside the bed and is unable to escape the enclosure. The bed must be able to be locked by the guardian and not by the child to prevent escape.
Design Specifications
When talking to the guardians of the child that this bed will be designed for, they had a few recommended design specifications. They were as follows:
Twin size mattress
Train type appearance
Enclosed on all four sides when locked
Accordion, sideways opening doors
Ventilation on door and top
Storage drawers under the bed with a locking capability
Child-proof locks
Soft lighting to act as a nightlight
Inclusion of a sleep training light
Heavy built so that the bed cannot be moved or pushed around the room
As a group, we determined that the inside of the bed enclosure needed to be something that the child could not chew or scratch as it was discussed that they had problems with wooden material being destroyed over time. We decided that the best material would either be a plexiglass material for the inside since it will be very durable and hold up through the years. We decided that the outside of the bed could be made of wood since the child will be supervised when he is playing around it.
Background Research
The background research for safe beds led to the conclusion that these beds are fairly straightforward. The main issue found among these beds are that sometimes certain locks are easily unlocked by the child allowing them to roam in the middle of the night, so we must design something that only the parent can control. Overall, Sleep Safe Beds are generally built to withstand a lot of wear and tear, so they must be built accordingly. We will need to build the bed in a way that it will remain sturdy over time and with continued and repetitive use.
Concept Design 1
The first design concept that we created was to build a bed out of wood and plexiglass to resemble a Southern Pacific Forward Cab style locomotive. There would be an accordion door on the front each with three panels with windows built in, possibly backed with mesh to prevent the child from escaping. The drawers underneath would serve as the storage component that was requested. The possibility to make the “cab” of the bed into more storage or possibly a play area also could be explored further.
Concept Design 2
The second design concept involved buying a dorm style loftable bed that we then would build the shell to go over to then look like a train and create a safe enclosure. The enclosure would again be made out of wood and plexiglass. The same style accordion doors would be used. Once again, three storage drawers would be located on the bottom of the bed.
Concept Design 3
The third concept design would be to buy a bed with safety features already in place and design additional pieces to help make it more train-like in appearance. We would need to upgrade the locking mechanisms on this bed to allow it to be used as the child grows with it. The bottom of the bed would also need to be fitted or designed so that the locking drawers could be installed.
Selected Concept Design
According to the decision matrix below. Design 1 appears to be the best fit for the child and their needs. We feel that the included storage and possibility for additional storage or a play area would be beneficial for the child and guardians as well as having a heavy weight so that it cannot be easily moved. This design will also be easily constructed as the frame and base can be made in one design and will not have to be adapted to fit onto another pre-existing product. Designing and building the whole bed will also be beneficial as it can be done so in a way that makes it easy to disassemble and move to the location as well as any subsequent moves after that.
Decision Matrix
Overview of Selected Design
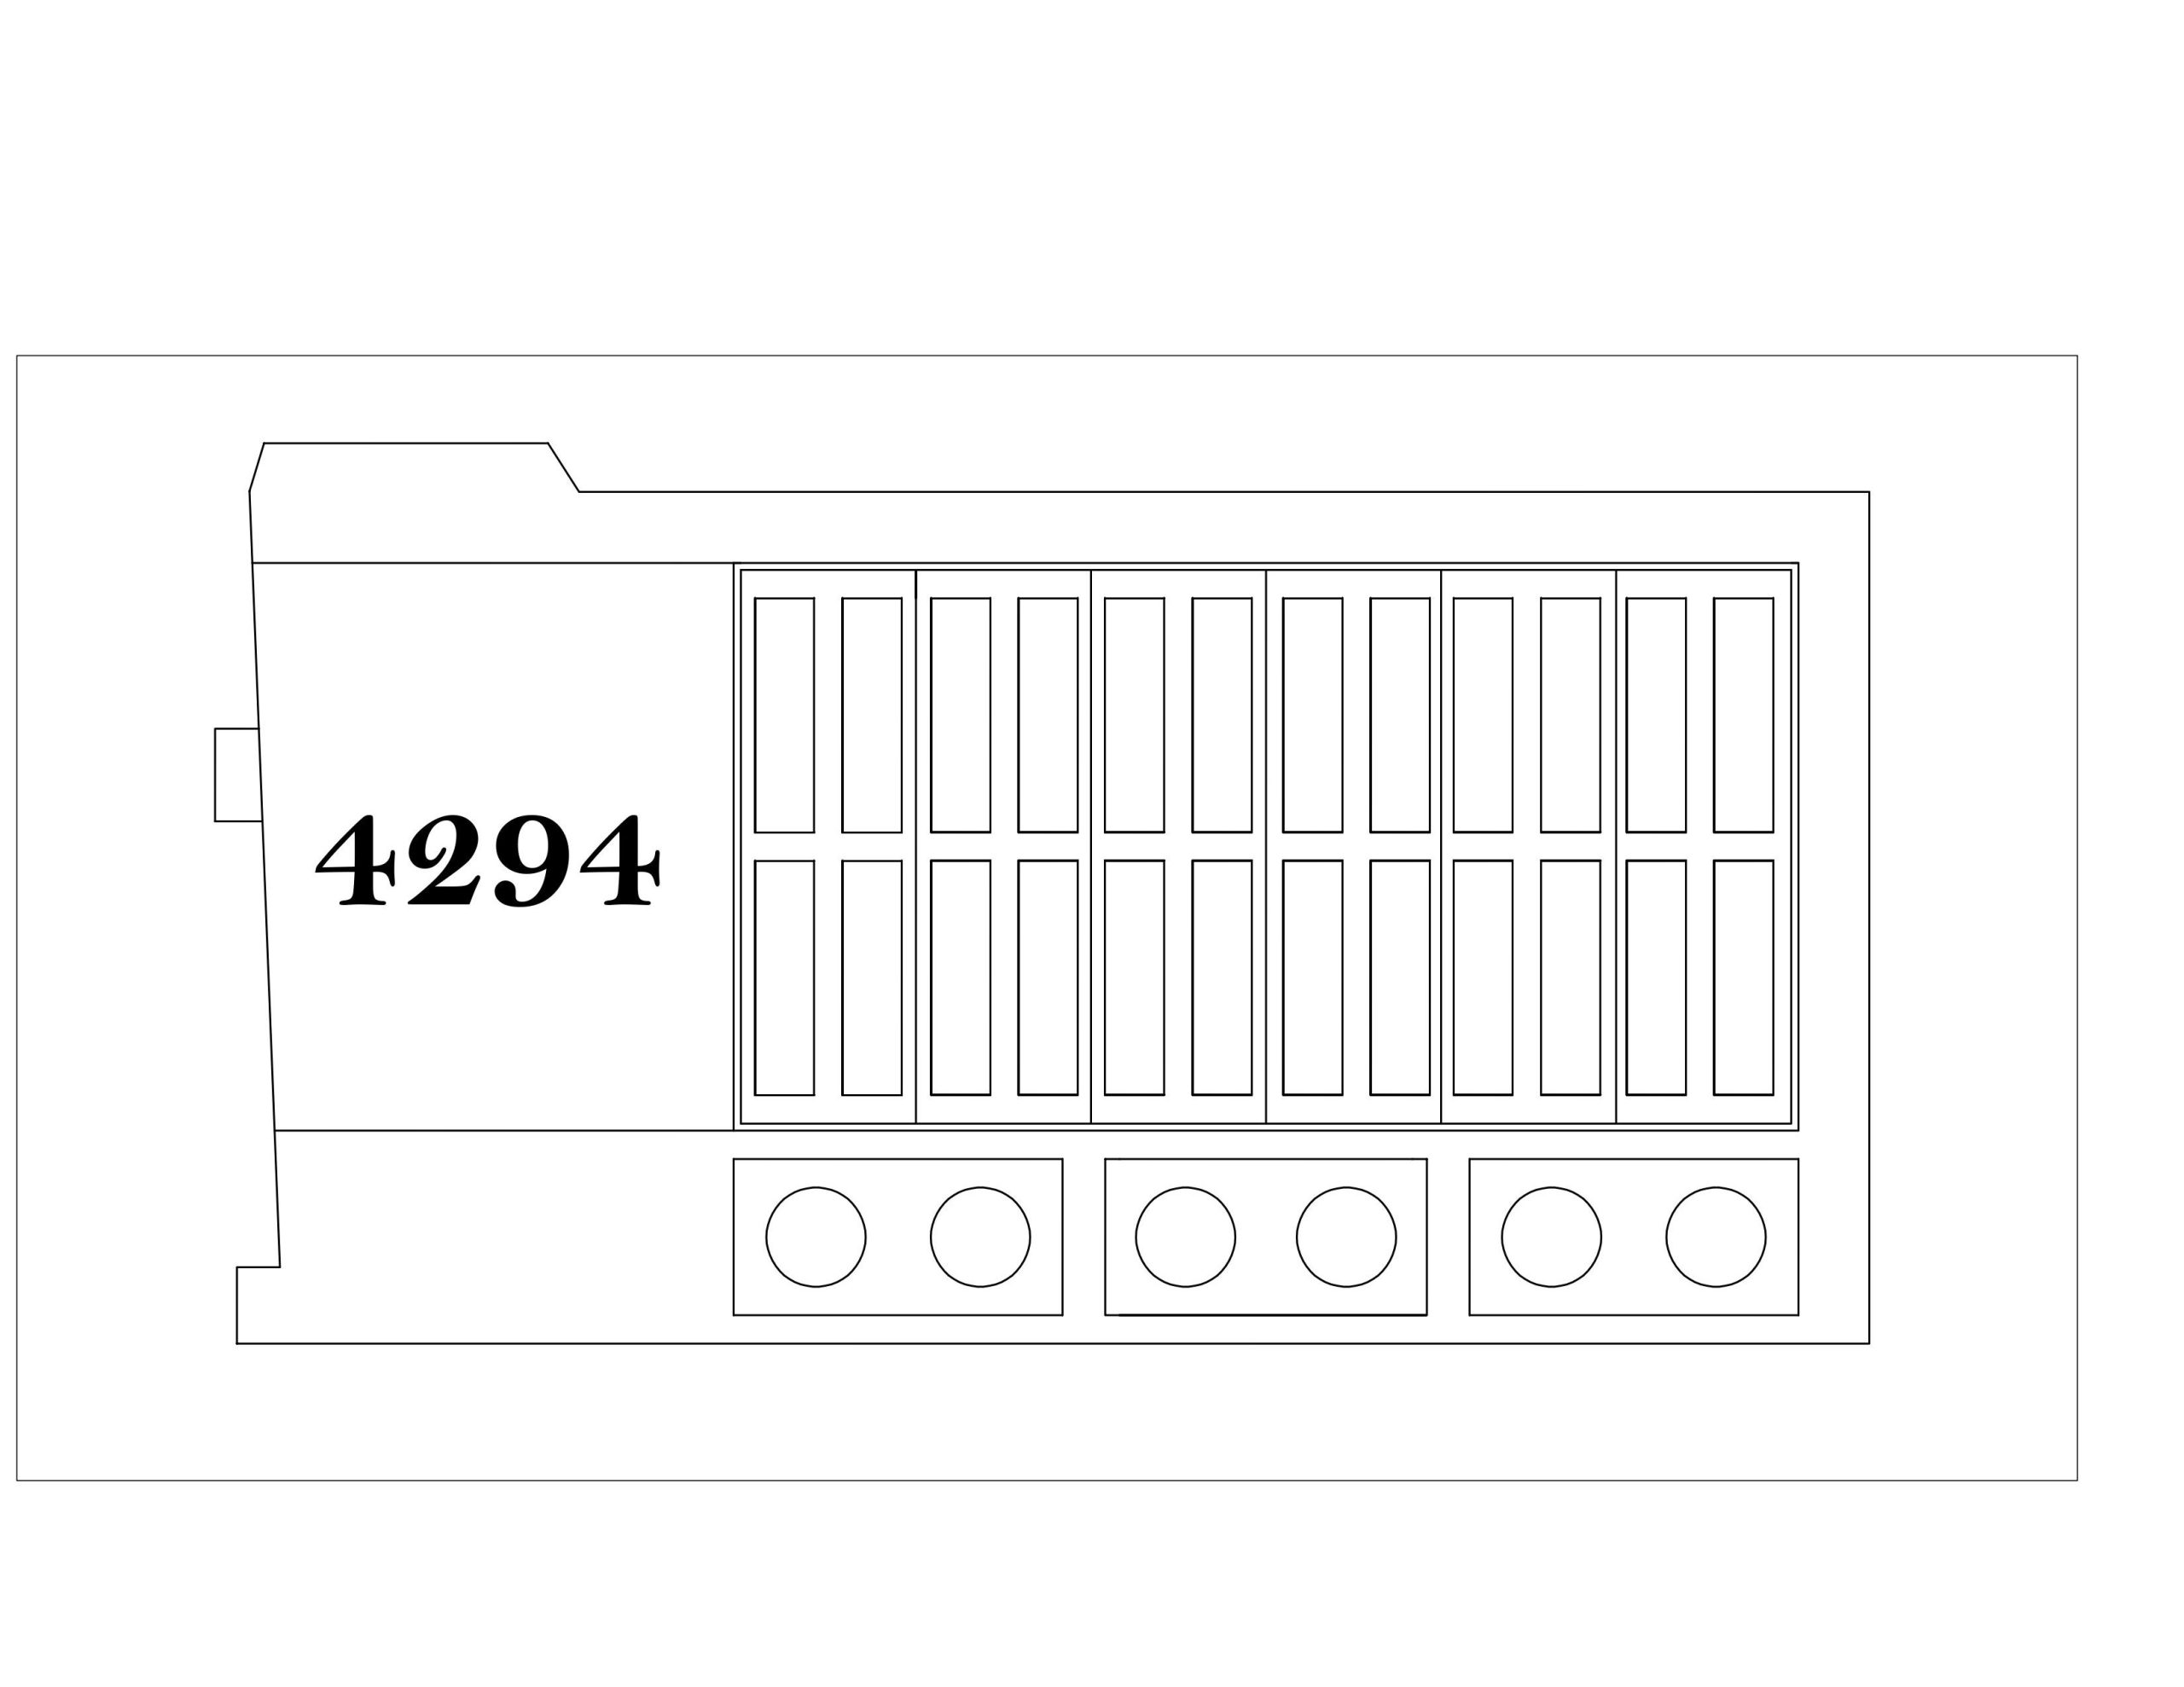
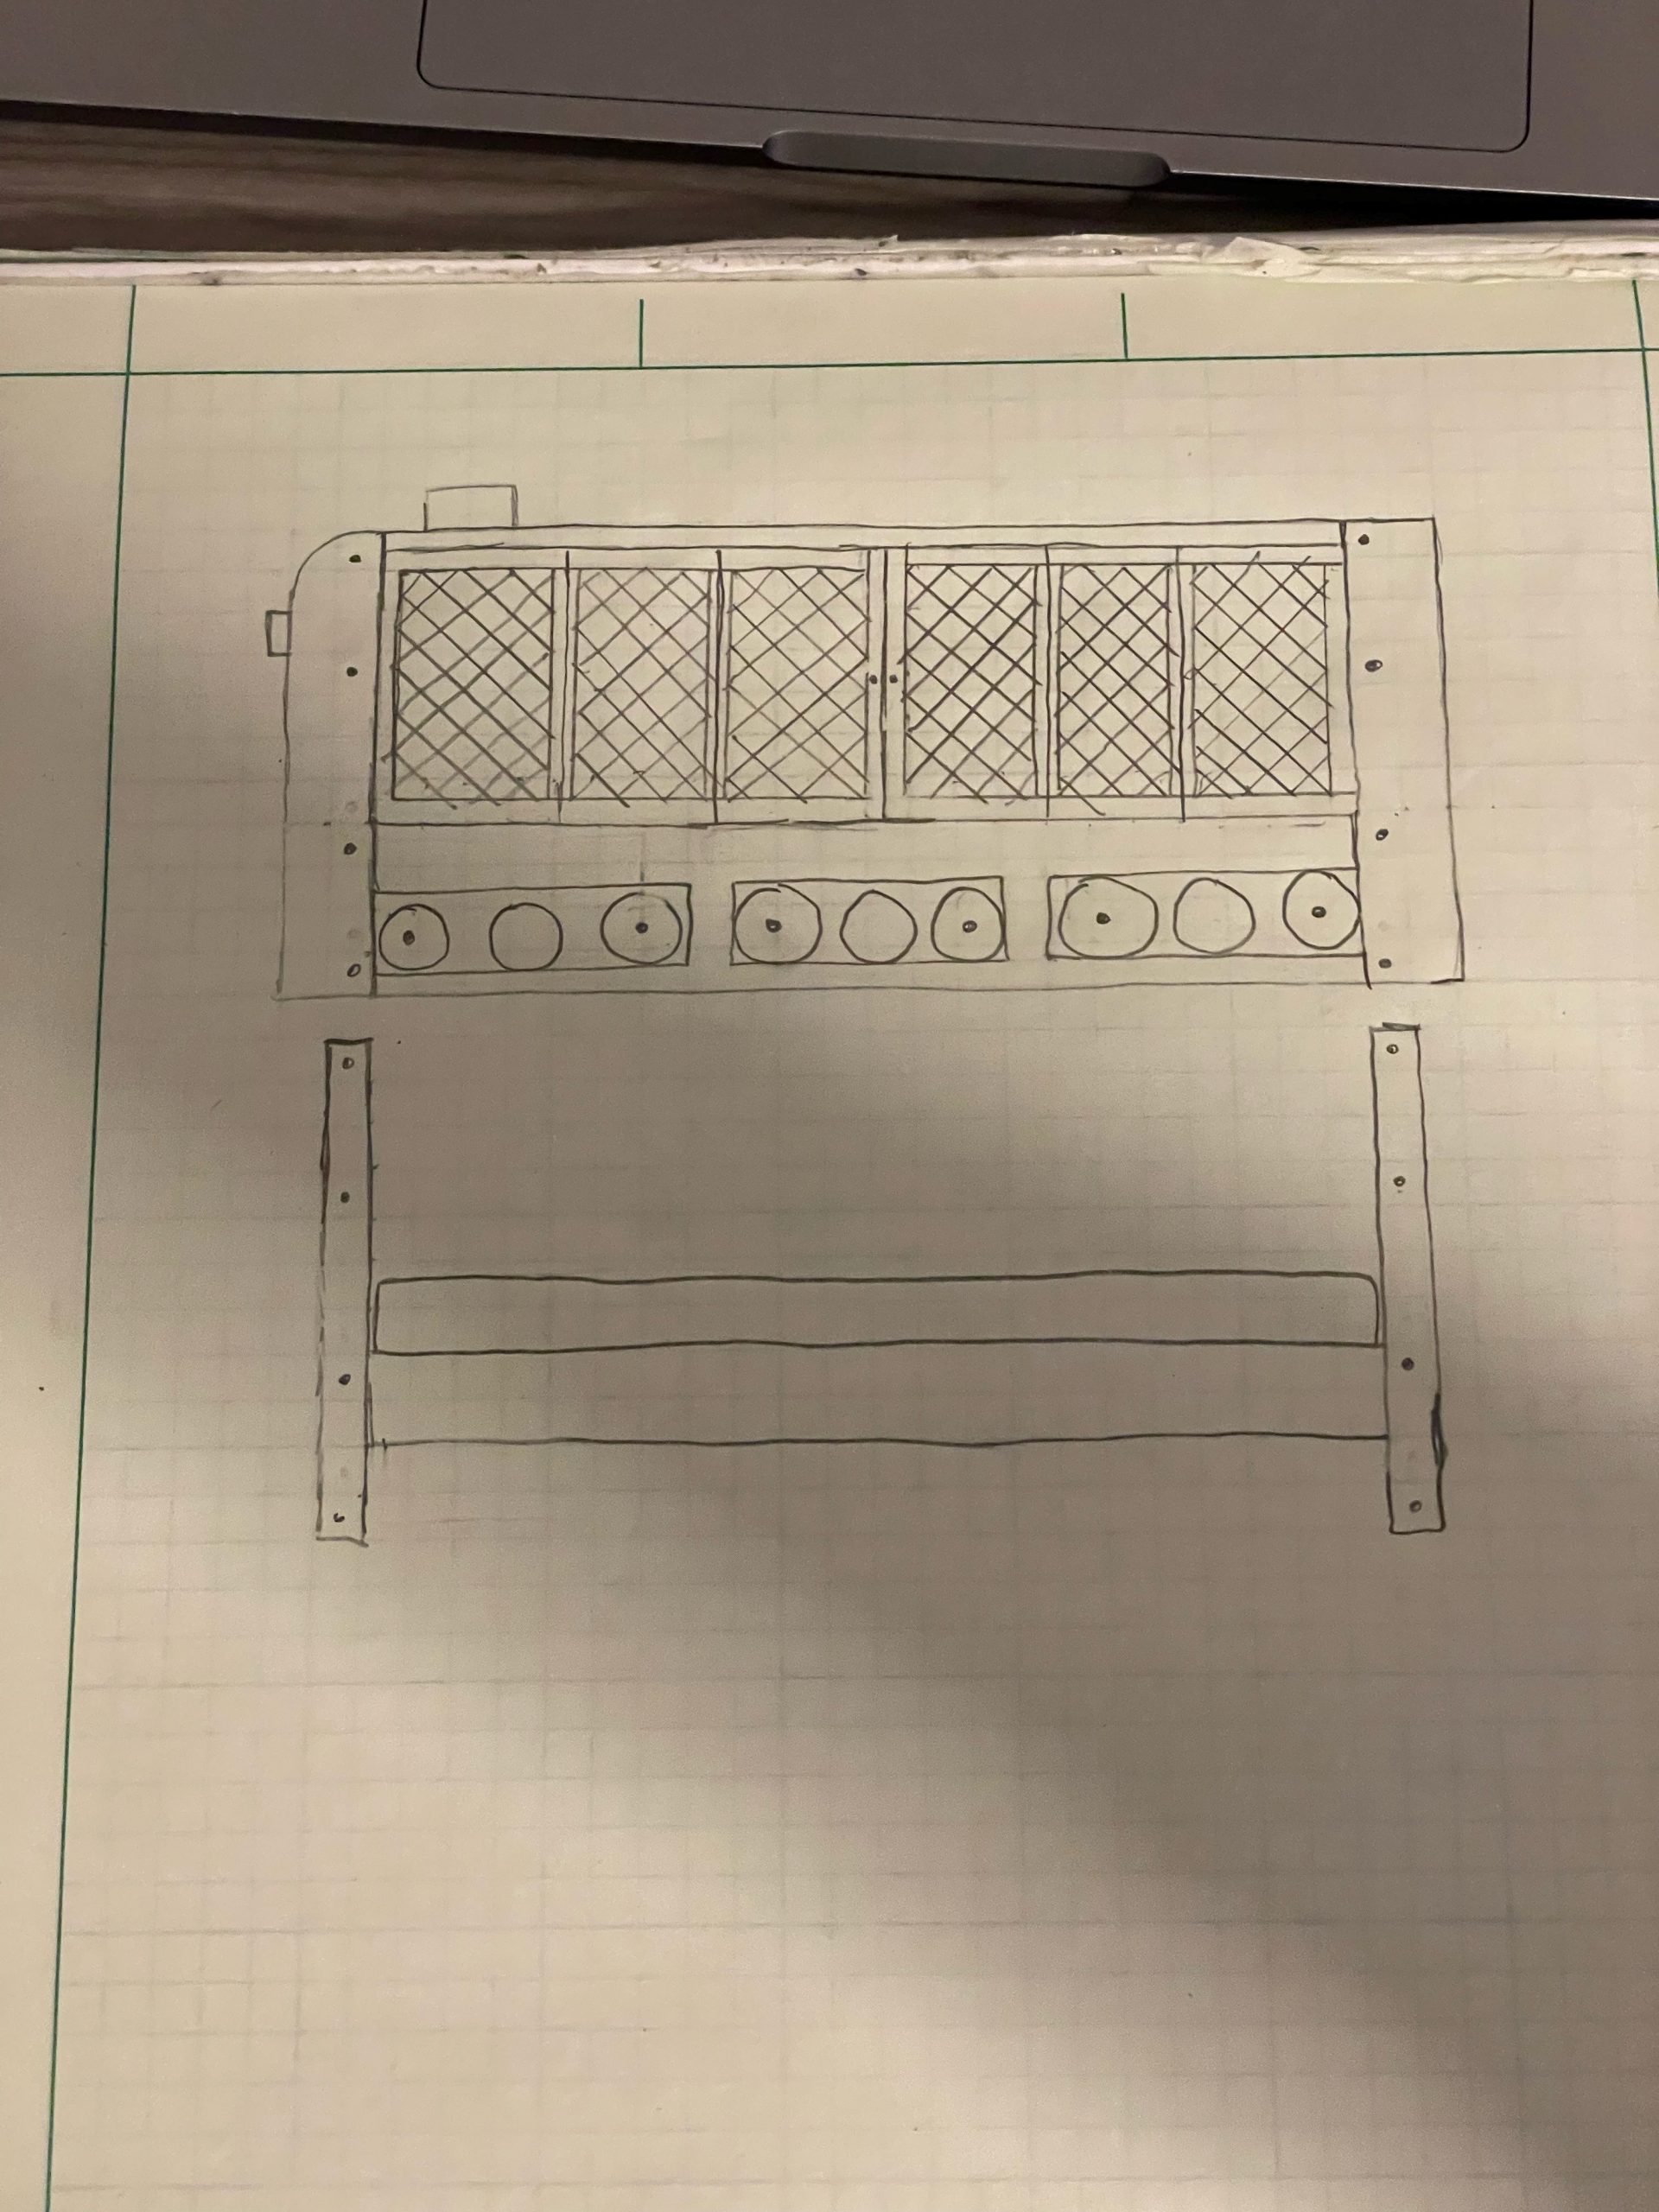
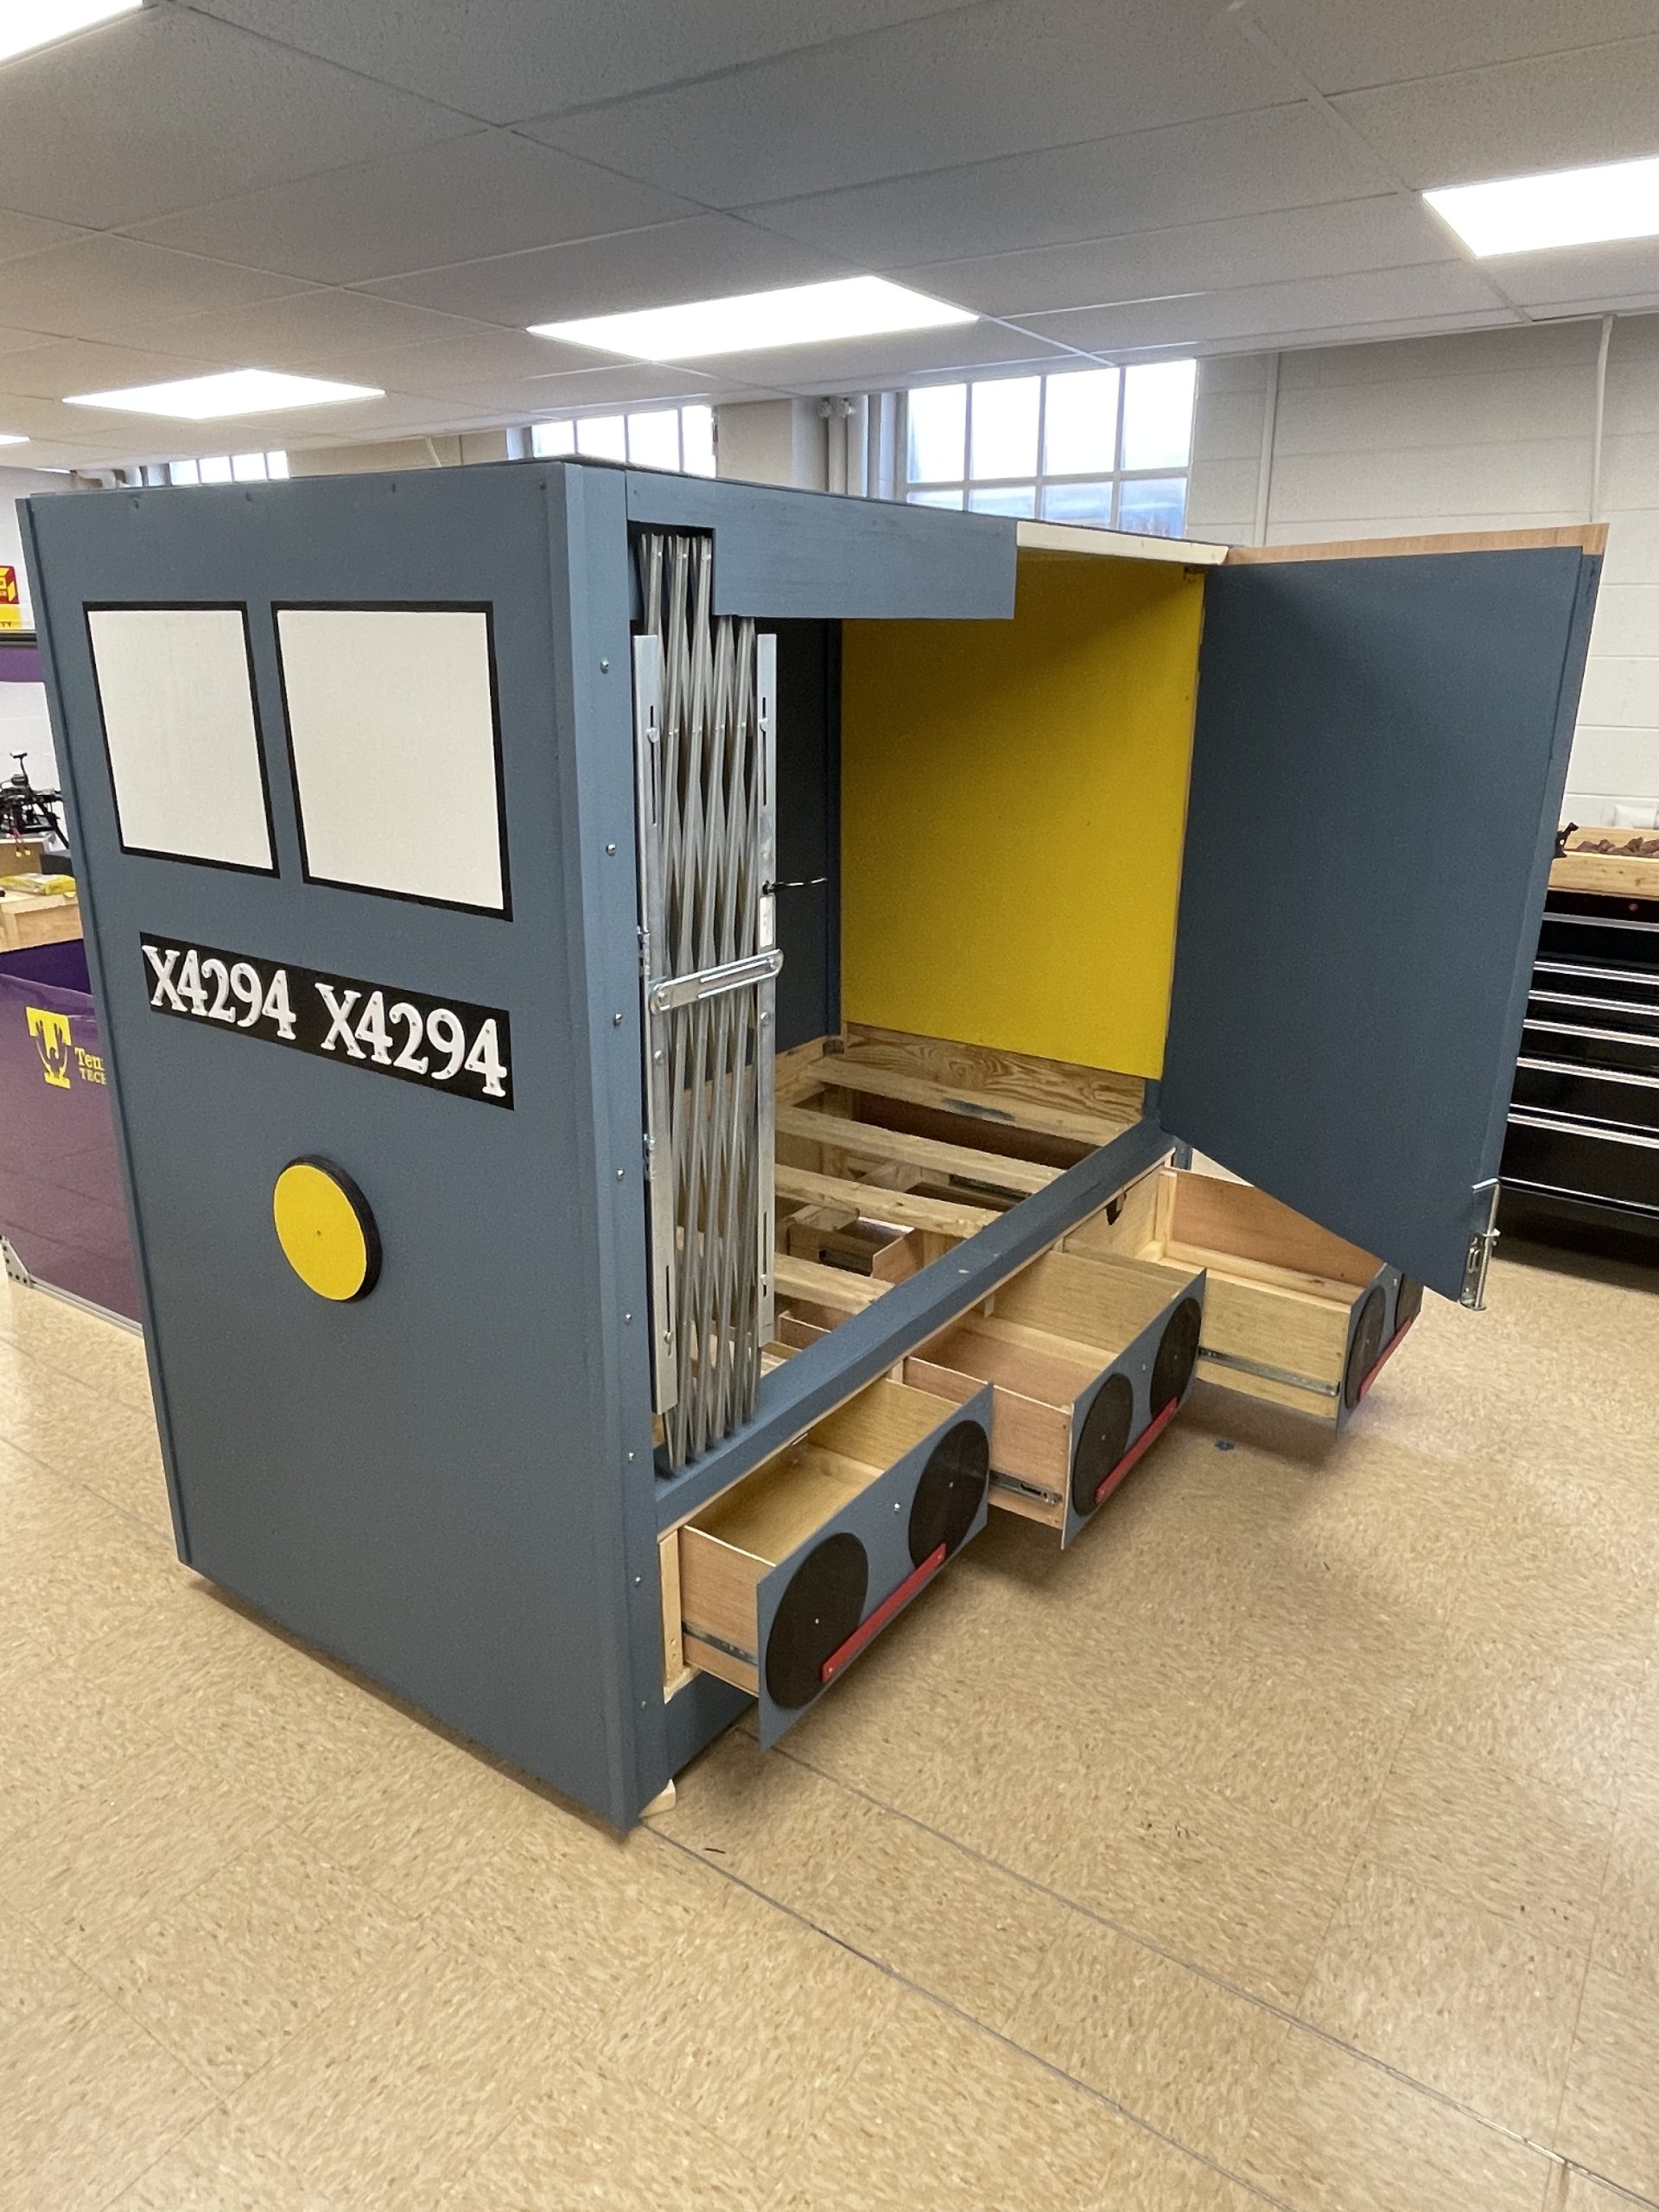
The selected design we went with was the first option, as it seemed to be the most feasible to produce ourselves with no unnecessary costs or time spent in design. The bed will feature three drawers as was requested for storage as well as sliding gate doors that can be locked. The panels on the sides will be slotted to provide adequate ventilation without letting the child be able to exit through. The bed as a whole will be heavy and large enough that the child will not be able to move it, yet still enclosed enough to provide a safe sleeping area that the child feels secure inside of.
Describe Design Details
The bed is designed in such a way that it can be assembled and disassembled to allow it to be transported as well as to allow it to fit through a standard door. All of the pieces will tie into four 4×4 posts at each corner of the bed and will be bolted together. The bottom of the bed will be assembled and fastened to a 22/32 sheet of plywood to establish the dimensions, and then the 4x4s will be bolted to the bottom. After the 4x4s are in place, the rest of the panels can be fastened to the posts with screws. The bed will be able to be disassembled in the same manner if the family ever decides to move to a new location, or if the bed is ever moved. The bottom and top panels are thicker, as it was deemed that those two components would be structurally important. We were also informed that the child would climb on top of things, so the bed was designed to withstand that type of stress.
Engineering Analysis 1
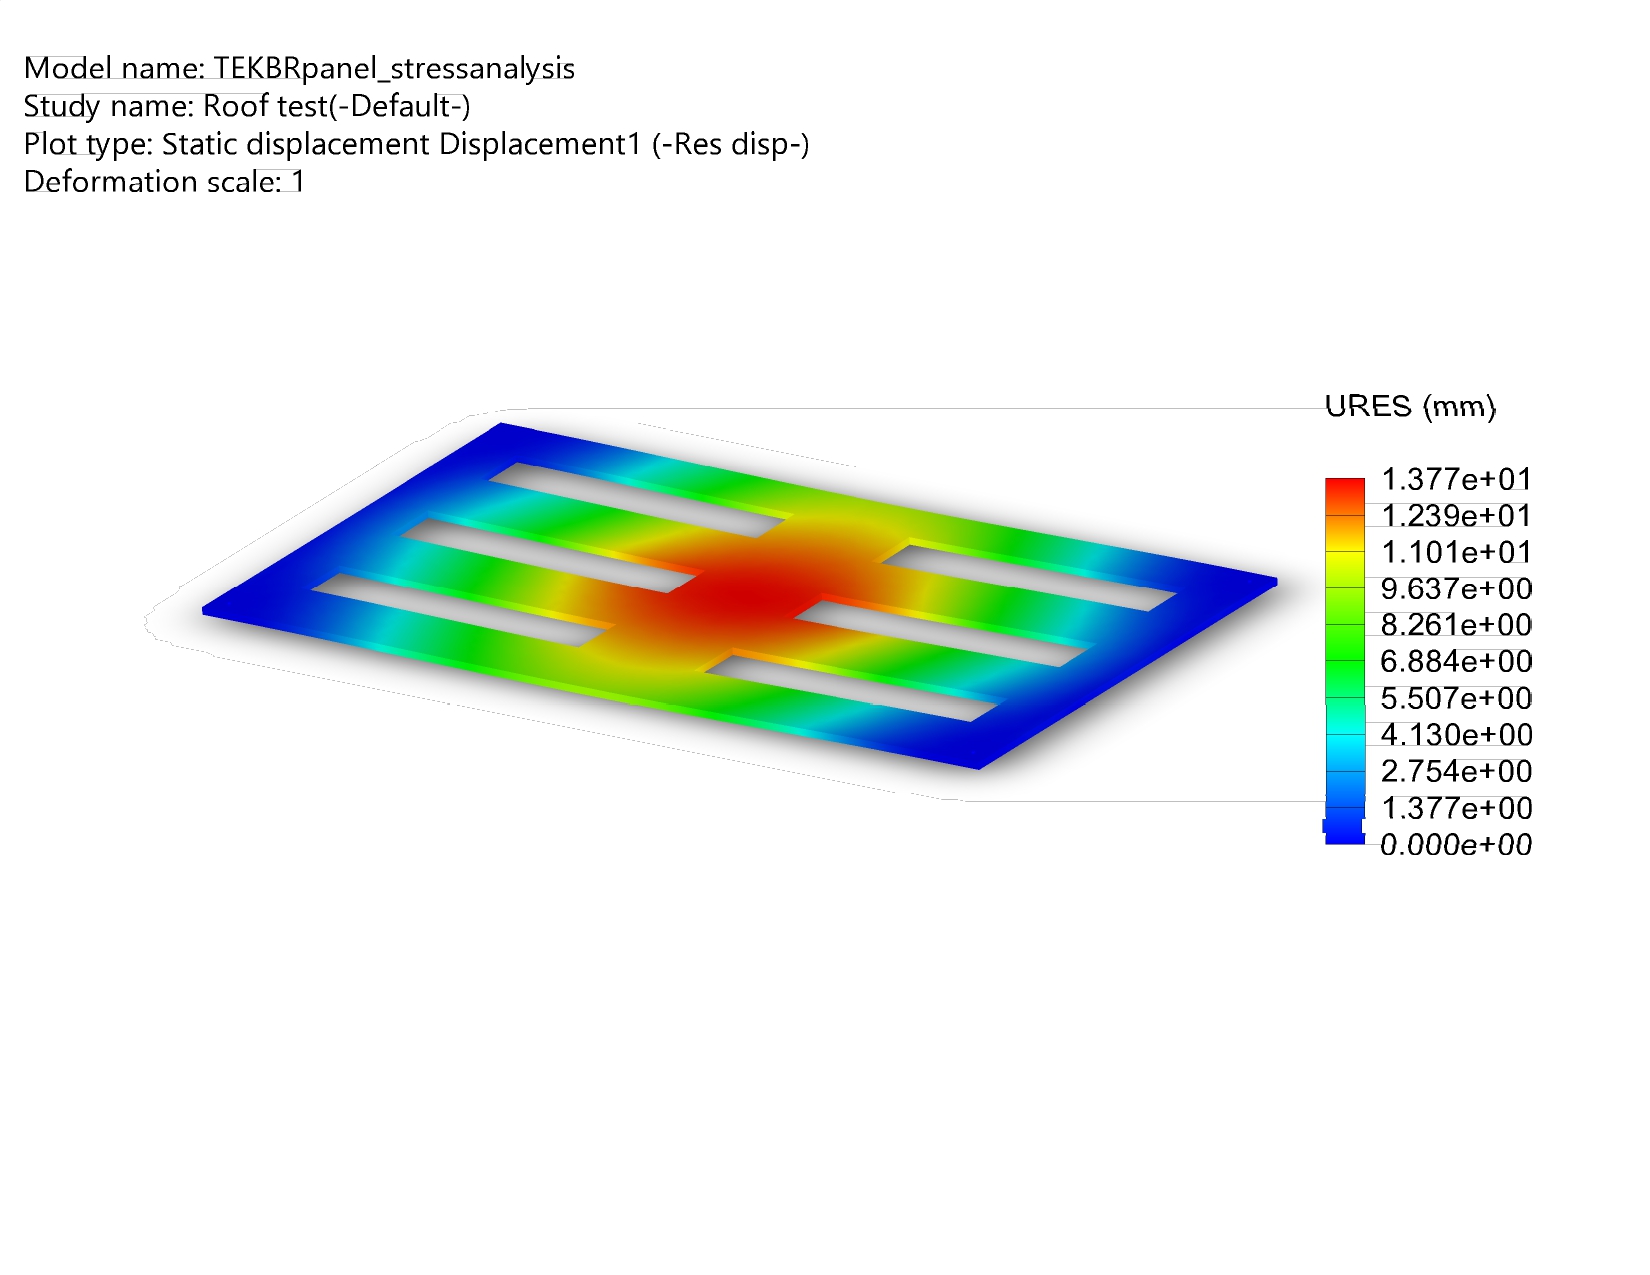
The first analysis we did was for the roof, as we know the child will jump on top of things if left unsupervised. We calculated the force of a 200 pound person jumping and applied the force to a 10 square inch area in the middle of the roof to simulate the most stress. The max displacement was 13.77 mm, which does not cause any problems with the integrity of the bed. This simulation was done in SOLIDWORKS using material properties found online for pine wood. Pine Wood Properties
Engineering Analysis 2
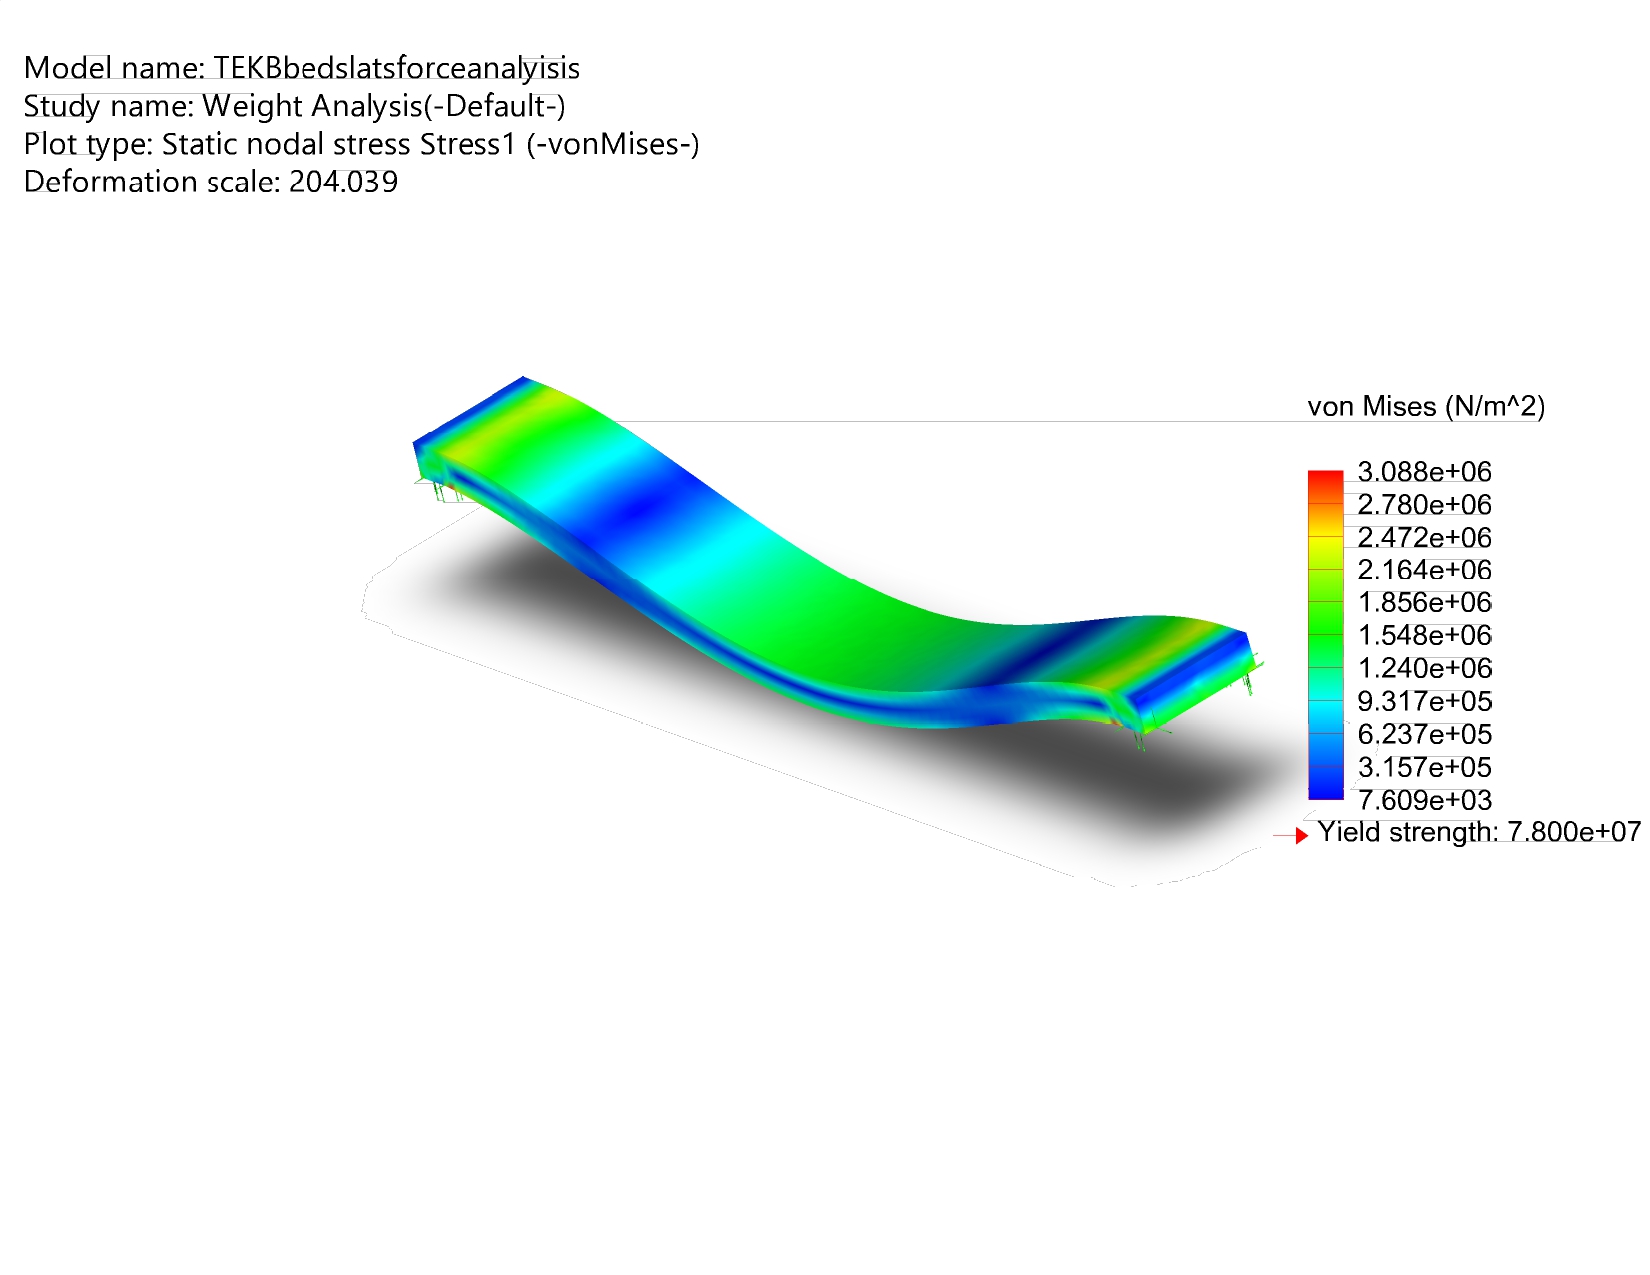
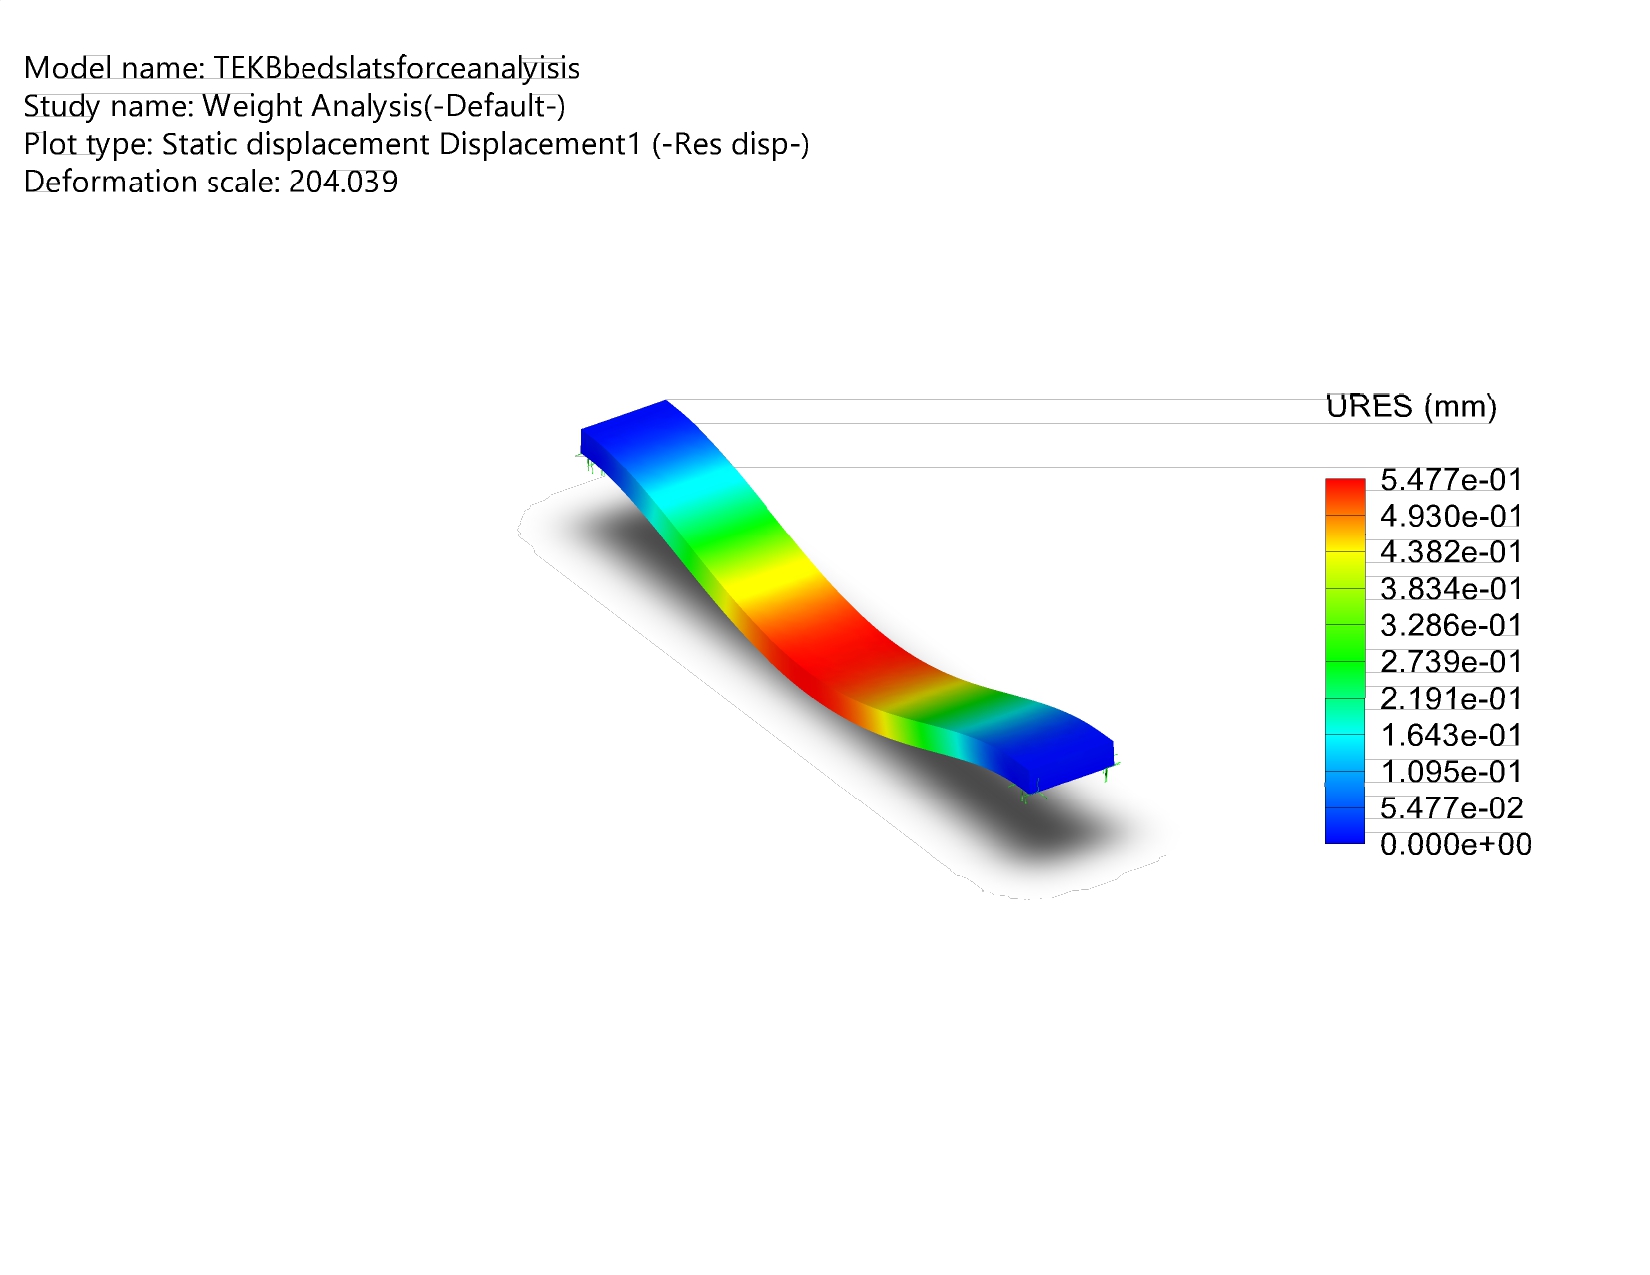
The second analysis that we did was for the bed slats that would be installed in the bed. These slats would be 2×6 boards so that they have the capacity to carry a lot of weight. The deformation when 250 pounds of force was exerted on even one slot was close to half a millimeter, so the size of these boards is far beyond the requirement to hold the necessary weight. This simulation was done in SOLIDWORKS using material properties found online for pine wood. Pine Wood Properties
Engineering Analysis 3
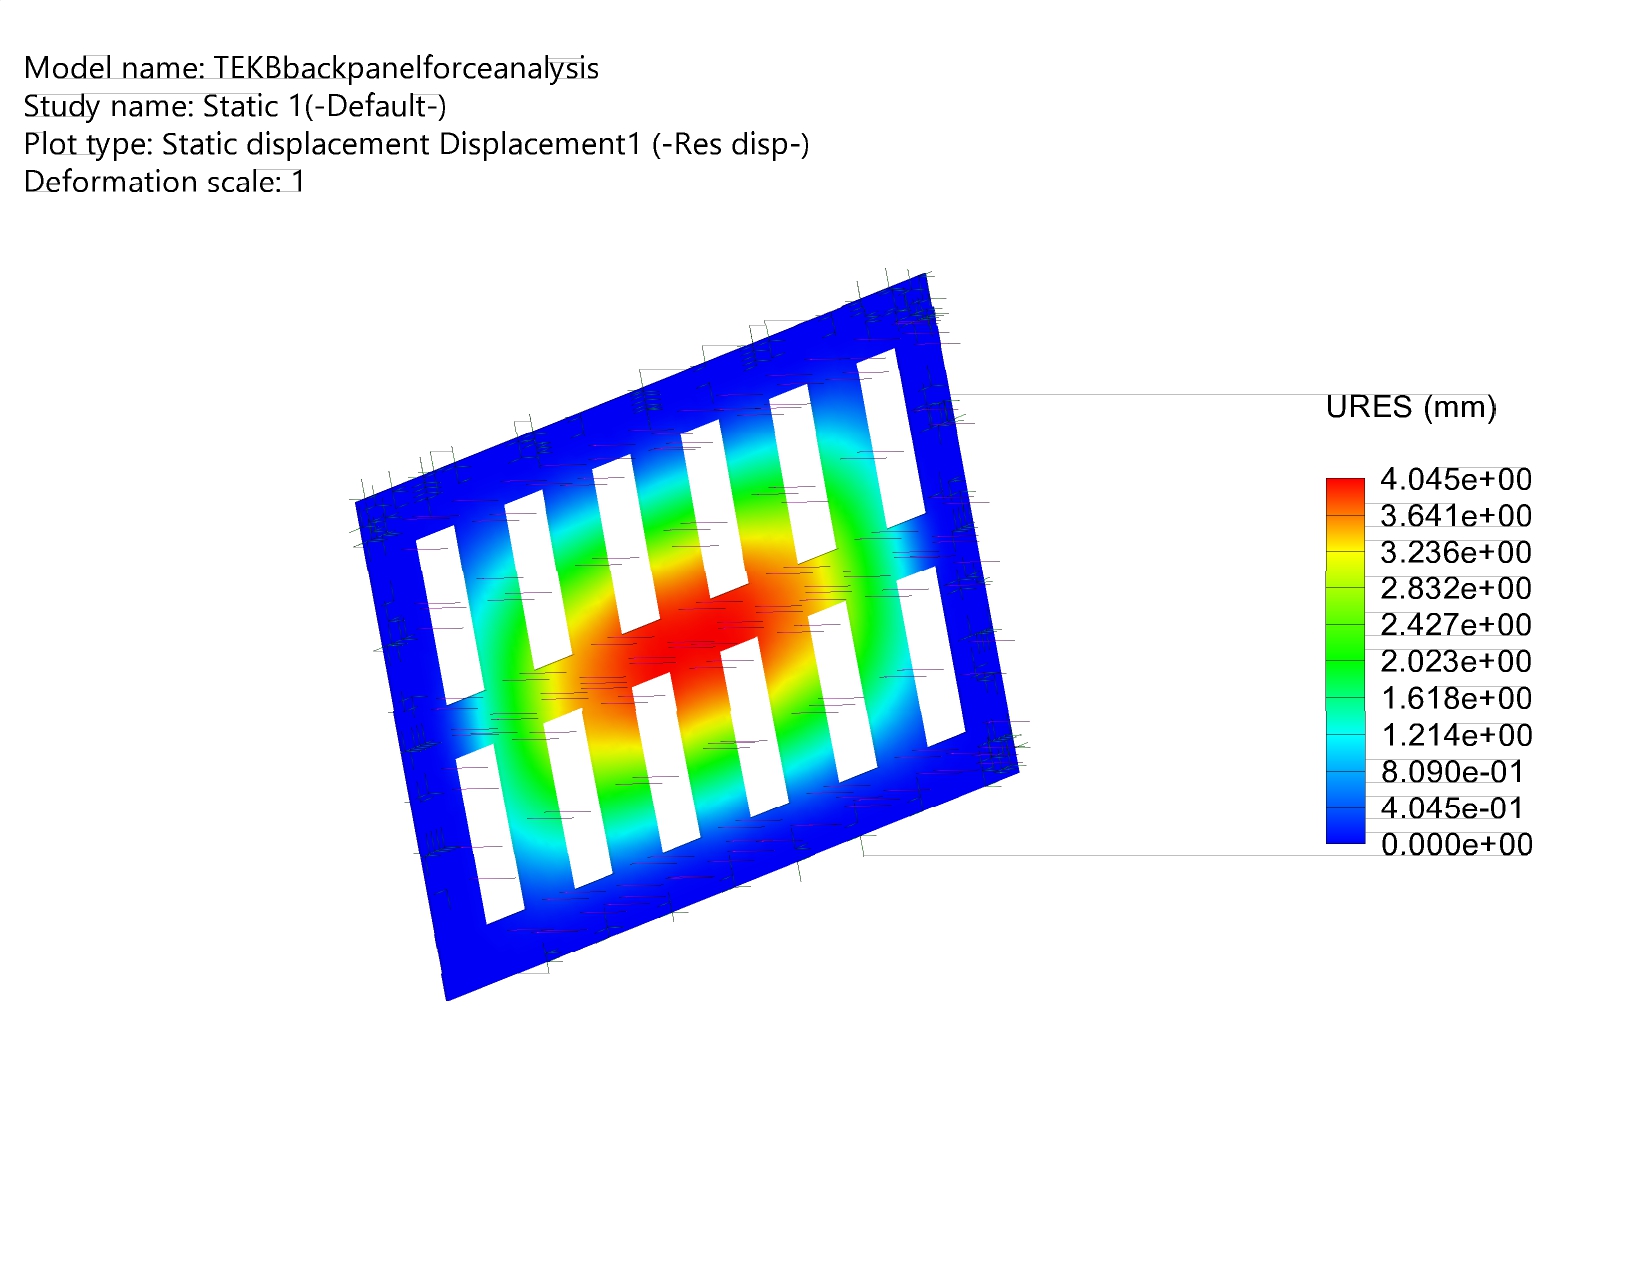
The third analysis we did was for the back wall, as the child may try to push or pull on it when bored or agitated. A force of 250 pounds was used to simulate the child applying all of their strength to it, and the wall only deformed around 4 mm. This simulation was done in SOLIDWORKS using material properties found online for pine wood. Pine Wood Properties
The design process for the bed was primarily composed of woodworking, which involved cutting and assembling supporting beams and posts, then cutting plywood to fit to the outside and inside to create the appearance of a train. After that, the bed was painted and decals were added to further enhance the appearance and likeness of a train.
Steps:
Cut corner posts and supports to go between that form the shape and set the dimensions of the bed
Build the frame for the drawers
Build the frame of the swinging door
Cut and install more supporting beams in preparation for the addition of plywood
Cut and install plywood to all outside surfaces
Install plywood to swinging door and modify so that the door does not catch and can operate without excessive force
Build and install drawers
Further build supports to make drawers sturdy
Install plywood to inside to create a safer construction for the child
Apply paint
Add decals
Video Overview:
Completed Design Photos
Instructions for Safe Use
Everyday Use:
This bed uses a sliding metal grate door that if used improperly could cause harm. Each time this door is opened or closed, a parent or guardian MUST be present.
To close the door, slide the door inside the track until it reaches the gate latch and latch the door into place. If so desired, the lock may be used to prevent the door from being opened.
To open the door, unlock the door and unlatch the latch. Slide the door inside the track until fully opened. The gate can be swing outward to accommodate the user with more room to reach inside the bed.
Swinging Door Use:
This bed is equipped with a swinging door that can be used to help allow more space when more demanding tasks such as changing the sheets or cleaning the bed is required. To open this door, push the pin down and turn to unlock to allow the pin to fully rise out of the hole. The door is now unlocked and is able to swing open.
To close the door, push the door back to its closed position and push the pin down all the way and rotate to lock the pin in the downward position.
Assembly and Disassembly:
Disassembly Steps:
Remove both rear panels by removing all hex bolts
Find all of the metal “L” brackets between the two posts of the bed across the long sides of the bed
Unscrew all screws from the posts on all “L” brackets keeping the screws in a safe location
Similarly, find all “L” brackets on the front side of the bed and do the same
The bed should come apart in pieces, with the pieces being: the top, the front, the back, the drawer assembly, and the supporting beams
Assembly:
This process is the reverse of the disassembly process, so the components must be assembled and then fastened together.
Assemble ends together first by fastening the drawer assembly and supporting posts together
The top piece can now be installed and fastened
After this, the back pieces can now be reinstalled.
Project Summary/Reflection
This project was very enlightening for all of us and provided an opportunity for us to learn the processes and techniques that go into the engineering process. We all feel that we came away with many new skills and were also grateful for the opportunity to do something beneficial for the community while also allowing us to learn crucial skills from.
As a team, the end product that we arrived at was very different than what we had originally pictured. As we worked, we learned how to do certain things in a more efficient manner as well as how some things were possible on paper, but not in real life. We had a few hurdles like this in the fabrication process that forced us to change our design, but overall the project idea remained the same.
Lastly, we would like to how our appreciation to Dr. Stephen Canfield, Jeff Randolph, and Chris Mills for their support, as without them, this project and the program as a whole would not be possible. We highly appreciate the opportunity to work with the above people and family of the child this was designed for, as well as the program that allows us to find and create solutions for these unique circumstances.


