The family we are working with has a child at the age of 2 with underdeveloped lower body muscles. The goal is to find a way to grow her lower body muscles with a design that will also benefit her as an enjoyable, fun activity. The design must be capable of increasing difficulty as her muscles grow, as well as increasing in size as her muscles grow. Stability is a need, and due to the area they live in, a more permanent structure would be preferred. There is also a level of unevenness in the yard the project will be placed on to take into consideration.
We will need to create or alternate a product to grow and develop a 2 year old girl’s lower body muscles. The project will need to be safe and to permit room for her to grow and still be able to use it. Because she is so young it will need to be fun and interactive. If the project will be placed outside it needs to be secure in the ground so it can not be taken and consideration of a track will need to be made if the project is to move due to the unevenness of the yard.
Safe, can grow with the child for at least two years in size and difficulty, interactive, works lower body muscles, if outside it will need something to run on due to uneven ground.
1. Stationary Bike: The well known stationary bike held in almost any gym would meet the requirements needed in the fact that it can adjust due to growth in legs, and adjust in resistance level. However, This may be lacking in the “fun” factor for a 2 year old girl.
2. Tri-cycle: A tri-cycle would add in to the “fun” factor, but lack in the resistance increase needed, and also lack in the ability to grow with the child. We would also have to take into consideration the unlevel yard and possible un-sturdiness of the design.
3. Mountain Bike: This was brought up for the need for resistance. Due to the gears allowing for the difficulty of pedaling to be altered. This would not work on its own as it is not safe enough.
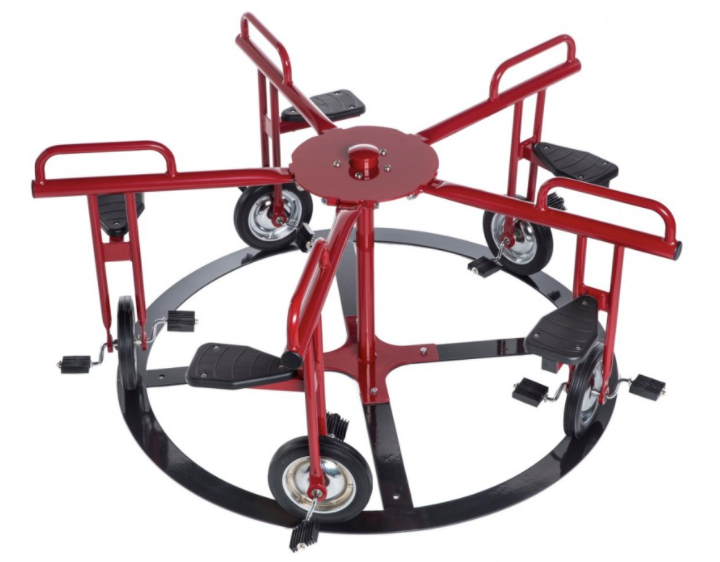
4. Paddle Merry-go-round: This was one of the other options we have produced after hearing the other group go. The ideal is great in the aspect of her being able to go as fast as she would like with the minimum amount of resistance. Also, with this design her siblings could push it if it is too hard to operate in the beginning and as she gets stronger it will become easier. The flaw is that it’s stationary and could get boring really fast.


Adapted 4 Wheel Bike: For this design we would first need to look into creating a leveled “track” for the bike to run on in the yard. We could accomplish this by constructing an adopted form of a railroad track for the bike to ride on and be attached to. We could also simply add a concrete trail with a form of railings on the sides. After the track is created we could add a section where different levels of weights can be added onto the bike. The different levels of weights would create different levels of resistance that can be added as leg strength increases. Similar to the resistance bike we will add sliding adjustments to the seat to give the design room to grow with the child. Finally, there will be a harness for added stability to the child’s body.
Marry-Go-Round Bike: With this design we could make some alterations to the gearing to add resistance to a single bike on the marry go round. We would need to find a way to be able to adjust the resistance and we would need to alter all the seats to be adjustive. This design she could have fun with her siblings while working on her lower body muscles.
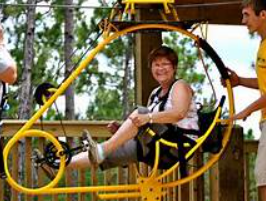
A zipline suspended 4-wheel bike: Due to the issue of the uneven ground and needing a track for the bike to go on, we could eliminate all this problems by bringing the bike in the air. This would also be much easier to adjust the resistance and it has a large fun and cool factor. However, safety is a priority so we would need to work very hard on making sure there are no problems with our design before dropping it off to the family.

Originally, we first chose the zipline thinking we could make that the most effective and fun design, after some leadership from our head engineer, Dr. Canfield, we decided to go with the marry go round route. Unfortunately, the company we were working with ended up not being able to provide us with the parts we needed to successfully complete our marry-go-round design. Because this set back was made so close to the end of the semester (giving us a little over 2 weeks to make a new design, get the parts, and produce a project), we had to scale down the creativity of the project. The final design we chose to submit to our family is a bicycle that we will add a platform to to make it stationary. To stimulate the child to pedal we will attach a sensor that is programed to detect movement on a 10 second interval. The 10 second interval will ensure that it does abruptly turn off if she stops for less than 10 seconds. This sensor will be wired to a small tv that is attached to the bike and a DVD player that plays some of the child’s favorite movies (Moana, Trolls, ect). To watch the movie the child must be pedaling. The bike is also made to be adjustable and can fit ages 2-4. All of the connections are also made for relatively easy removal so that even after the child out grows the need for the movie-bike she can remove the add-ons and have just a normal child’s bike.
Because we have had multiple “selected designs” we have added work made for other designs. For example, our 3 engineering analysis are made for the zipline, and because we had so little time to work on the actual bike we do not have much background research on our bike design.
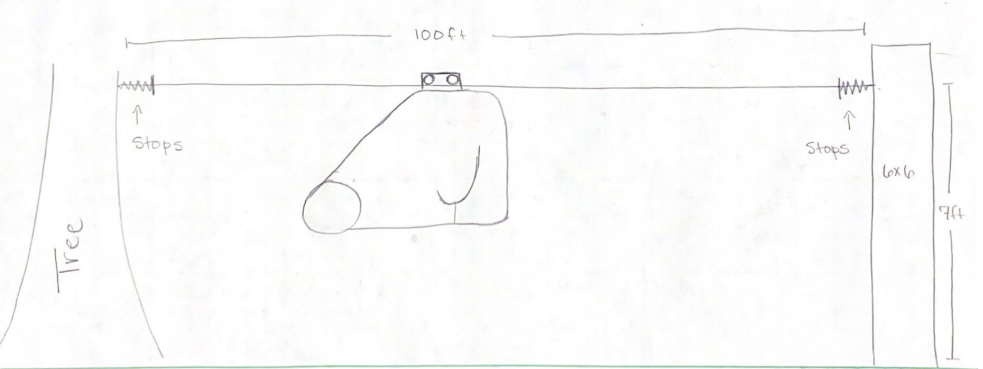
The first engineering analysis we did for the zipline was to determine how much tension was needed in the wire to keep the bike from drooping too low to the ground.
For the stand we added an extension to the bolts already on back wheel, this extension lifted the back wheel slightly and gave it a stand to sit up straight on. By slightly suspending the back wheel we transformed the entire bike into a stationary bike. Next we added an extension to the front of the bike at the handles. This second extension has our TV mounted to it and our DVD player was attached by velcro it for easy removal. For the sensor we first coded it to see white and black but the tv was losing power whenever the colors switched. We didn’t want that so we altered the code to make the tv stay powered on whenever there was a change in color. It takes 14 seconds for the TV to shut off without any movement. At first we were going to use white tape on the bike so that the IR sensor could sense the change in color but it was too easy to peel off so we spray painted it. After painting parts of the tire white, the code worked exactly how we wanted it. To mount the electrical components onto the bike, we housed them in a basic pencil box and drilled holes for the power wires to go through. To end the fabrication process we filed all the rough and sharp edges by the pedals for Rosalie’s safety and we zip-tied all the loose wires on the bike.
When first running everything we discovered a hiccup in our code leading the bike to turn off when seeing the color black, when we wanted it to stay on when seeing white and black. We did a slight adjustment to our code and got the bike running to where after about 14 seconds of not seeing both colors the TV would turn off. We then added some more permanent color change to our tires by painting parts of the tire white. Finally, we added more safety by filing down some sharp corners and by covering up the section with all the wires with a strong, clear piece of plastic.


First plug the bike into the wall and then get on the bike and begin to petal. The design is not made for ages 5 and older. Once pedaling the sensor will begin to blink and the TV will turn on momentarily. If you stop pedaling you will have 14 seconds to resume before the TV turns off.
In conclusion, this was a very hard but fulfilling project. Our group was given many curve balls that I’m sure we will see once again in the real world with manufactured projects not coming in when expected, or really ever at all. We learned how to problem solve and come up with creative ideas decently quickly. Our family was very happy with out final design and we were as well.

