Warning: parse_url() expects parameter 1 to be string, array given in /home/mechengineering/www/www/wp-includes/media.php on line 5483

Warning: strpos() expects parameter 1 to be string, array given in /home/mechengineering/www/www/wp-includes/compat.php on line 520

Warning: parse_url() expects parameter 1 to be string, array given in /home/mechengineering/www/www/wp-includes/media.php on line 5483

Warning: strpos() expects parameter 1 to be string, array given in /home/mechengineering/www/www/wp-includes/compat.php on line 520

Warning: parse_url() expects parameter 1 to be string, array given in /home/mechengineering/www/www/wp-includes/media.php on line 5483

Warning: strpos() expects parameter 1 to be string, array given in /home/mechengineering/www/www/wp-includes/compat.php on line 520

Warning: parse_url() expects parameter 1 to be string, array given in /home/mechengineering/www/www/wp-includes/media.php on line 5483

Warning: strpos() expects parameter 1 to be string, array given in /home/mechengineering/www/www/wp-includes/compat.php on line 520

Project 05: Compact Sensory Table

Abstract

The goal of the group is to create a compact sensory table that has multiple functions to help a young child who has mobility issues and possible autism.

Dawson Jones, Michael “Tate” Roberts, Brace Barber, Matthew “Matt” Evans, and Connor Hoffman.

Problem Statement

We were tasked with creating a compact sensory table for a young child who has limited speech, mobility, and possible autism. The table will be used to help calm the child and help with the mobility issues. The table will contain certain parts to help the parents move the table and change out the activities while keeping it child friendly. We must come up with the size of the table and some activities that we believe would best suit the child. It must be easy to access for the child while also keeping the child from making a mess or harming his/her self. The biggest part of this project is to make the table to where the child would want to play with the activities and have fun.

Design Specifications

We were asked to create a sensory table with the ability for the child to stand or sit in a chair while playing, locking wheels on the bottom for easy mobility, compartments on the interior of the table for kinetic sand and other items, and a lid that has different activities on either side. On one side of the lid, it was asked to add half LEGOs and half peg board. The other side could be some other kind of sensory activity.

Background Research

We already knew that we would need LEGOs and a peg board for the table. We started by looking into different sizes of LEGOs and pegs for these activities. We then looked into adding compartments to hold the kinetic sand and other items, such as the LEGOs and pegs. We also found other items that could be added to the table. There was many different sensory activities that the child could use. Many of these items were things that the child could feel, push, pull, or move around. These items will help the child with the motor skills while having a good time.

Concept Design 1

A basic rectangular table with multiple compartments for toys and other activities. The lid must be able to be flipped by the parent but not by the child. Their will also be wheels on the bottom of the table that can be locked. This design will be the easiest to make.

Concept Design 2

This is a circle table so that the child can reach the objects better at any position around the table. It also has compartments for toys and other activities. The lid will also need to be able to be flipped by the parent and not the child. There will also be locking wheels on the bottom. This design will be slightly harder than design 1.

Concept Design 3

This is a circular table that the child can sit in the center and reach anywhere on the table without having to move around. It will also have the compartments for toys and other activities. The lid will also need to be able to be flipped by the parent and not the child. The wheels will also be able to be locked on the bottom. This design is the hardest of the three designs.

Selected Concept Design

We decided to go with our original design, Design 1. This decision was influenced largely in part by the fact that our family requested this design in particular. We also decided that it would be the simplest design to do, which was also an important aspect we were looking for.

Decision Matrix

Overview of Selected Design

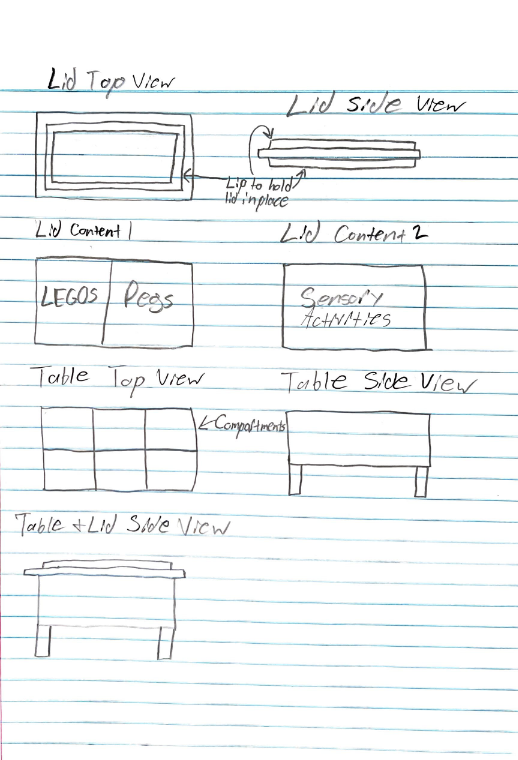
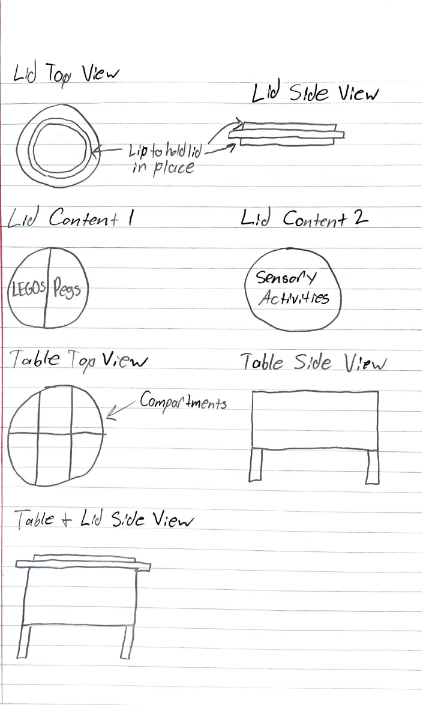
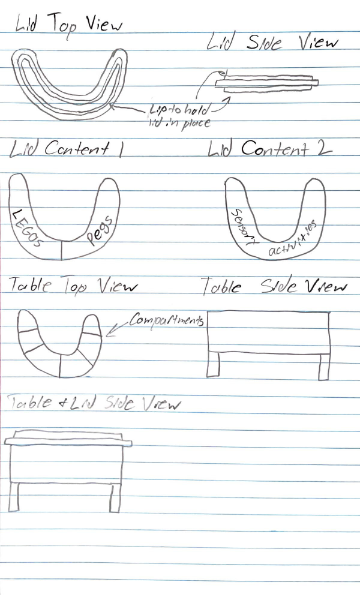
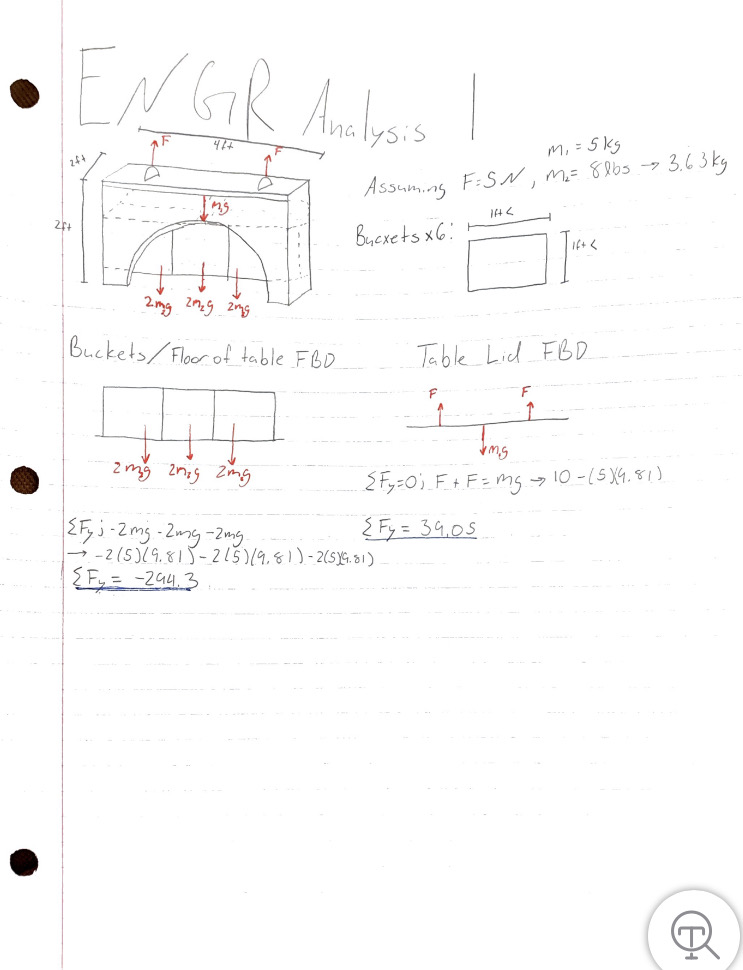
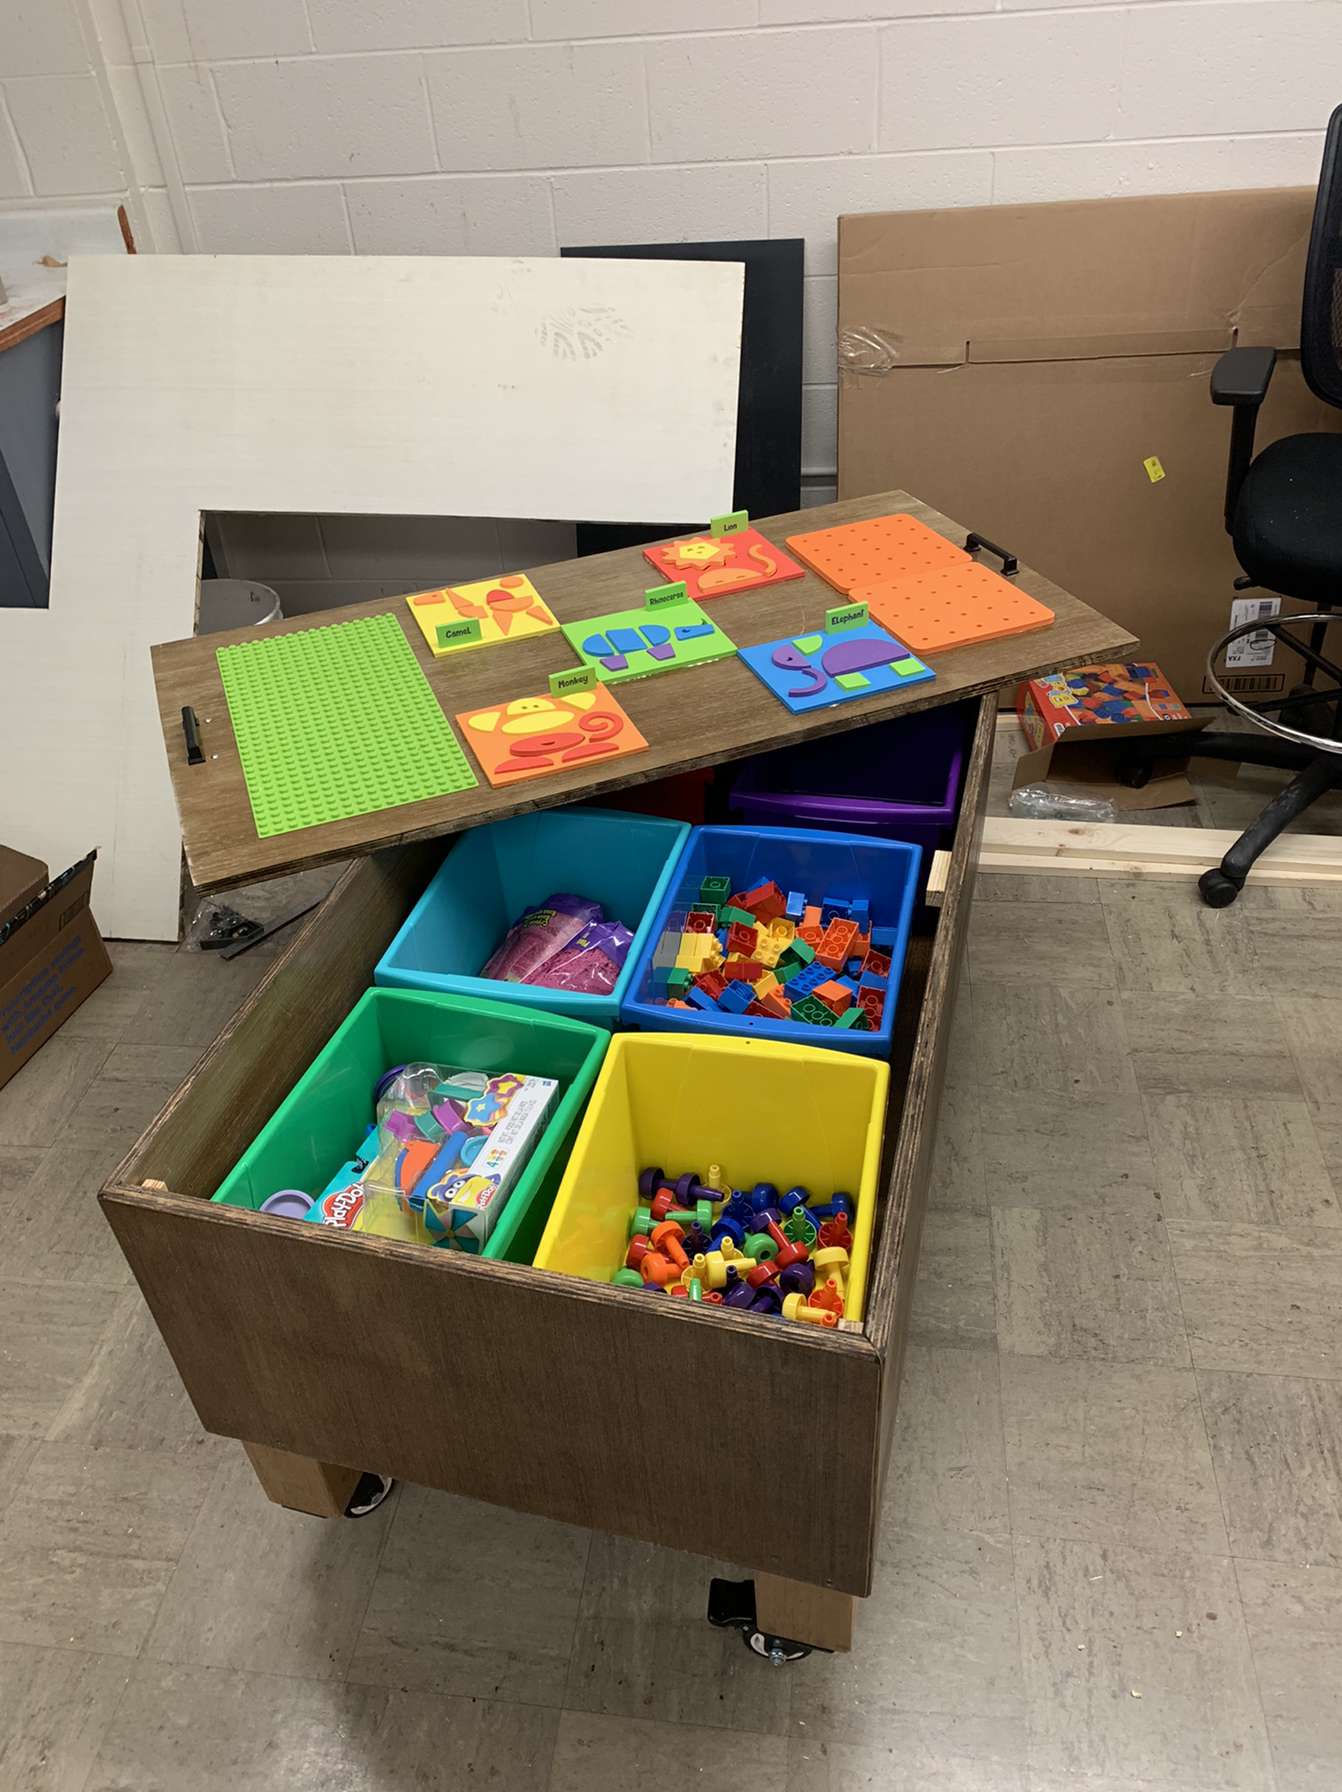
The design that was chosen was the simple rectangular table that stands two feet tall, two feet wide, four feet long. The table will have a compartment within the table allowing for six 1ft x 1ft bins capable of fitting several different types of sensory devices and tools. The table will have a 2ft by 4ft lid that will have more sensory devices attached to it on both sides of the lid. It will be able to slide out and be flipped around to utilize both sides. The sensory toys/devices include kinetic sand, water beads, Legos, a variety of fabrics, a pegboard and pegs, and a foam puzzle. Our final design did not really vary from the original concept due to the family being very specific on the design specifications.

Describe Design Details

The final major dimensions of the table will be 4ft long, 2ft wide, and 2ft tall. The other dimensions will be shown in the drawing. The interior will have 6 compartments to hold different activities or objects for the lid. The lid will be split into 2 parts on one side and 4 parts on the other to hold different activities. It will also have 2 handles so that the parents or therapist can easily flip the lid. We will also be adding doors to the side of the table to make it easy to access the compartments when the lid is on. The lid will have LEGOS and a peg board on one side and sensory activities for the child to touch and feel on the other. The compartments will have sensory activities, such as kinetic sand, water beads, LEGOS, and pegs. The bottom of the table will have wheels that can lock so the table can be moved easily when needed.

Engineering Analysis 1

We wanted to determine the forces that would be applied to our table and lid. The forces we focused on were from the six buckets and the force from someone pulling up on the lid handles. Our method was using the sum of forces formula in the y-direction. Results are shown in the image below.

CAD Drawings


Warning: parse_url() expects parameter 1 to be string, array given in /home/mechengineering/www/www/wp-includes/media.php on line 5483

Warning: strpos() expects parameter 1 to be string, array given in /home/mechengineering/www/www/wp-includes/compat.php on line 520

Bill of Materials

Document Fabrication Process

After acquiring our wood, we first started by making all of our measurements and marking the wood with a chalk line. We then took the wood into the shop where we used both the table saw and a circular saw to get our wood to the necessary parameters. Next, before assembling the table, we stained both sides of our wood. After the wood was stained, we put together the base of the table. Then, once we had the base, we simply attached the legs with a drill. After the legs were attached, we placed the wheels on the bottom of the legs.

Testing Results

We applied various loads to different segments of the table, which withstood all applied loads while showing no indication of yielding. We also checked to make sure that it was level and rolled with little to no effort.

Completed Design Photos

Instructions for Safe Use

Being a table, there aren’t too many safety concerns, but it is important to be careful when placing the lid and making sure to lock the wheels to keep the table in place.

Project Summary/Reflection

Our task was to design and construct a sensory table for a three year old girl that both her and her slightly older brother could enjoy. We were given most of the necessary parameters by the family, which cut down on a large part of the design and decision making. Throughout the entirety of the process, we held on to most of the same ideas. When moving in to the construction phase of the project, we made some design changes after taking into account how much work would go into certain decisions. Ultimately, our final design was very similar to our initial design, with some slight differences. Looking at our final product, we our happy with how it came out and feel that we adequately accomplished our task. There were a few design ideas that would have been cool to include, but were not time or cost-efficient enough to make the cut. We think that we made a table that delivers on the required tasks while also being more personalized than something from the nearest supermarket.

Semester

2022 Spring