This sensory water table is a project designed for a little girl diagnosed with cerebral palsy who loves to play with water. Her adoptive family’s desire was for this table to be a welcome and necessary means of entertainment and comfort for their daughter. It is equipped with many different interactive features in order to engage her motor skills and mind as advised by her therapist. Not only has our team learned more about mechanical design and engineering, but also we have embraced the opportunity to help others in need. We aim to create a water sensory table that the family will love and appreciate for many years.
Alexa Garrison, Colby Adams, Owen McCall, William Hashbarger, Tanner Palmer
Problem Statement
This water table engages the girl’s muscle strength and control. The nozzles and handrails will improve her grip strength as she picks up and plays with the toys on the table. This table is designed to adjust the height as she grows so that she can use it for many summers. She will develop more balance as well since she can walk around the table to access different parts of it.
Design Specifications
In speaking with the family, some design aspects that were necessary in order to properly accommodate their daughter and her lifestyle became apparent. The table would need to
have:
Support bars for her to hold herself upright with
Piping that would need to be able to withstand outside conditions
A run-off for water drainage
A basin for the water to collect and exit through
Weatherproofing to better handle the elements
Be able to be adjusted from a seated measured height of 2’8″ -3’4″
Regulate the pressure to safe parameters so she can enjoy her interactions with the table
Background Research
When looking into various designs for this project, there were many water tables for kids to collect ideas from. For the durability of this table, many of the common plastic toys did not seem to fit the needs of the table. Thus, we found alternatives that would be fun to play with and difficult to misplace. The adjustable waterproof and weatherproof legs for this table are another significant decision for safety and simplicity reasons. We concluded with a spring lock system that is easier to use and similar to a pin-through-legs mechanism.
Concept Design 1
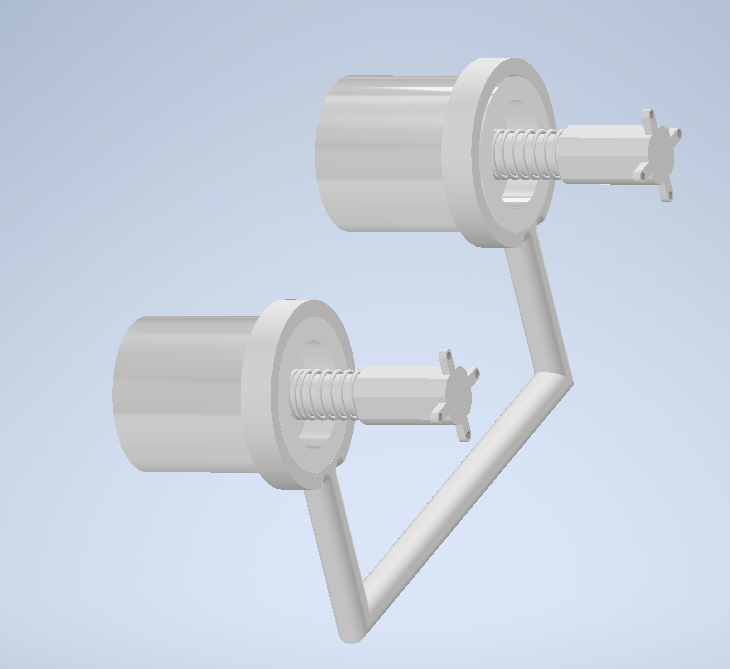
Spring Lock Table Top
A tabletop with two planks designed as walls and legs with holes bored to the matching diameter of the pegs. Two pegs are connected together through a handle and are centered on a rod with a spring in compression. The handles located on the underside of both ends of the table will be pulled inwards to compress the spring further and disengage the locking mechanism, allowing the tables height to be adjusted.
Pros:
Two-person mechanism
Difficult for accidents
Low center of mass
Stability
Cons:
No mechanical advantage to assist raising and lowering
Three to four predefined positions for the tabletop
Materials:
Either acrylic or polycarbonate plastic (table top/sides)
Aluminum (support frame/handles/rods/pegs)
Concept Design 2
Scissor Lift
Mechanical lift with wedge/incline movement.
Pros:
Constructed easily
No buckle movement
Cons:
Lack of lateral strength
Locked by pins
could easily be pulled out
Materials:
Metal
Concept Design 3
Hydraulic Lift
Hollow legs to accommodate a hydraulic cylinders and their lines that extend to the top.
Pros:
Compact and easier to operate
Hydraulics’ longevity
Cons:
Control unit or locking system
Hard to replace and fix
Fluid leaks
Materials:
Wood
Metal (hidden)
Selected Concept Design
The selected concept design is concept design 1. This design is the simplest, safest and most durable for the family to use when adjusting the table up and down.
Decision Matrix
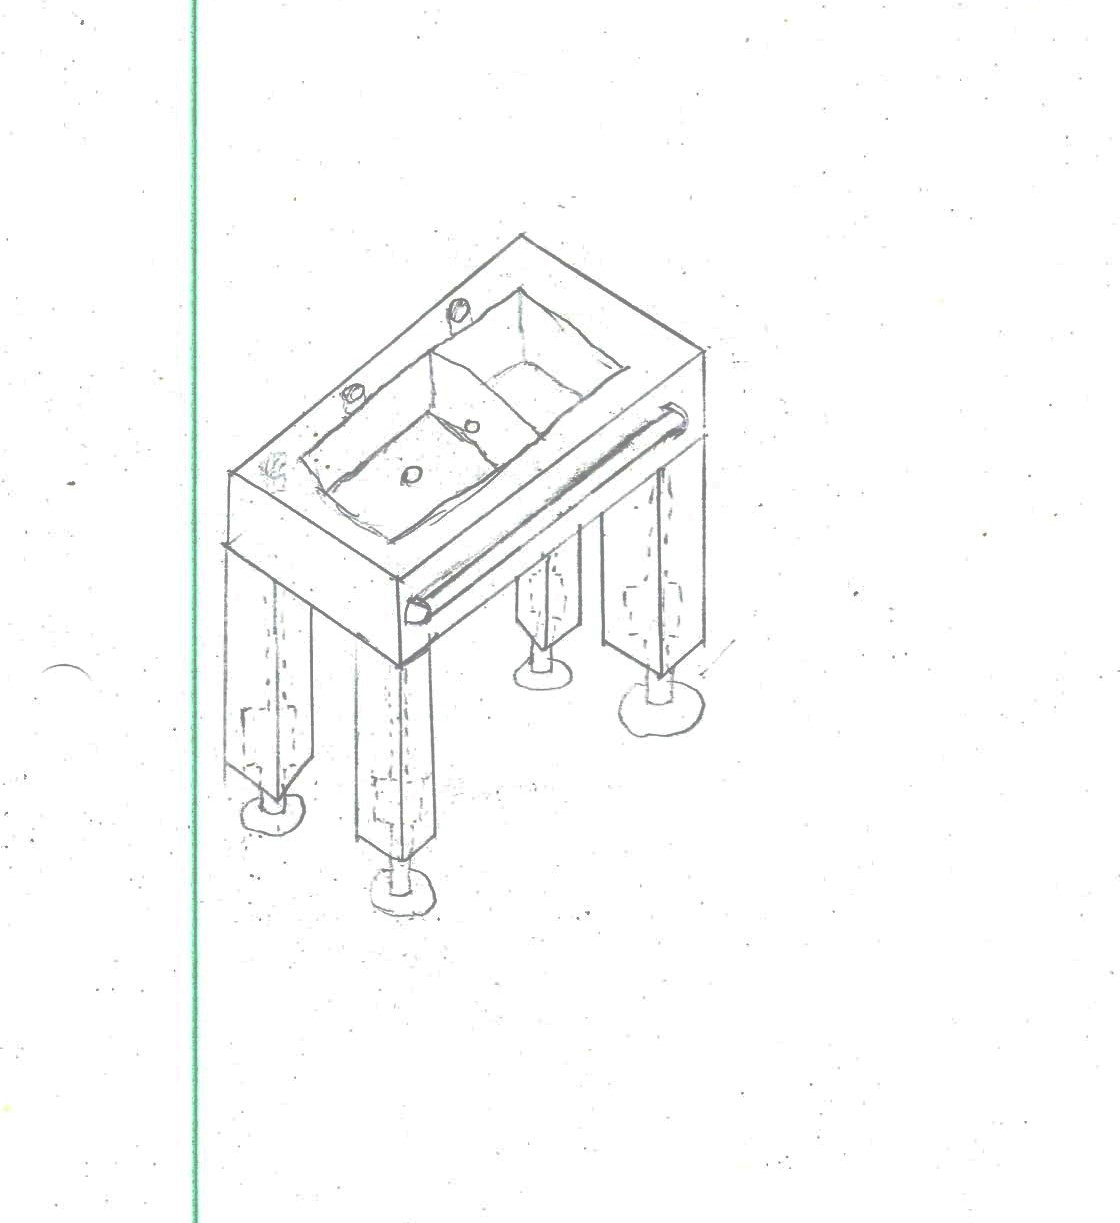
Overview of Selected Design
The water table is an all-inclusive play center. This table has many water toys, adjustable height, and the entire table is durable against weather all year.
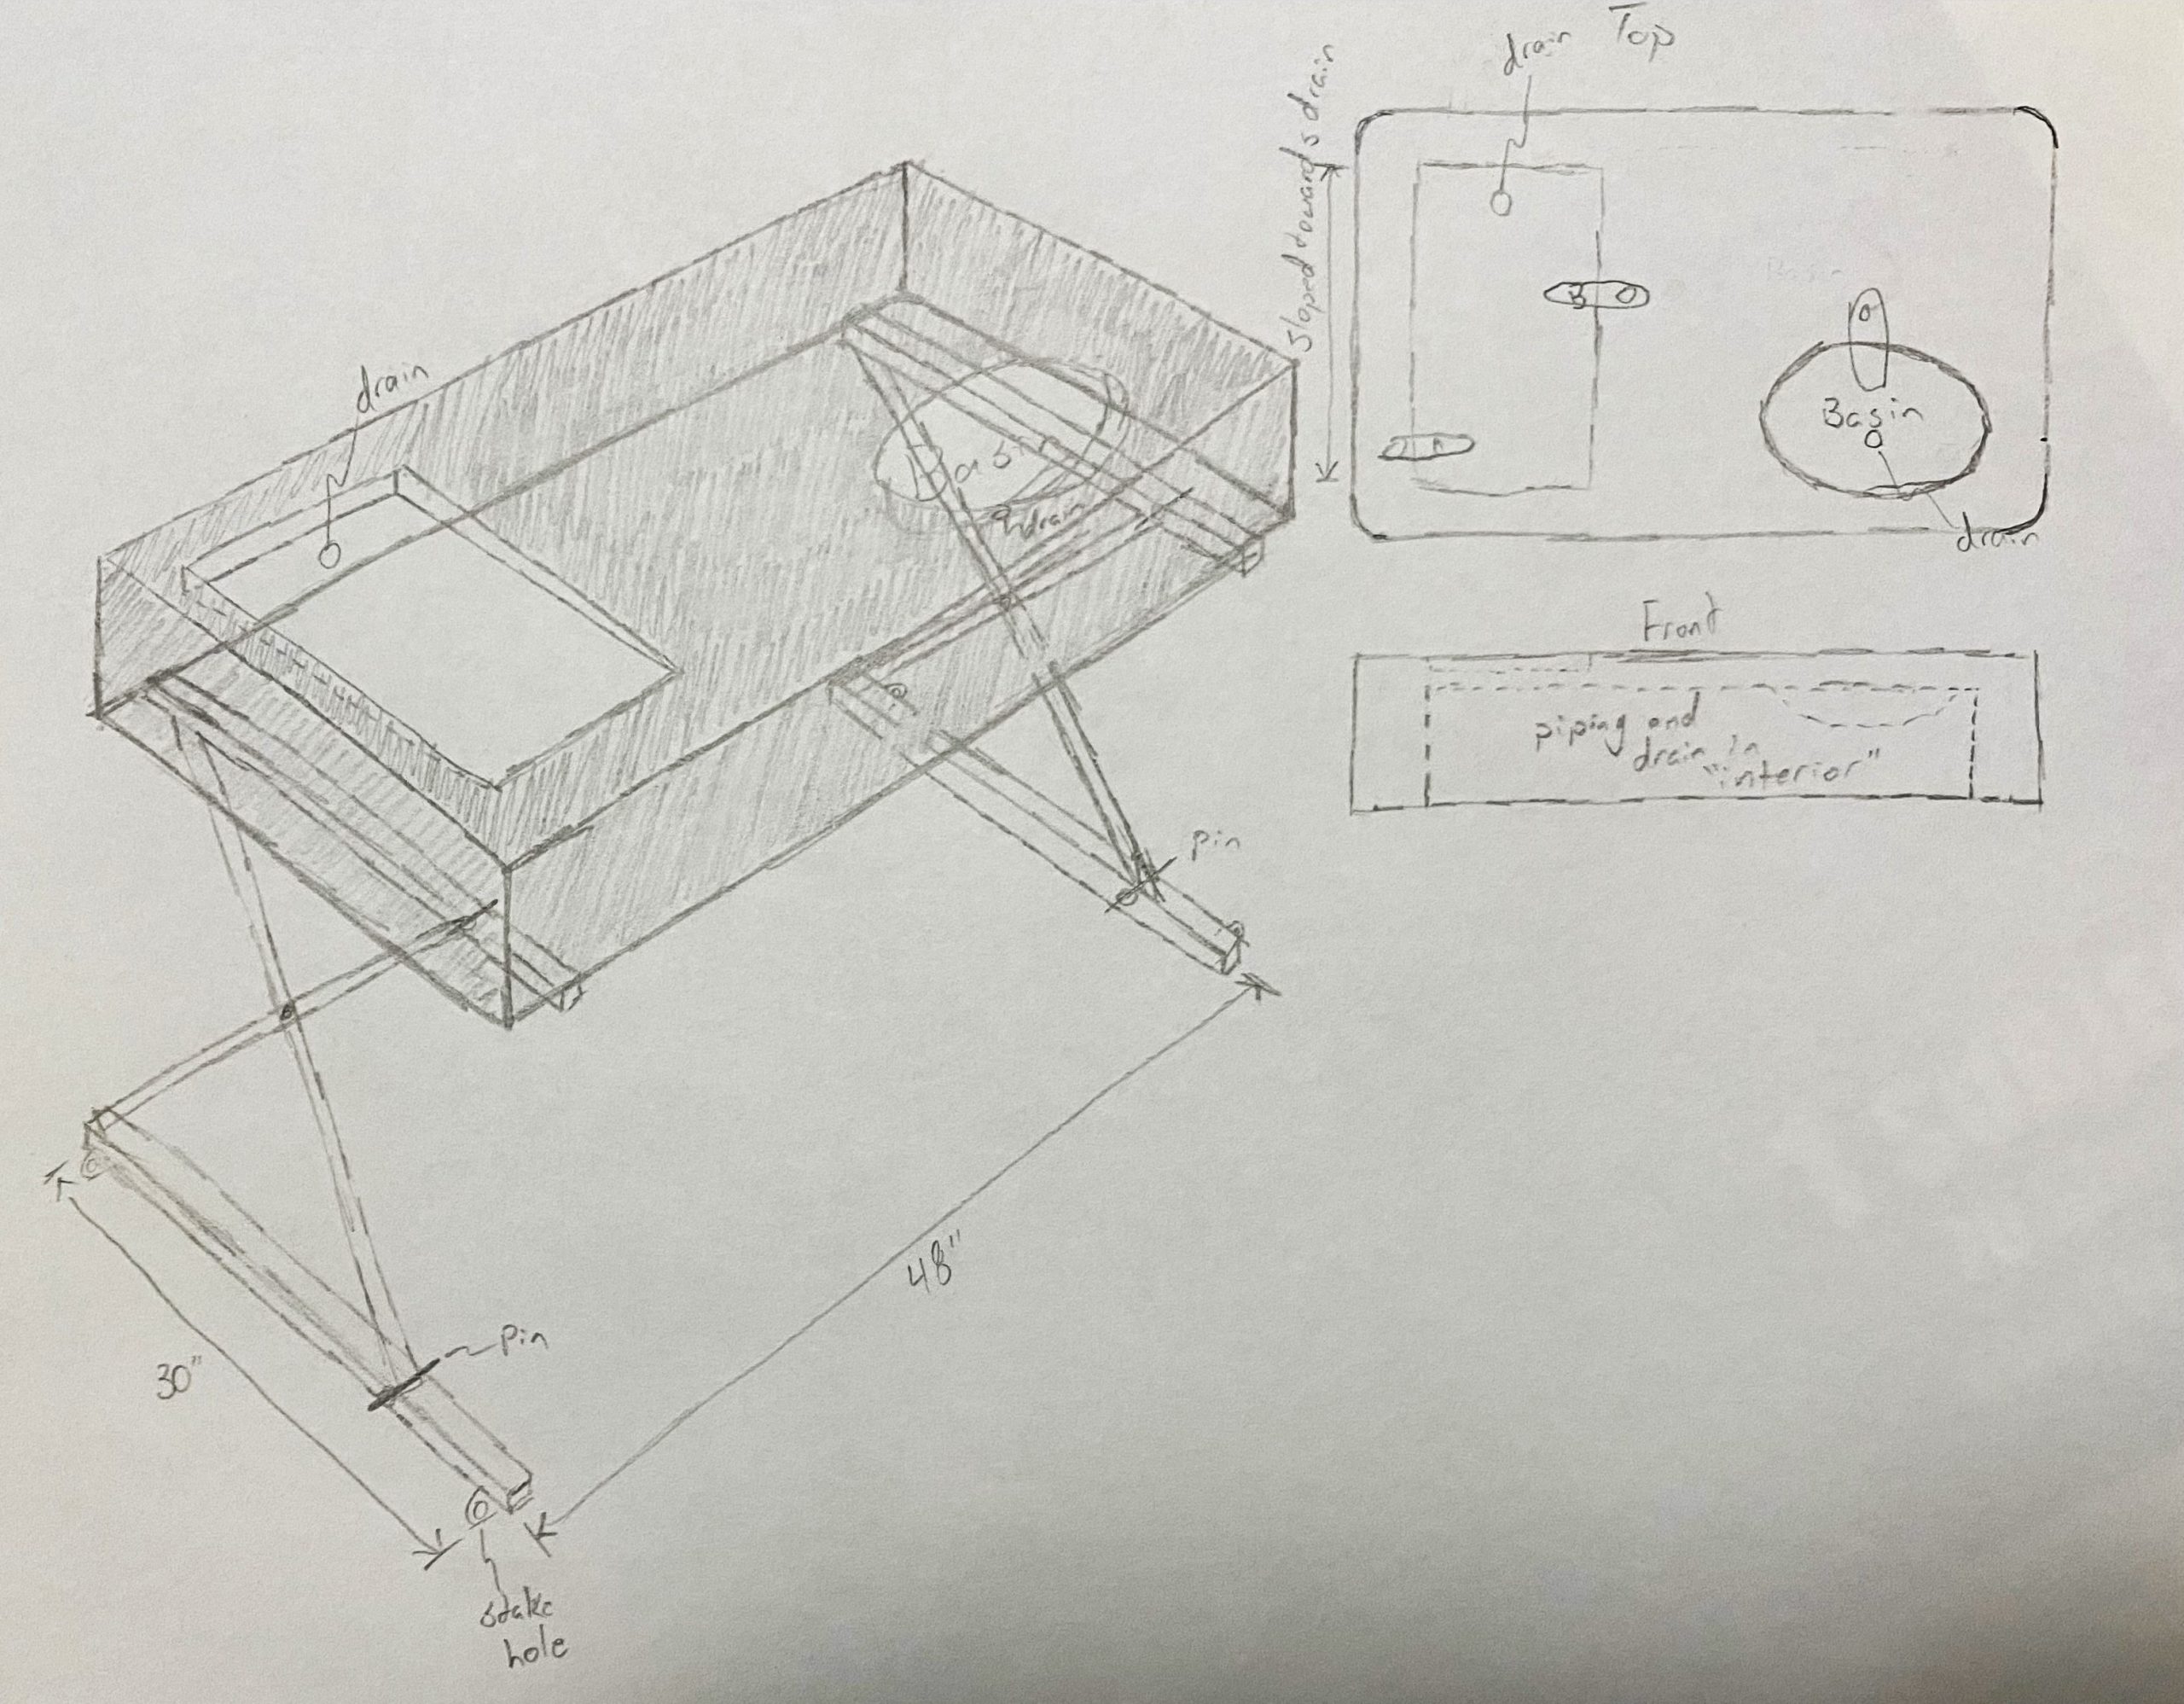
Describe Design Details
The water sensory table has multiple water features on top and adjustable height tabletop. The tabletop has a sink basin in the middle and the following features are planned for the edges of the table: water pitcher pump, bubbler, hand crank pump, and gas pump. A removable tray will have a toy waterslide and the water wheel toy while still allowing drainage to occur. The design of the table is intended for the parents to be able to operate the height adjustment capability while leaving it inoperable to their daughter. Hand rails will also be connected on all external faces of the table to allow added to support to allow their daughter increased mobility when using the table.
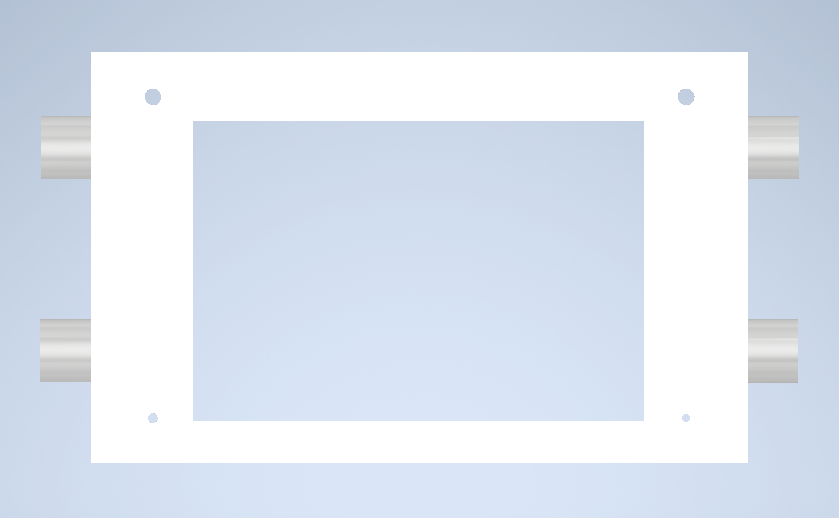
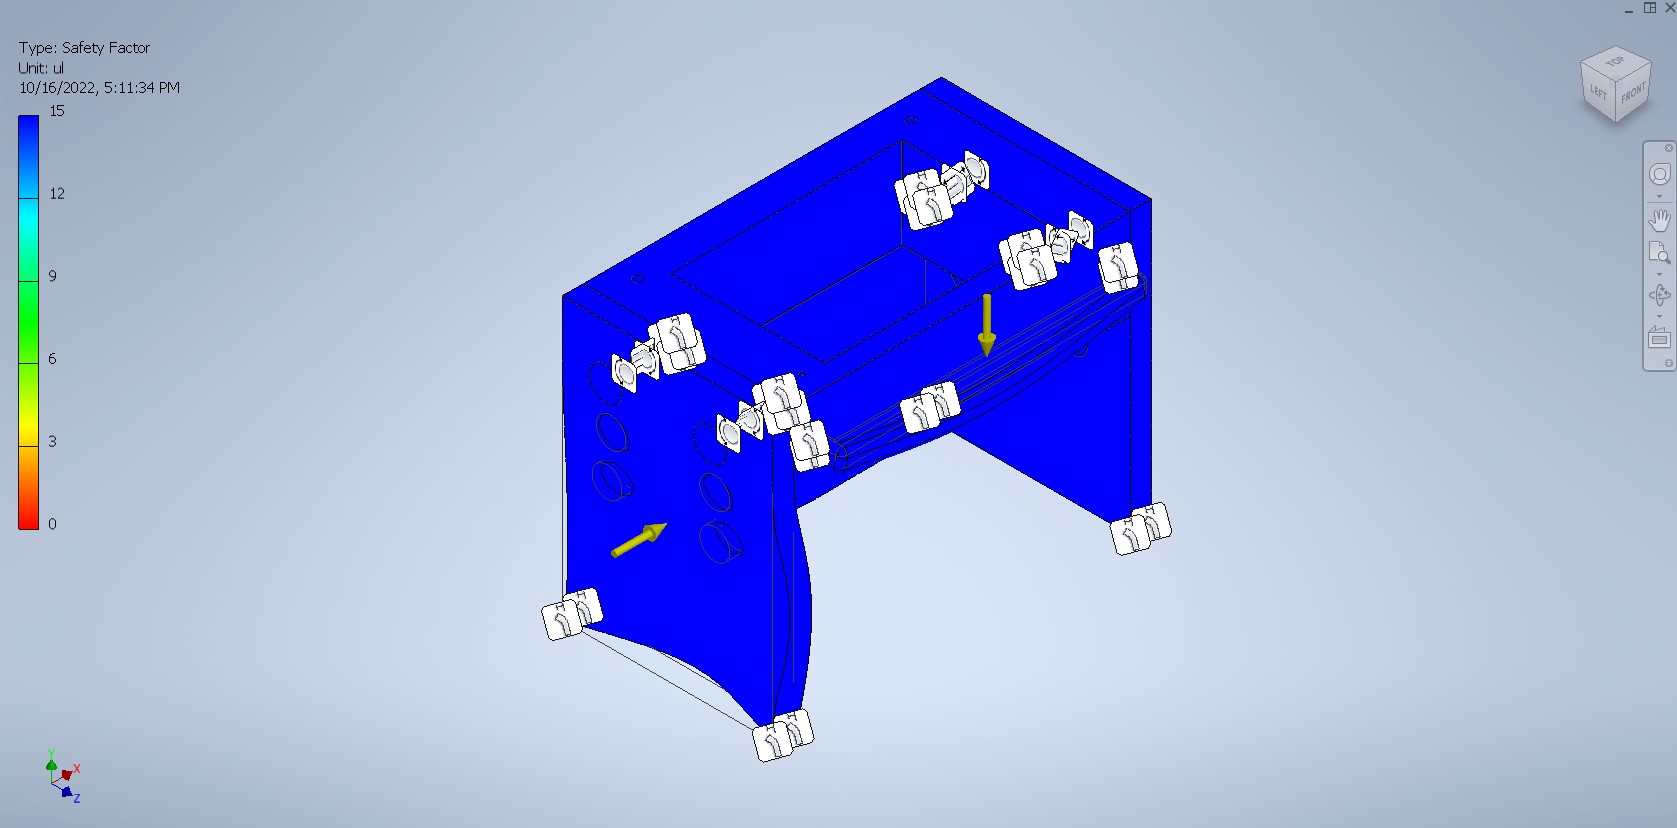
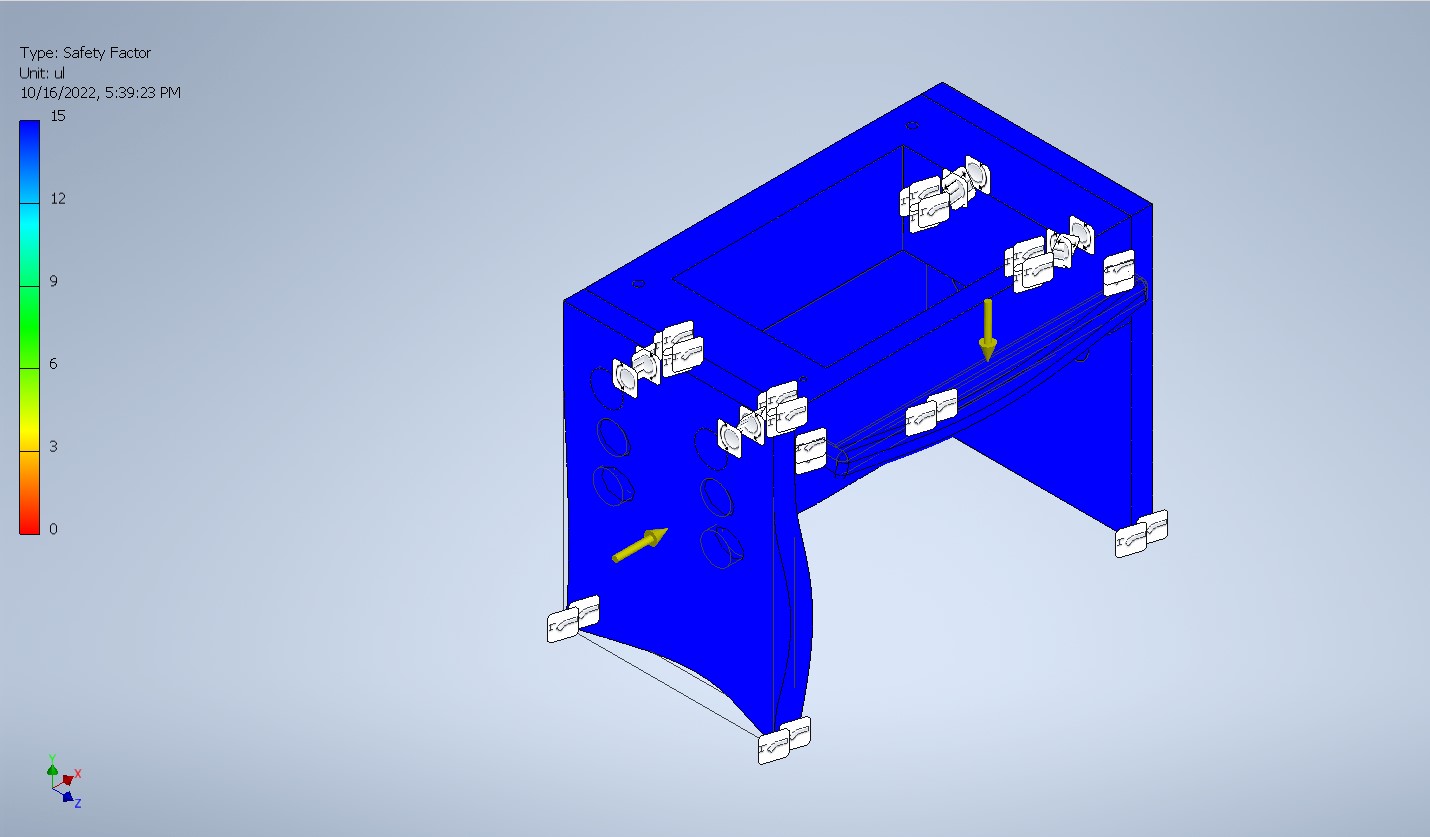
Engineering Analysis 1
The associated images are a analysis of the Von Mises stresses as well as factor of safety of this table design accounting for 100 lbf being applied to both the side of the table as well as directly downwards on the supporting handrail. The design does show a relatively effective means of distributing these stresses across the body to accommodate the forces applied and the entirety of the table maintains approximately a overall safety factor of 13.
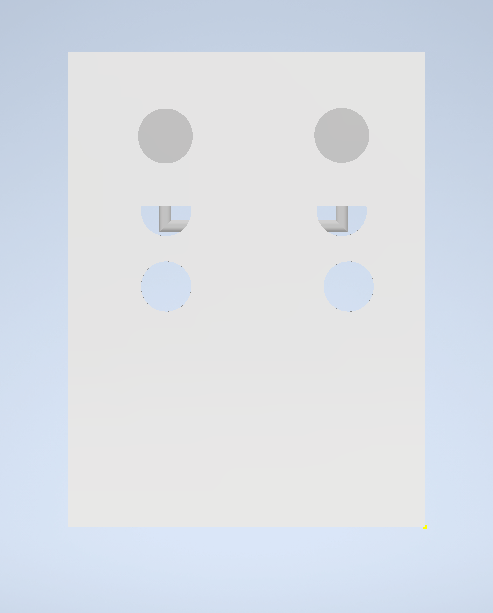
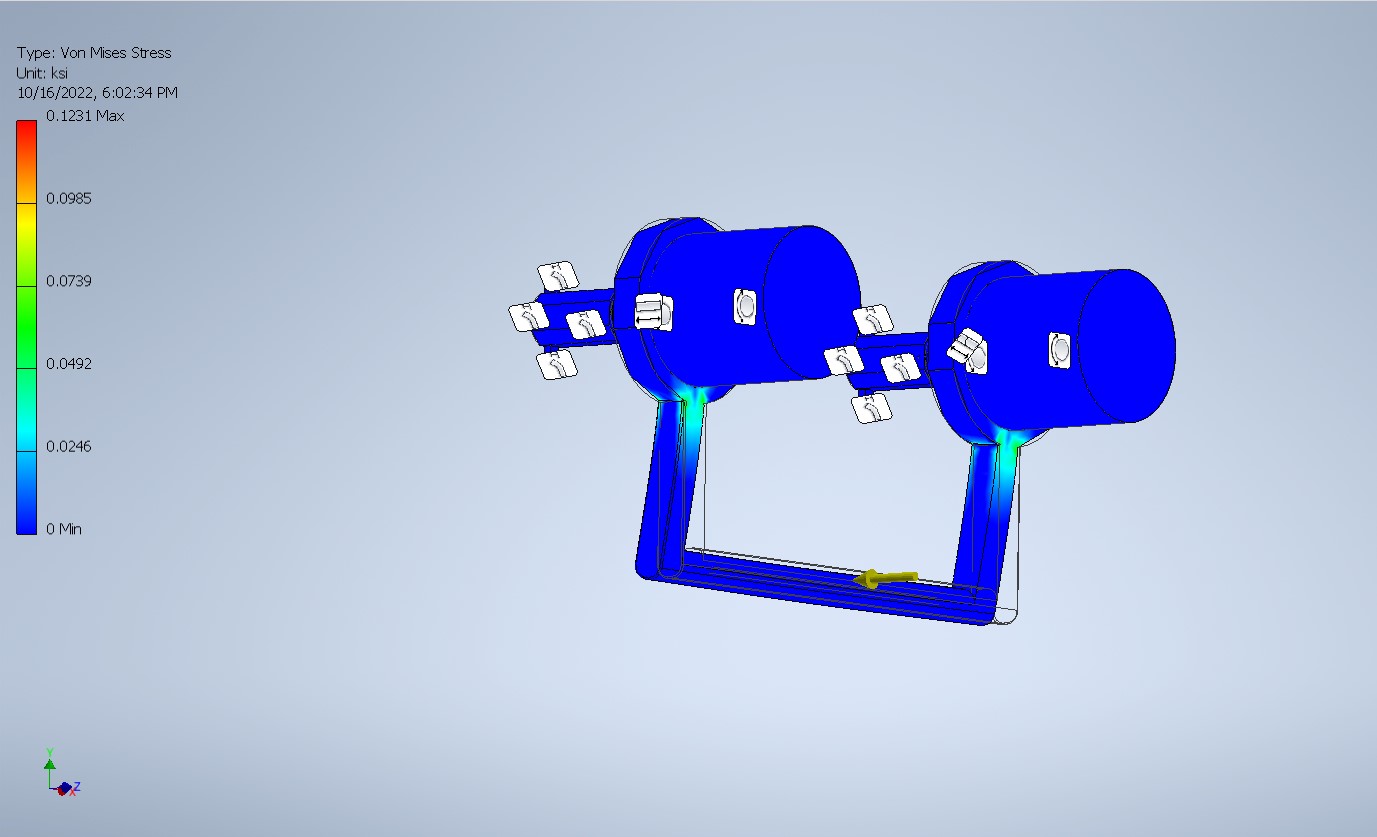
Engineering Analysis 2
The associated images are an analysis of the Von Mises stresses as well as factor of safety of the spring lock system itself accounting for 15 lbf being applied to the handle. The design shows an effective means of distributing these stresses across the body to accommodate the forces applied and the entirety of the lock system maintains approximately the overall safety factor of 12.
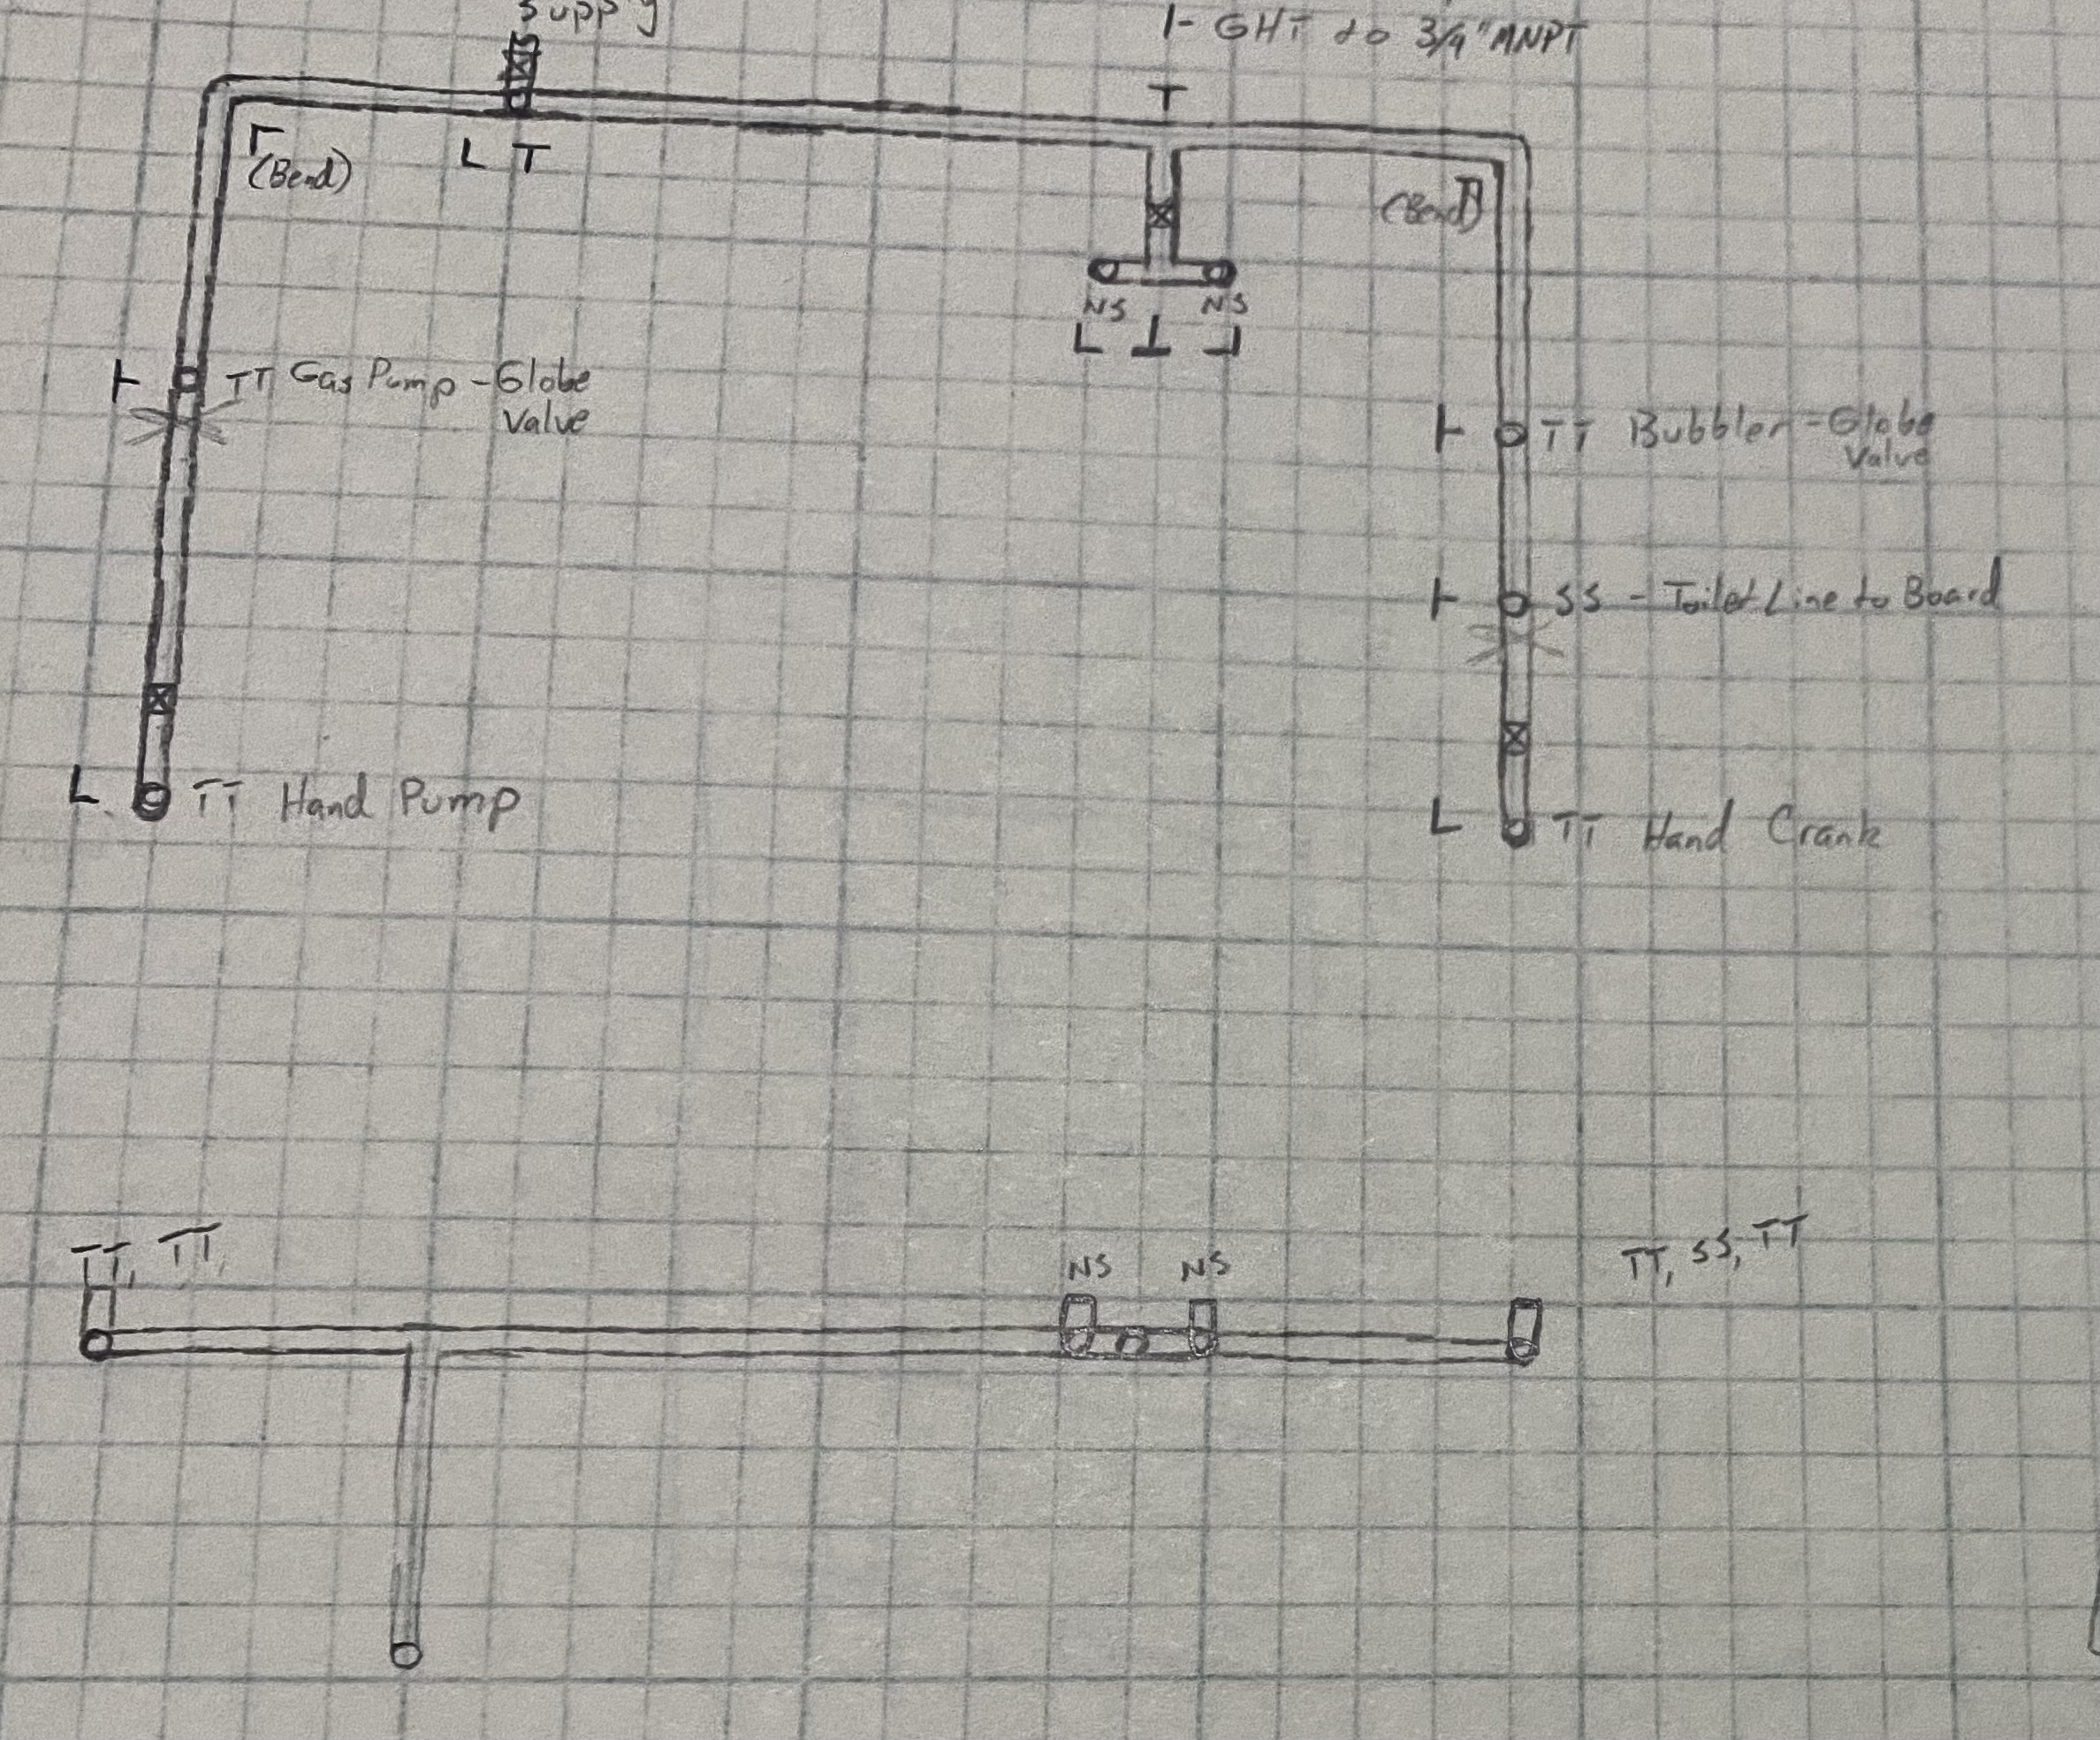
Engineering Analysis 3
The drawings and calculations shown to the right are displaying the water design portion of this project. There are six total toys/devices for use on the sensory table. Two of these are not being accounted for as they are hand-powered. The other four possible flow rates are being calculated assuming a constant supply flow from the house. The assumptions at the top of the page are being used to calculate the volumetric flow rates from each of the 4 devices. This shows that technically all devices could be operated at once, but there would be a significant drop in flow rates through each device.
The frame is made of aluminum. The top is made of HDPE plastic with purple matte vinyl wrap over it. The sink and the hardware are stainless steel.
The entire water table will be built with three major assemblies. Two leg assemblies, left and right, and the tabletop assembly. The entire structural assembly will be created using 1” aluminum extrusion with guiding grooves for ease of assembly and adjustability.
Each leg assembly will be built identically and could be easily described by saying that there will be two vertical individual legs that will be attached to the each other at the top and roughly one foot from the top to prevent the table flexing from front to back. Then two leg assemblies will also have a cross bar from the left leg assembly to the right to help prevent the legs from separating from each other.
The tabletop section will be slightly more involved but kept fairly simple for this description. The same aluminum that were used for the legs will be used as the structure for the tabletop section. The structure would resemble a hollow rectangular cube. The piping will be installed on the inside of this cube to prevent any UV exposure. The piping will be PEX, which is one of the most common piping materials that are currently used in home construction, which means the water would be fit for drinking. There will be a 1/4” plastic skin over the top, front, and back of this tabletop section to help deter curious hands from reaching under the table. A large single basin stainless steel sink will be in the middle of this tabletop section and it will have some extra sort beneath to ensure the weight of the sink, water, and anything else will be supported.
We started the table ideas with numerous different ways we could raise and lower the tabletop but we finally just decided on sticking to something fairly simple that should easily perform ask of the necessary functions. On all four corners of the tabletop section there will be an aluminum plate that is permanently mounted. Half of the plate will be attached on the tabletop and the other half will have knobs with a threaded bolt in the end that can be used to raise and lower the tabletop section of the table.
Now that safety and structure is out of the way, on to the fun stuff. All of these will be mounted to the top of the table and if water is permanently directed a specific direction, it will be directed into the sink basin. On the front left will be an old school hand crank, think oil barrel style crank. On the front right will be a old school water pump, think of a pump for bringing well water up. These are the only two that will need to use a bucket of water beneath our next to the sink as their source of water. On the back left and right there will be garden hose thread connections. We currently have a gas pump and a garden bubbler picked out but anything that uses a garden hose that could be used here for any future changes. The sink itself will be fairly standard with a faucet and a simple spray nozzle with a hose.
And to end it all off, the sink will have a valve beneath it so the sink can be filled easily without worrying about any plugs inside the sink being pulled out. There will actually be two valves beneath the sink, one of which can be used to fill a bucket with the sink water, and the other would go to a hose to drain the water away from the house.
Testing Results
In the midst of building and completion of the table, we tested it multiple times for water proofing, plumbing and resistivity. We have added pins to the adjustability in addition to the sliding knobs to add more strength to the table. We also added supports around the bottom of the frame more resistance when the table is being pushed or pulled. We have changed all the hardware to stainless steel so that the hardware does not rust.
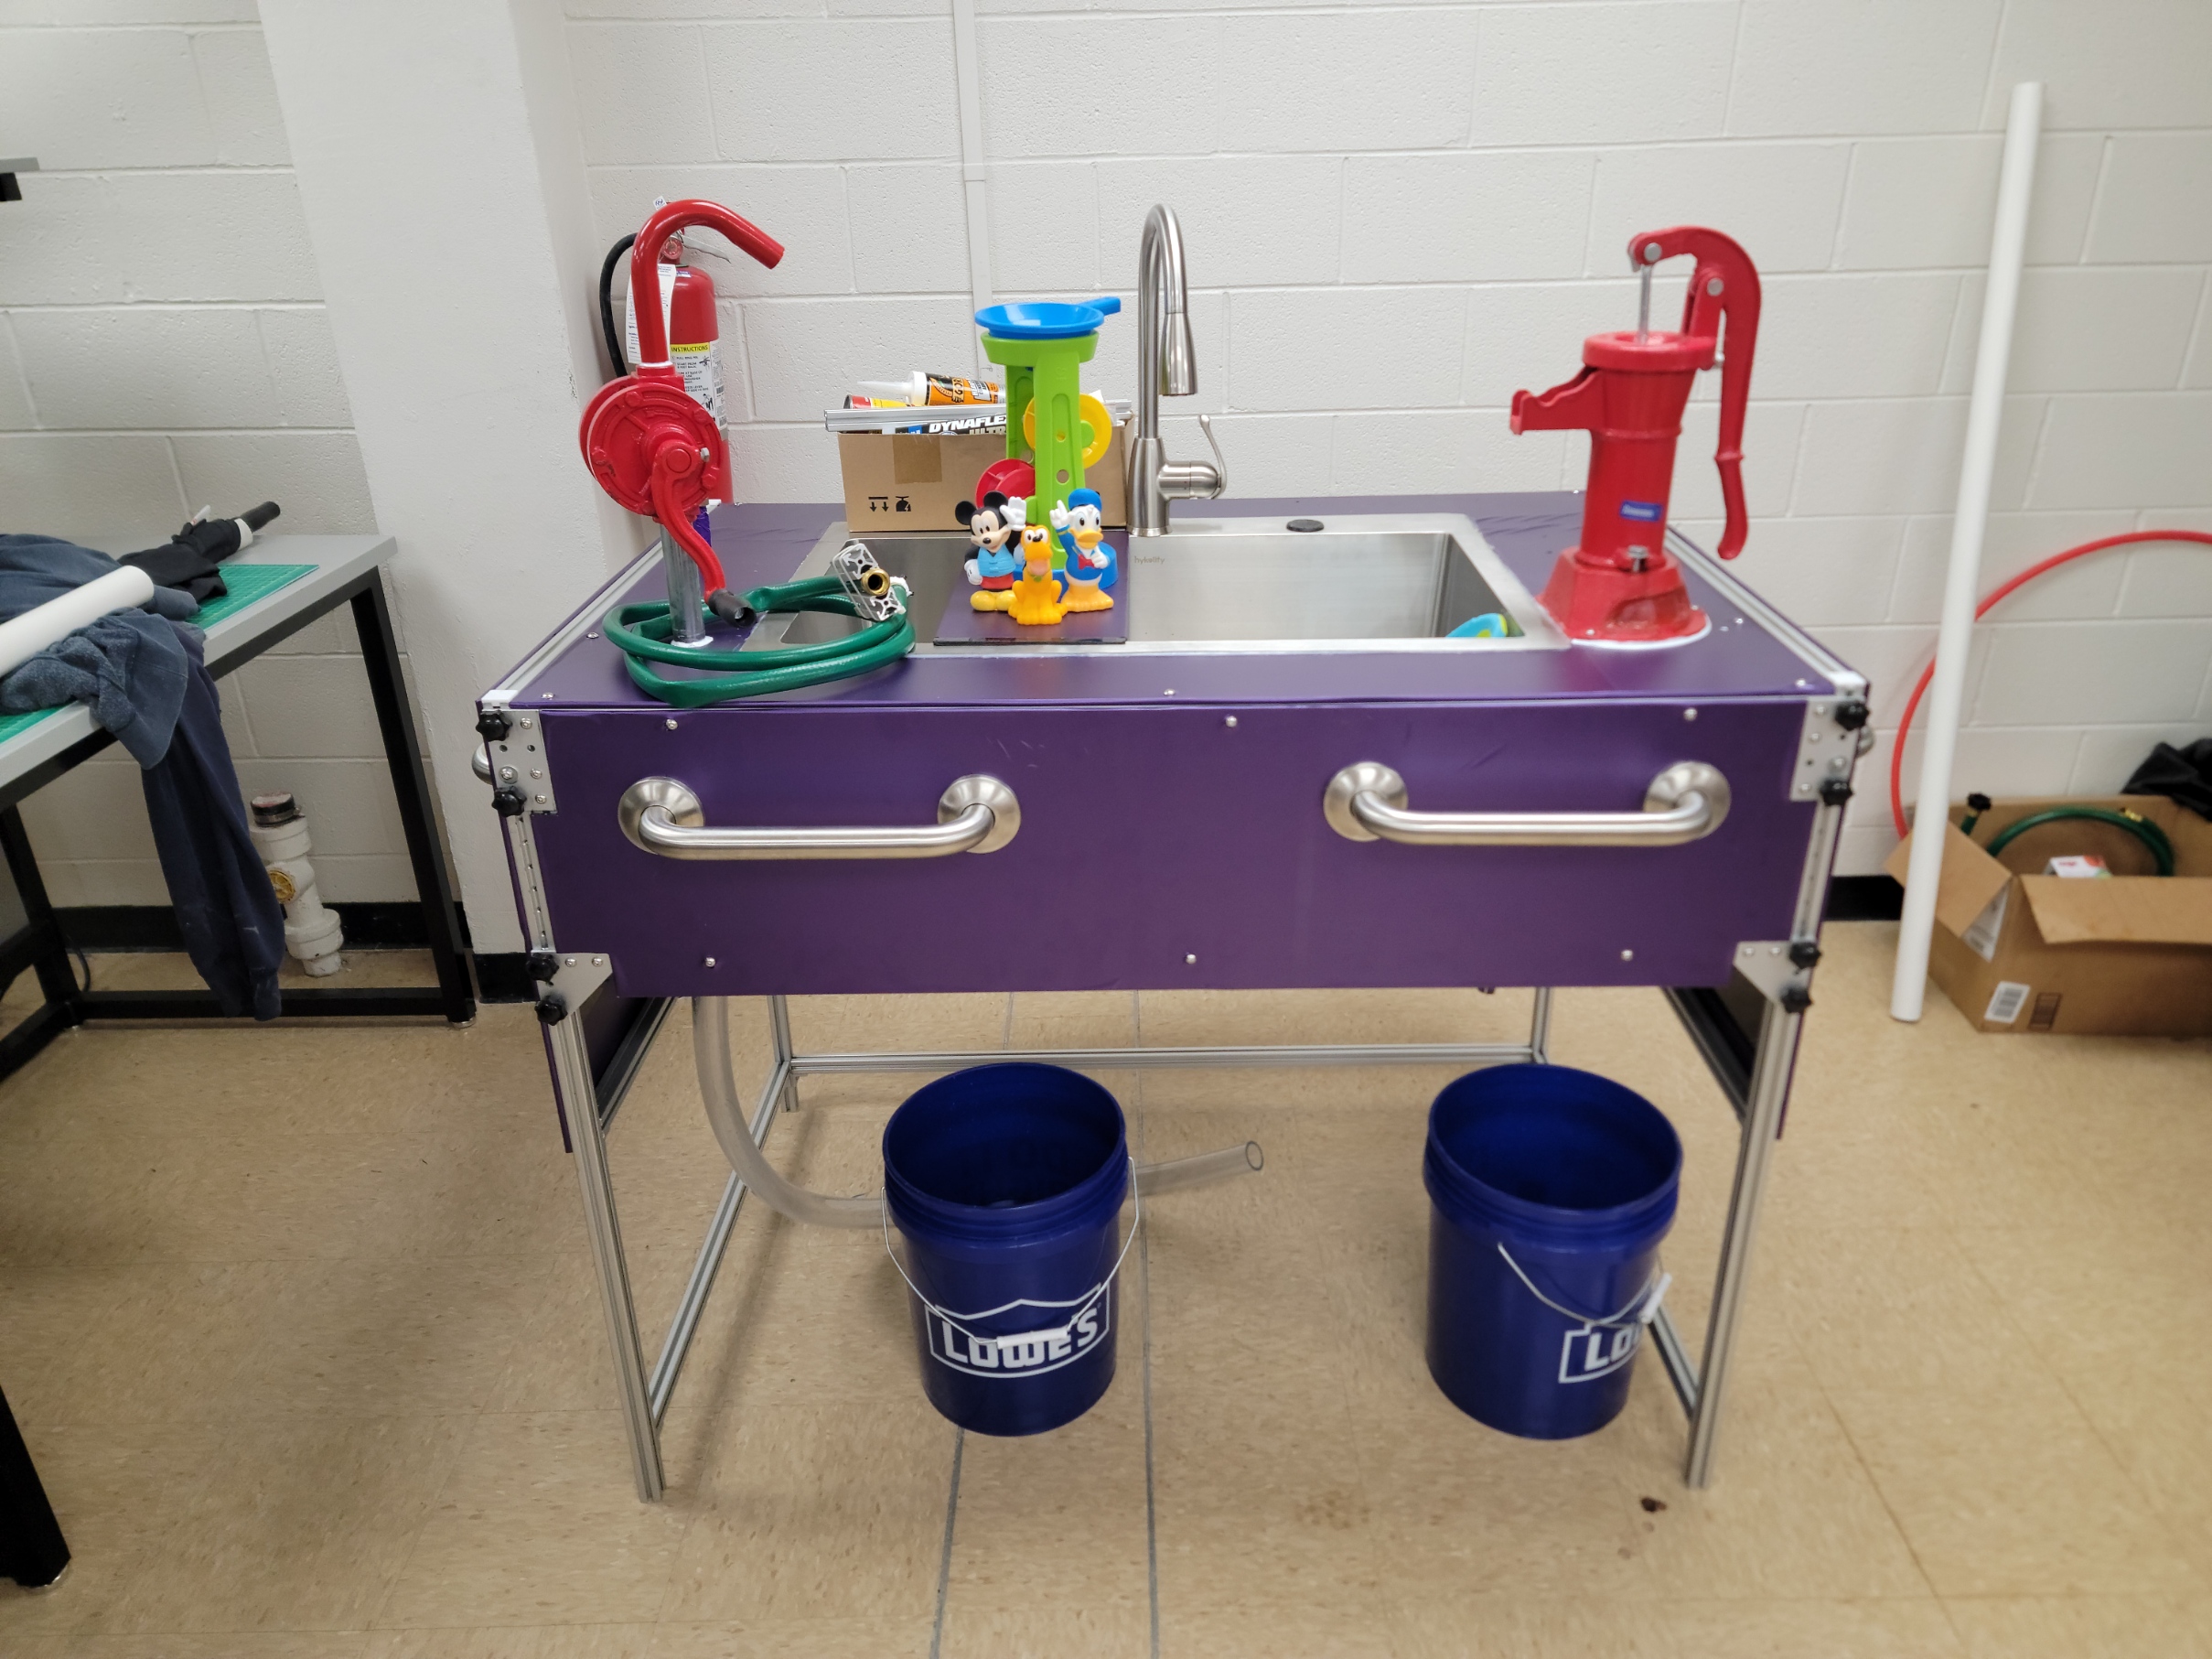
Completed Design Photos
Instructions for Safe Use
Raising and Lowering the Table
Grab at least one friend, you will need at least two people to raise and lower the table.
Loosen the adjusting Knobs (there are four on each corner) and hold on because it is going to start sliding down. Do not loosen them too much because they will come out and are hard to put back in.
Locate the stabilizing pins under the top adjusting knob on each corner, then take them out. Keep them though because they are extremely important.
Lower/raise the table to the desired height.
Line up the pin holes and slide the pins back in.
Rules for Table
People under the age of 18 should avoid contact with components underneath the table.
For the hand cranks, water needs to be in the reservoir (buckets) underneath the table (run some water in the sink).
If the old timey hand crank has been dried for a while or it seems to not be working, then you will need to prime the upper part of the chamber with water to get it working.
It is recommended that the safety caps, on the table corners, are not removed.
Drain water out of reservoir when not in use and clean regularly.
Project Summary/Reflection
We are thankful to have this opportunity to build this water table and help the family that has reached out to Tennessee Tech. We have learned much about the design and fabrication process of this project and we hope to implement these skills in our future careers. We are thankful to have had great leaders, including Dr. Canfield and everyone who works in the shop, to guide us and help this project successfully come to life.


