The goal of this project is to design and build a customized gait trainer to help with standing and building lower body strength and coordination for a 15-month-old boy.
The child is in physical therapy for standing and walking. He uses a gait trainer in PT and now has need of a personalized design for use at home; this will allow for more exercise and help to improve his mobility. The gait trainer will need to help with stride, leg strength, and overall body control/mobility. In order to meet these requirements, the gait trainer would need to have ample torso and lower body support to encourage correct use, as well as meet all the former needs met by the gait trainer used in PT. It would also need to be able to be adjusted as needed with age.
The following websites we used to see what existing accessories are made for the gait trainer and how we can adjust them for our child’s specific needs.
After verifying what their designs had in common and double-checking the model with what the contact shared with us, we began our design process.

Concept 1: Brakes or a lock for the wheels. Back wheels will only move forward and backward (one degree of freedom), and front wheels will rotate to allow for turning (2 DOF).
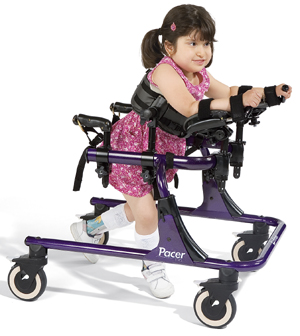
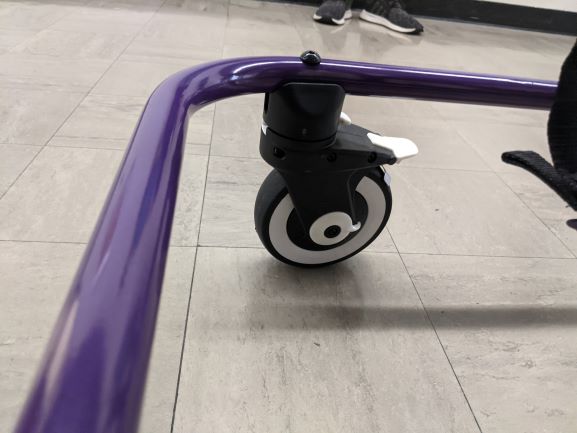
The casters that we ended up getting were from Rifton (call-in order, (800) 571-8198). These wheels have rotational locks, brake locks, reverse locks, and adjustable resistance.

Concept 2: Adjustable frame to allow for more precise support and to change height. The adjustment could be at the bottom of the frame so that the height will change from the bottom. Frame can be forward facing or backward facing (with respect to the person walking). Frame can also be colored by powder coating.
Our final design featured the powder coating, adjustability, and we added gussets to high-stress locations on the frame to add even more support. The ends of the pipe were also rounded off for safety purposes.
Concept 3: Added accessories, such as a cup holder, tray, or guide bar. (Guide bar used by parent or therapist in a manner similar to a stroller).
Our final design did not feature any added accessories, as we decided to go with a more streamlined and flexible approach to allow for adjustability over accessorizing. There is still a bar at the back of the gait trainer which could be pushed or pulled from behind in lieu of a guide bar.
The image below shoes the entire gait trainer, but the bar we are referring to is toward the back of it, running between and connecting the ends of the upper tier (yellow) at the back.

Our process was straightforward due to the suggestions and requests from the contact and family.
They asked for:
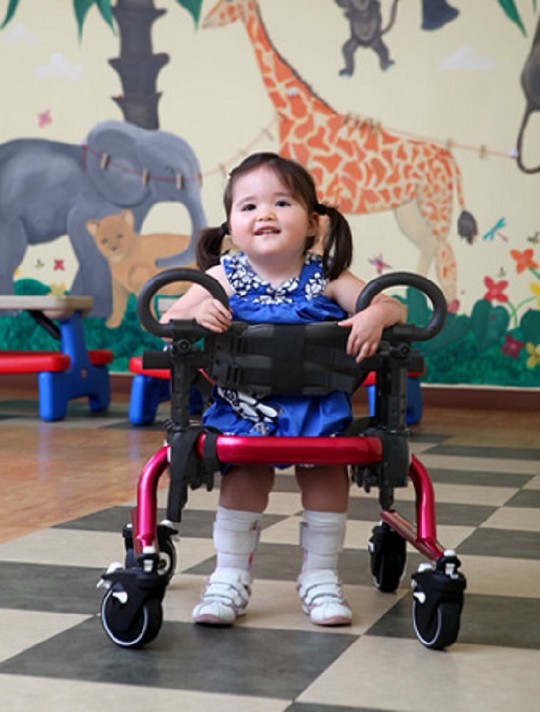
Since they did not specifically ask for the accessories, we decided not to add to our workload and instead aim for what was achievable in the time we had. Our design had to include a chest pad, and a saddle worked better based on our frame design, which we modeled after Rifton’s mini pacer design, than a leg rest would. We then focused on getting the most adjustability that we could while still sticking with our tiered, U shaped frame. We chose this frame due to its stability, ability to offer periods of rest where the child could sit in it, durability, and flexibility in terms of the child’s ability to control its direction and speed without too much effort. It also had the highest potential for adjustability, which we wanted to make sure could also shrink small enough to make the gait trainer easily transportable.
The casters were a high priority, but we wanted to make sure we had all of the above areas completed before we chose our casters. We ended up getting them directly from Rifton and placed 4 of them at each of the four “points” on the U. This was to best carry whatever weight load might be placed on it.
Your goal for analysis, your method of analysis, and results.


We put our weight on the frame to see if it would hold up and repeatedly adjusted heights to make sure the adjustability was also functioning.

Guideline for Safe Use
This gait trainer is composed of a height adjustable steel frame which is locked in place with threaded screw inserts, a height adjustable chest prompt, two arm prompts, pelvic support which attaches to the frame at four locations and to two adjustable clamps which can be adjusted to allow or prohibit swing, and four casters.
Adjustable Components
The arm prompts attach to the frame with a bolted screw. To adjust the height of the arm prompts, press the white button and push or pull to the desired height, letting it lock into place. They adjust at 1 inch intervals.
The chest prompt attaches to the metal bar across the back of the frame and is also adjustable in height by pressing the white buttons on the clamps at the same time and allowing it to lock into place once you have reached the desired height. Also at 1 inch intervals. Tightness of the prompt itself can be adjusted using plastic clamps and velcro.
The frame of the gait trainer locks into place with threaded screw inserts (4). Once these screw inserts have been loosened and removed, the frame can either be lifted or lowered to the user’s height (include screw size/screwdriver). Can also be detached into two separate pieces which make up the top and bottom tiers of the gait trainer.
The pelvic support / saddle attaches at six separate locations. There are four plastic buckles which go around the frame—two at the front of the frame and two just before the caps on the top tier. The two metal rings clip onto the two clamps also just before the caps. The clamps can be moved up or down. This minimizes the forward and backward swing of the saddle.
Casters are all-terrain, with reverse locks, rotational locks, brake locks, and adjustable resistance.
The gait trainer is easily dissassembeled to ensure its transportability. You can use a Philips head screwdriver to adjust height and the angle and height the chest prompt sits at can also be adjusted.
Overall, this project was a fulfilling learning experience, allowing us to be hands on with a task that we all could contribute to. We all were able to try things we had never done before, and it was great to be able to deliver it to the family after we had finished it.
